toilet silent fill valve

Repairing A Toilet Silent Fill Valve

Preface

This post describes: How to repair a Toilet Silent Fill Valve. Basically that’s how to replace the rubber diaphragm within the valve.

Introduction

I recently heard my cistern overflowing. On investigation I decided to adjust the float level to stop it by reducing the height to which the water in the cistern rose when it filled. A few days later I heard the distinct sound of the cistern overflowing again. I then realised I needed to repair my Toilet Silent Fill Valve.

What Is The Valve Called?

In order to satisfy the requirements of Internet SEO (Search Engine Optimisation) the valve is referred to, in this article, specifically as a Toilet Silent Fill Valve or more generally Silent Fill Valve but its full title is a Silent Fill Toilet Cistern Inlet Valve since it is:

  1. A Valve.
  2. An Inlet Valve.
  3. A Cistern Inlet Valve.
  4. A Toilet Cistern Inlet Valve.
  5. A Silent Fill Toilet Cistern Inlet Valve.

Old & New Fill Valves Compared

Repairing a Toilet Silent Fill Valve used in a toilet is, in my opinion, easier to perform than one on a traditional ball valve (ball cock). Modern inlet valves take up the minimum of space with their small float, are made of plastic and can often be dismantled by strong hands without any spanners because their screw threads don’t jam with calcium and corrosion like brass ones. They are available in various formats. Some mount through a hole in the side of the cistern, and are a good replacement for old brass ones (which are usually mounted that way), while others stand on a tubular stalk inside the cistern which mounts through a hole in the bottom of the cistern.

When the fill pipe is attached at the bottom of the cistern the pipe can often be situated out of sight. Bathrooms look much nicer and cleaner when pipes are out of view.

It may be that a Replacement Fill Valve is required. If so take a look at my article “Replacing A Toilet Fill Valve”.

To find out how a Toilet Silent Fill Valve works see the addendum to this post entitled:

How A Toilet Silent Fill Valve Works

Why Is It Silent?

This type of inlet valve is referred to as silent because it is designed to fill the cistern quickly (mine takes about 30 seconds for a small flush and 45 seconds for a large flush) and without the sounds of rushing and splashing water within the cistern. The silence is mainly achieved by keeping the outlet of the inlet valve below the water level in the cistern.

Syphoning Back From Cistern To Supply

If the inlet valve outlet fed into the water through a solid round pipe it would be susceptible to becoming a syphon. This might occur under adverse conditions when the supply pressure is low, e.g. when the water supply to the house is turned off. Water could then syphon back into the supply pipes1. The water authorities are very keen to prevent syphoning back into the supply with any connected apparatus in case the water main gets contaminated by it. People in the same building could end up drinking the water siphoned back. In the past they would not have allowed any inlet valve outlet pipe to be immersed.

However by using a collapsible polyethylene pipe for the outlet (its like a narrow polyethylene bag with a hole in the bottom) siphoning can’t take place. The flexible polyethylene pipe doesn’t float up and lay on the water surface because it has a thin plastic rod inside it which keeps it pointing straight down. I think that if it did float on the surface water might spray in all directions within the cistern. Remember they don’t have watertight lids since air has to get in rapidly to replace the water when it is flushed out.

When the cistern is filling I can still hear water flowing in the house pipes, but only for a short period.

My Ideal Standard Toilet Silent Fill Valve was supplied with my Armitage Shanks toilet in 2007. It’s served me well needing very little float level adjustment and no replacement parts in the intervening period up to April 2014. I have now just replaced the diaphragm again in February 2019.

Accessing My Toilet Silent Fill Valve

To perform any operation inside the toilet cistern the lid must be removed. I have already posted an article describing how to do that on a modern push button toilet like my Armitage Shanks Ascania WC. You can read it here entitled ‘Dual Flush Toilet Cistern Lid Removal’. With older ceramic cisterns that are close coupled to the pan, or just above it, the lid usually just lifts off. I’m sure some plastic cisterns have some screws around the edge of the lid holding it on.

Cistern Overflows

My Internal Overflow

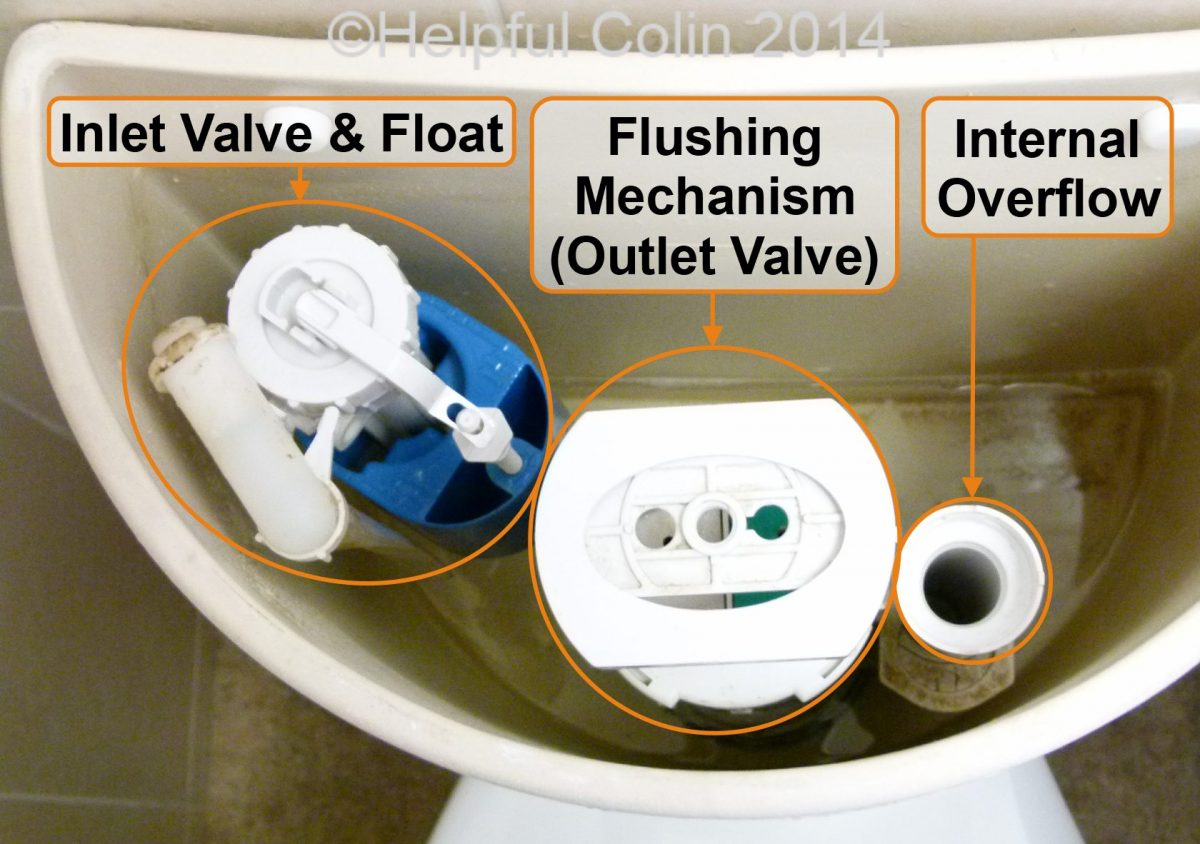
Pic. 1. The internal parts of a dual flush toilet cistern.

My cistern overflows internally through a pipe rising from the bottom of the cistern. (See adjacent image.) The output from this overflow pipe drains straight into the toilet pan at the point where the flushing water enters. The overflow pipe is integral with the flushing mechanism.

The height of the overflow can be adjusted. The top section is just a pipe with a screw thread moulded on it. It can be screwed in and out of the bottom section. So turning it clockwise lowers it and anticlockwise raises it.

Why it took a century to develop an internal overflow I don’t know. All the problems with external overflows disappear with an internal overflow.

The Problems With External Overflows

  • Water pouring all over the paths outside and then freezing in winter in cold climates.
  • Water pouring down the wall of a house where the overflow pipe is too short or doesn’t hang down or the wind blows the water back to the wall. Unattended this can seriously damage a wall causing damp, mortar erosion, mould and bad staining which then ruins the look of a property.
  • Icicles hanging from overflow pipes which break off and injure people underneath in cold climates.
  • Water in the overflow pipe freezing whilst overflowing in cold climates causing the overflowing water to back up and spill indoors.
  • Toilets need to be near an outside wall or have a lengthy and maybe problematic overflow pipe run on the inside of the building.
  • Cold air blowing into a clear overflow pipe from outside and passing across the top of the water in the cistern. This can chill the water in the cistern by evaporation until it freezes. (The overflow pipe should turn down into the cistern water so that air cannot pass through the pipe.)

My Toilet Silent Fill Valve Parts

Once the cistern lid has been removed the Toilet Silent Fill Valve is accessible on the left of my cistern. Here you can see the parts labelled:

Pic. 2. The silent Fill Valve and Float System with labels.
toilet silent fill valve
Pic. 2. The silent Fill Valve and Float System with labels.

Here is the Silent Fill Valve Parts List:

  • Arm,
  • Clamping Nut,
  • Flexible Flat Anti-syphon Tube,
  • Float,
  • Float Adjustment Screw,
  • Input Pipe,
  • Output Tube,
  • Pinhole Cone & Stopper,
  • Pivot,
  • Top Cover,
  • Water Level Mark.

Adjusting A Toilet Silent Fill Valve Float

When I found water overflowing I removed my cistern lid to access my Toilet Silent Fill Valve’s float. I adjusted the float level so that the cistern water level didn’t rise so high.

The adjustment is made by turning the long screw which has a hexagonal nut moulded onto it. Although it’s shaped like a nut it doesn’t require a spanner to turn it, fingers are sufficient. See the image below where the Toilet Silent Fill Valve Top Cover and Arm have been removed to give a better view of it.

Pic. 3. Here the Clamping Nut, Top Cover and Arm have been removed.
Toilet Silent Fill Valve close up view showing the detail of the float adjusting screw with its hexagonal turning wheel and stop mounted on the thread to stop in being screwed into the float too far.
Pic. 3. Here the Clamping Nut, Top Cover and Arm have been removed.
The float is being held up by hand to show the adjusting screw. The knob on the top of the screw attaches to the Arm.

Adjusting My Cistern’s Water Level

helpfulcolin.com

To raise the water level: I turn the screw clockwise when looking down on it, i.e. screw it into the float.

NOTE: There is a ❝Stop❞ moulded onto the screw thread (see Pic. 3) to prevent the screw being screwed too far into the float.

helpfulcolin.com

To lower the water level: I turn the screw anticlockwise when looking down on it, i.e. screw it out of the float.

NOTE: There is a line marked in the porcelain showing where the water level should be when the cistern is full. Make sure the top of the overflow is above the line by at least 1 cm. But make sure it is well below the screw holes (or any other holes) in the cistern.

Flushing The Cistern With The Lid Off

The cistern can be flushed with the lid removed by poking something suitable through the holes in the Height Adjustable Securing Plate and using it to push the flushing buttons down. Either a button with spindle attached or a screwdriver can be used. Where space permits the buttons can be pressed directly with a finger or thumb. For more information refer to: ‘Dual Flush Toilet Cistern Lid Removal’.

Turning Off My Cistern’s Water Supply

When adjustment of the float failed to stop my cistern overflowing I presumed there must be a problem with the Toilet Silent Fill valve itself, probably the rubber diaphragm within the Toilet Silent Fill Valve. I decided to examine the rubber diaphragm by taking it out of the plastic body. That required me to turn off the cold water supply to the cistern. I have an inline stop tap installed as part of the flexible hose linking the copper supply pipe, where it exits the wall, to the Toilet Silent Fill Valve Support Tube protruding from the bottom of the cistern. So I just had to rotate the tap with a flat blade screwdriver until the slot was across the pipe instead of inline with it. See images below:

Pic. 4a. Water Turned ON
A fill pipe inline tap (part of a flexible hose) in the ON position. Used to connect to a Toilet Silent Fill Valve.
Pic. 4a. Water Turned ON
Pic. 4b. Water Turned OFF
A fill pipe inline tap (part of a flexible hose) in the OFF position. Used to connect to a Toilet Silent Fill Valve.
Pic. 4b. Water Turned OFF

NOTE: This type of tap can turn both ways and through 360° but some (like mine) only turn back and forth through 90°.

Repairing My Toilet Silent Fill Valve

Removing The Top Cover

helpfulcolin.com

I began by unscrewing the Clamping Nut in an anticlockwise direction. This holds down the Top Cover of the Toilet Silent Fill Valve and seals it against the outer edge of the Rubber Diaphragm.

NOTE: There is a detent protruding from the top of the output pipe which engages the Clamping Nut. I had to force it out of the way of the ridges on the nut so that the nut could be turned.

Then I removed the Top Cover to reveal the Rubber Diaphragm inside:

Pic. 5. Fill Valve with the Top Cover removed and the Diaphragm in place.
Toilet Silent Fill Valve with the Top Cover removed and the Diaphragm in place.
Pic. 5. Fill Valve with the Top Cover removed and the Diaphragm in place.

NOTE: The Top Cover retaining the Clamping Nut can be removed without disconnecting the linkage from the Toilet Silent Fill Valve operating lever to the float. The whole assembly can then be moved aside by pivoting it on the float adjusting screw (not shown in this view).

Removing The Fill Valve Diaphragm

The Rubber Diaphragm then has to be winkled out revealing the innards below:

Pic. 6. Fill Valve with the Top Cover removed and the Diaphragm removed.
Toilet Silent Fill Valve with the Top Cover removed and the Diaphragm removed.
Pic. 6. Fill Valve with the Top Cover removed and the Diaphragm removed.

At first I couldn’t see much wrong with the diaphragm but on closer inspection, when I stretched it, I found several splits in the rubber.

Here the diaphragm is pinned, in the stretched position, to a block of wood covered in white paper to display it:

Pic. 7. A Damaged Diaphragm – holes show when it is stretched.
A Damaged Diaphragm from Toilet Silent Fill Valve. It's stretched to make it oval and pinned to a board to expose the splits in the rubber.
Pic. 7. A Damaged Diaphragm – holes show when it is stretched.

“Why do the rubber diaphragms tear?”

T K Mukasa

Every time the diaphragm goes up and down the area that tears is bent, straightened and stretched. Eventually the molecules rip apart at a place in the material where they are overworked.

The real question is: “How many times should you be able to bend, straighten and stretch this material before the damage is done?” I suspect if it were to be used on a device taking a long space journey it would be able to do it millions of times but it would cost a small fortune.

What have we here? A twopenny-halfpenny device, so it only lasts a few years. Perhaps a better design or a better material that isn’t prohibitively expensive might make it last longer.

“. . . I found your site, looked at the diaphragm and quickly spotted the tear. 10 minutes later and £1.57 later problem solved.”

Richard King

Replacing Fill Valve Diaphragms In General

There has been debate comparing diaphragms with red pins to those with white pins. The questions have been:

  1. Are they identical?
  2. Will the white one work in the same fill valve as a red one and visa versa?

Well I’ve got my hands on a white pin diaphragm at last. So I have compared it with a red pin one. I took edge on photos of both and measured their thicknesses and diameters. You can see them side by side in the picture below:

Pic. 8. White and Red Pinned Diaphragms side by side.
toilet silent fill valve
Pic. 8. White and Red Pinned Diaphragms side by side.

The answer to Q1 above is: They are different. Although they are the same diameter, 31 mm, they are different shapes.

The answer to Q2 above is: Because they are the same diameter they can be placed in each others’ fill valves.

So I have tried a white pin diaphragm in my fill valve which should have a red pin diaphragm in it. It did work after I had adjusted the Float Adjusting Screw considerably. I had to screw it out of the float by about 3 cm.

The white pin diaphragm has to travel 2 mm more to close than the red pin diaphragm. To do this a greater force is required above the diaphragm. This is achieved by closing the pinhole earlier in the fill process when the float is low in the water.

As far as I am aware the white pin diaphragms are for use with the twist lock valves. If there is a failure when substituted for a red pin diaphragm don’t blame me. I still intend to use red pin diaphragms in my older valve which has a screw on retaining nut to hold it in place, if I can get them.

Replacing My Fill Valve Diaphragm

I couldn’t get a replacement diaphragm from Wickes in 2014, but I did get one from B&Q.

Other suppliers are:

Kingsway Plumbing,

Pic. 9. Diaphragm
toilet silent fill valve
Pic. 9. Diaphragm

“. . . I then found an own Plumbsure brand replacement at B&Q which works perfectly. Part No. WB540QV3 diaphragm washer for quiet fill valve.”

Mike Robinson

I had to replace my diaphragm again in February 2019. This type was what I had already got as a spare.

Here is the diaphragm held in its operating attitude with the little red Restricting Pin pulled down by gravity. It doesn’t drop out of the hole because the other end of the pin is squashed flat making it too wide to pass through the hole. Make sure the pin can move up and down freely under gravity while submerged:

Pic. 10. The Diaphragm in detail.
An enlarged detailed Toilet Silent Fill Valve Diaphragm with its parts labelled.
Pic. 10. The Diaphragm in detail.

The diaphragm is flexible so that the section which shuts off the main flow of water, when filling the cistern, can go up and down relative to the area which seals against the inside of the Silent Fill Valve Tube.

NOTE: Some ask which way up the diaphragm should be. Well the side with the red pin head should face towards the incoming water supply.

Cleaning & Servicing The Parts

Before I reassembled the Toilet Silent Fill Valve I cleaned various parts. It’s quite easy to disconnect the adjustable float screw from the valve operating lever. The lever has a slotted hole and the plastic is flexible so it can be stretched to go over the ball on top of the Float Adjustment Screw. Only after disconnecting the lever from the float can the inside of the valve top be inspected. Below you can see the Top Cover Assembly:

Pic. 11. Top Cover Assembly with the Arm threaded through the Clamping Nut.
The Top Cover Assembly of Toilet Silent Fill Valve with its parts labelled and the Arm threaded through the Clamping Nut.
Pic. 11. Top Cover Assembly with the Arm threaded through the Clamping Nut.

Calcium can be removed from all the parts with the help of a descaling agent and the aid of an old toothbrush and a penknife to scrape with. It’s important not to damage the plastic around the pinhole in the Top Cover or the valve won’t function correctly (it may leak). See image below with Clamping Nut detached:

Pic. 12. Top Cover Assembly with the Clamping Nut detached.
The Top Cover Assembly of Toilet Silent Fill Valve with its parts labelled and the Clamping Nut Detached. This shows the insidde of the Top Cover with the Pinhole viiible.
Pic. 12. Top Cover Assembly with the Clamping Nut detached.
Pic. 13. Valve with the Arm removed and the pinhole exposed.
The Top Cover Assembly of Toilet Silent Fill Valve with the Arm removed to expose the Pinhole from above and the clips for the Arm's Fulcrum Pivots.
Pic. 13. Valve with the Arm removed and the pinhole exposed.

With care I prised the supports on the Top Cover sideways to release the fulcrum pivots of the arm so it could be removed. I was concerned that the supports might break under force.  The supports are shaped so that the arm pivots can be clicked into place easily. (I suspect the manufacturer only expected it to be assembled once.)

The Pinhole Cone & The Rubber Stopper

Below is the valve with the arm removed. You can see the underside of the arm with the Rubber Stopper insert in the Top Cover below:

Pic. 14. The Arm (upside down).
The Arm of the Toilet Silent Fill Valve is disconnected an upside down showing the rubber Stopper which covers teh Pinhole.
Pic. 14. The Arm (upside down).

NOTE: The rubber Stopper may need replacing if the dimple in it becomes too deep. The dimple’s made when it presses down, over a long time, on the proud Pinhole Cone on the Top Cover. I presumed, incorrectly, that the Stopper was a simple rubber cylinder. I expected it could be removed and turned end over end to present a new flat surface with no dimple. However I have been informed by a reader (Tom Fenwick-Brown) that the Stopper is pressed onto a spindle to hold it. This means it has a hole in the opposite end preventing that type of repair. I have not had occasion to remove my Stopper and look at the hidden end. I suppose the dimple in the stopper could merge with the hole embedded in it from behind. Then it would leak water and not seal the pinhole cone.

“Just one tiny (but important) point regarding your suggestion to: – remove the ‘stopper’ in the arm and turn over to present a new flat surface. This is not possible as the stopper is hollow and sits on a spindle, so the bottom side is open. I was unable to find a replacement anywhere, so I improvised with a shim under the stopper to raise the level and sort the problem. I tried a few tiny rubber washers first but found them too thick, [so] I ended up using a cut out from an old pair of thin rubber gloves, which worked a treat.”

Tom Fenwick-Brown

Reassembling The Toilet Silent Fill Valve

As is often the case reassembly of the parts was the reverse of the dismantling process thus:

  • I began by clicking the Arm into the forks of the Top Cover. Then I threading the Clamping Nut over the Arm until it fitted around the Top Cover.
  • Next I seated the new Diaphragm in the top of the Inlet Valve body fitting the Top Cover over it.

NOTE: There is a spigot on the edge of the Top Cover. It can be positioned into one of three recesses on the valve body. The spigot will prevent the Top Cover rotating while the Clamping Nut is tightened. The spigot should be engaged with a recess according to the position of the float.

helpfulcolin.com
  • I Held down the Top Cover by screwing down the Clamping Nut in a clockwise direction.
  • Then I pushed the ball on the end of the Float Adjusting Screw into the slot at the end of the Arm.
  • All I had to do then was turn on the water supply and adjust the Float.

Flow Restrictors & Filters

A Toilet Silent Fill Valve may have a flow restrictor. It prevents the cistern filling too fast when the water pressure is high. It may also have a filter to stop grit going into the finer parts of the valve.

A restrictor effectively narrows the fill pipe and resists the flow of water. Allowing the cistern to fill too quickly can adversely affect other appliances attached to the water supply. They can suffer from a lack of pressure when the cistern takes all the water. Showers, for example, require pressure to be maintained for them to work correctly.

Restrictors are not usually required if a cistern is fed from a header tank only one or two floors above. The pressure from such a tank will be low enough.

Many a Toilet Silent Fill Valve is supplied with the appropriate restrictor. The plumber decides whether to insert it or not. Some have a low pressure insert to put in its place if the restrictor is not required. What and where it is inserted depends on the design of the Toilet Silent Fill Valve.

An Inlet Filter Problem

Below there is a quote taken from a comment to this post by someone who resolved a filter problem. They had a Toilet Silent Fill Valve slightly different to mine.

“. . . I then remembered, before replacing the diaphragm, that underneath it – in my float arm cap – there’s a filter unit. Shaped like a small bullet – I’d pulled this out to flush it through as the instructions for the float arm, which I have, said to do periodically.

Anyway, I finally realised I’d not pushed this filter unit back properly into the recess under the diaphragm. Thus the diaphragm couldn’t even begin to do its job as it wasn’t being pushed down onto the valve as the cistern filled up! I pushed it firmly in and voila – the waterfall stopped!

So just in case others also have this little filter unit underneath their diaphragm – ensure you push it firmly back into the recess before replacing the diaphragm. Use a pair of long nosed pliers to twist the filter one quarter turn clockwise once it’s firmly pushed in place. The filter has little lugs on it which you can grip with the pliers.”

Marianne Wilford

My Silent Fill Valve Has Been Superseded

My Toilet Silent Fill Valve seems to have been superseded by a new one. It has a Twist-lock cover instead of a screw cover for one thing.

The new one has 18 supports for the diaphragm to rest on. See below where the supports have impressed ridges in a red pin diaphragm:

Pic. 15. The underside of the Top Cover of the new Twist Lock valve with a Red Pin diaphragm.
The underside of the Top Cover of the new style Toilet Silent Fill Valve with the diaphragm in place showing its 18 ridges.
Pic. 15. The underside of the Top Cover of the new style Twist-lock fill valve with a Red Pin diaphragm.
NOTE: The diaphragm should not be shaped to fit against the 18 supports like it is in this picture. Maybe it should have a white pin and thus be shallower. See Pic. 8.

I now (June 2020) think a red pin diaphragm is not the correct one to use and that the ridges seen in it should not be there.

A Video of A White Pin Diaphragm Being Replaced In A Twist-lock Fill Valve

helpfulcolin.com

As far as I can see the top is removed by an anticlockwise  quarter turn twist to gain access to the diaphragm. Take a good look at the My Toilet Spares video below showing the diaphragm being replaced:

I have noted that the plumber is not replacing the diaphragm with one with 18 ridges already embedded in it. Also it has a white pin.

I believe the ridges get pressed into the diaphragm if it has a red pin, because it’s the correct diameter but the wrong shape (too deep).

I now know that diaphragms with white pins have different dimensions to those with red pins. However they do have the same diameter. See Pic 8 above.

Reference

1. How A Toilet Silent Fill Valve Works

Go to my reference article in the Reference Library entitled ‘How A Toilet Silent Fill Valve Works’ to see the detail in an addendum to this post.

2. Encyclopedia of Toilets

Check out this Encyclopedia of Toilets. Part of InspectAPedia.

Footnotes

1. How water could syphon back into the supply pipes and be a danger

If the street stop cock or the main house stop tap is turned off then, if the cold tap downstairs in a house is turned on water will come out of that tap when an upstairs tap is turned on (letting air in), or if water from an upstairs cistern can syphon backwards out through a valve which is not held shut. That upstairs cistern water isn’t guaranteed to be clean and once in the cold water pipework it could be drunk. It could have been in the cistern for a long time if the toilet was not regularly used.

Comments

201 responses to “Repairing A Toilet Silent Fill Valve”

  1. Clive Holman avatar

    I would only comment on your biased enthusiasm for internal overflows and many people don’t realise there is a problem – unlike a drip outside. Consequently there is a greater waste of water and a build up of deposits on the pan if not attended to. I agree an ignored external overflow is more damaging.

    Occasionally in the past overflow pipes were fed directly into a waste pipe but this was regarded as bad practice and a device could be fitted on the, pipe to show when water was overflowing.

    However, good work in spreading the benefits of your experience

    1. Helpful Colin avatar

      Hi Clive,

      Thank you for your positive comment. Because I’ve always lived in a house where technical irregularities (like overflowing tanks and cisterns) don’t go unnoticed for long I hadn’t realised there are issues with internal overflows. I find every exposed pipe or wire is a place where crud collects and there is one less in the bathroom with an internal overflow.

  2. Ian avatar
    Ian

    brilliant! I found a similar split in the diaphragm which I wouldn’t have spotted!!

    1. Helpful Colin avatar

      I’m happy I helped you Ian.

  3. Derek avatar
    Derek

    Hi which way up does the diaphragm go

    1. Helpful Colin avatar

      Hi Derek,
      Look at the section ‘Replacing The Diaphragm’. The picture in that section shows me holding it the right way up with the red pin head pulled down by gravity and the widest part of the diaphragm at the top. I hope that’s how yours needs to be too.

      1. Jeremy avatar
        Jeremy

        Purchased my Hushflow valve from Screwfix for £2.55, inserted as you directed and I am now impressed at my own ability, thank you Colin! very helpful.

        1. Helpful Colin avatar

          Hi Jeremy,
          Your welcome, Colin.

  4. National Hunter avatar

    Hi
    Have a similar system, with the same fill valve arm, diaphragm etc (. Mine also has a narow syphon bag ). I’ve carefully removed the arm, cleaned the parts, checked the diaphragm and that’s fine. However, the toilet keeps filling. Any thoughts ?

    1. Helpful Colin avatar

      Hi National Hunter,

      If you can stop the water filling the cistern with the lid off by manually pulling the arm up so that the pinhole cone is closed by your action then the problem will be with the float and its adjustment.

      If you can’t stop it filling by lifting the arm the water must be getting past the diaphragm. There must be a fault with the diaphragm or the way it is inserted or the housing containing it. Is the Clamping Nut which holds down the Top Cover cross threaded? Look at the comment from Ian. He eventually found a split in his diaphragm which he had difficulty spotting. You may have to get a new diaphragm just to prove a point.

      1. National Hunter avatar

        Hi and thanks for the reply – No , it doesn’t stop when the arm is lifted manually. Doesn’t appear to be an issue with the diaphragm so is it the other part ? Included links to images of the system

        http://i.cubeupload.com/inp35U.jpg
        http://i.cubeupload.com/DO3ALo.jpg
        http://i.cubeupload.com/R2Wj4f.jpg

        slightly different as there’s no clamping nut – it’s one piece.

        1. Helpful Colin avatar

          1. Amongst my information you will see a picture of the arm alone. You will notice it has a rubber stopper in it which bears down on the pinhole cone to stop the water oozing through it when the cistern is full and the float is raised. Is the rubber stopper in your arm doing its job. If you can remove the arm without breaking it or its supports you could:
          a. look at it and check it visually.
          b. put your finger over the pinhole cone (with the valve assembled in the cistern) and see if you can stop the flow of water that way. If you can stop the water the stopper/arm must be faulty.

          2. I counted 18 ridges on your diaphragm and 18 supports under it. I advise fitting the valve in place aligning it so it is a comfy fit over the 18 supports. Then applying the cover. See if it still leaks.

          3. If you can turn the water supply on just a little bit so that the water just wells up and into the cistern then you may be able to put the diaphragm in place and press it down in the middle and successfully shut off the incoming water. If you can’t then there really is something wrong. e.g. has the rising fill pipe split and is it letting water in before it gets near the valve.

        2. Helpful Colin avatar

          Hi,

          I’d better say this now since it could be fundamental to the problem. My diaphragm or any I have seen in a DIY shop doesn’t look like yours. Those 18 ridges perhaps shouldn’t be there. The diaphragm should be nice and smooth. I now have a series of questions for you to consider.
          1. How did it get like that?
          2. Has excess pressure forced it to mould to the shape of those 18 supports over time?
          3. Has your cistern been plumbed into the hot water supply so that the hot water softened the rubber?
          4. Are those ridges wedging between the supports and preventing it from moving up and down?
          5. Can you find a replacement that looks like yours in a shop in your area or do they all look like mine?
          6. Has it been damaged by being inserted incorrectly (upside down maybe) at some time?

          1. Don avatar
            Don

            Well guys, I have had to replace the diaphragm (the rubber washer with a red pin in it) on my inlet float valve and obviously googled it, one of the comments stated that your diaphragm should have ridges in it for the updated twist cap type float valve (not a threaded cap).
            Wrong answer!
            I purchased a service pack and found the diaphragm was smooth, so called Armitage Shanks and was told that there is no such animal as a diaphram with ridges, the ridges mould in to the unit when you replace it, that’s the way they work.
            So replace it with the correct part number with a smooth diapham and bingo job done.
            The problem is if its been working for some years and you take out the diaphragm to check it, it will not locate back into its original position with the ridges lining up with the valve body, so you will need a new diaphragm, a smooth one.
            By the way nothing to do with hot water or fitting it upside down.

            1. Helpful Colin avatar

              Hi Don,
              Thanks for your very informative comments.
              Kind regards, Colin.

          2. Paul avatar
            Paul

            All three of my toilets have those 18 ridges as in Fig 15 also and I cannot find a diaphragm the same. They are there as where the diaphragm sits, the plastic is moulded with those 18 inserts also. So I thought it was a special brand to create the seal.

            Can anybody say if a normal diaphragm will fit and still create a seal?

            I can’t get hold of persimmon homes to tell me what brand anything is but a number of my neighbours have checked and all are the same.

            Thanks in advance

            1. Helpful Colin avatar

              Hi Paul,
              I’ve never handled one of these twist-lock fill valves with 18 ridges. So, all my knowledge has been pieced together from what people have fed to me. I have got diaphragms with white and red pins and I carefully measured them in Pic.8.
              I’ve just edited that part of my post to emphasize that I think you should try a diaphragm with a white pin which you will find available at “Fix The Bog” and “Screwfix” amongst others.
              Good luck Paul.
              Regards, Colin.

        3. Helpful Colin avatar

          Hi,

          My diaphragm sits on a nice smooth red support which gives it all round support. Is there a part missing from your valve?

          If you look at my in depth article http://helpfulcolin.com/how-a-toilet-silent-fill-valve-works/ you will see my valve looking nice and smooth, in some photos there, where yours is corrugated. The part of yours which is corrugated is obviously being gripped yet it is the most flexible part and works like the rubber roll surround on a loudspeaker (if you’re familiar with them).

    2. Helpful Colin avatar

      Hi National Hunter, Helpful Colin here.
      Did you repair your toilet fill valve?
      I have another reader who has a similar problem and a similar valve with 18 supports for the diaphragm. He noticed your comment and wondered if you have any good info I can pass on to him.

  5. Matt avatar
    Matt

    Thankss youve just helped me find a tiny tear in our toilets diaphram

    1. Helpful Colin avatar

      Hi Matt,
      I’m glad I was of some help to you.

  6. dadalias avatar
    dadalias

    Since this page has been so helpful can I pick your brains please? Our silent valve has a plastic top cap fixed over the clamping nut (or is our clamping nut but, either way, looks nothing like yours…I suspect the former)and I can’t work out how to get it off. It is a circular piece of plastic with curved holes at 3, 6 and 9 o’clock through which I *think* I can see some kind of thread/screw and has two solid H shaped plastic bits behind and in front of the arm. It *looks* like it should pop off but my hands are too blooming big.

    If it helps the number on the arm is either 2903108 or 290310B but having googled I and just got loads of American phone numbers.

    Any advice welcome!
    Will reread in case I’ve missed this already being answered.

    Cheers in advance.

    1. dadalias avatar
      dadalias

      Well, typical, having typed all that I gave the screw one last turn to get the last millimetre out of it and it worked. Typical!

      Probably a temporary success. I may be back.

    2. Helpful Colin avatar

      Hi dadalias,
      You might be able to ID your valve by Googling ‘toilet valve’, ‘silent fill valve’, ‘toilet fill valve’ or something similar, but select to get results under ‘Images’ rather than ‘Web’. Then look through all the images to find one that looks like yours and click on (select) the image, then from the web site you are taken to get a name or description which might be helpful in further discussions.
      I haven’t got that much experience of other types of valve apart from the old brass valves with a big ball for a float.
      I do think there are valves out there which are intended to be replaced immediately they go faulty. I suspect they have parts that clip together and don’t unscrew.
      Good look with your search.
      Kind regards, HC.

  7. Jane avatar
    Jane

    Hi Colin,
    I’ve an Ideal standards ‘quiet concentric ball valve’ very similar to the one you show here.. I’ve replaced the split daiphragm ( again – these systems are not fif for purpose ) but need to replace the rubber billet in the float arm. I can’t reverse it as it has a locating hole on the other end. Do you know where I could buy these items? The manufacturers just want to sell me an expensive kit with lots of other bits that I don’t need ( I’ve already bought one of the kits before just for the diaphram and billet) . Or how could I fix the existing one which has a dimple now from use and I think this is causing the valve to stay open.
    Many thanks for any hints you may have.
    Jane

    1. Helpful Colin avatar

      Hi Jane,
      Apart from DIY emporiums such as B&Q and Wickes. The best places to try for plumbing parts are well established builders merchants. Try yellow pages. However even they aren’t what they used to be 10 or 20 years ago. If you think the pinhole is not being closed when the float rises and you can remove the arm, then remove it and see if it stops filling when you put your finger over it. If it still fills up then the problem is elsewhere. Or you can leave the arm attached and pull the float up by hand giving it more force than the rising water can give it. I would be surprised if you can’t stop the water escaping through the pinhole by doing that. Mine is a few years old now and it hasn’t been a problem. If you changed it once already I would be surprised if you had to do it again so soon.

      Could there be some other reason why the float isn’t rising as high as it should. On a different type of plastic valve system used on my previous loo I found the float spindle would rise until it touched the cistern lid so it couldn’t rise enough to shut the water off. When I took the lid off to examine it I couldn’t see what the problem was.

      1. Jane avatar
        Jane

        Many thanks Colin for your help. I’ve tried lots of online sites for billets but will try some actual plumbing shops next time I’m near one. The beastly thing is only 8 yrs old and I had to change the original diaphragm about 2 years ago as it was split and it would only work with a new one after I also changed the billet. This one has split much faster ( and the loo is only used by one person) and using a new one bought on ebay it again fails to shut the water off. The lid is off so that isn’t the problem. I’ll have another go at it this weekend. One difficulty is tightening the nuts up enough – there is no room to get a good grip in the tiny cistern and I’m worried about breaking something. I shouild have bought an old style cistern with the big lever and float – these never gave any touble. The new ones ( 2 more in my Mum’s house ), 3 different makes but all the same type of works have all failed within about 6 years.

        1. Helpful Colin avatar

          Hi Jane,
          I agree 6 or 7 years is about as long as the diaphragms last. When I said try builder’s merchants I meant builder’s and plumber’s merchants. Some builder’s merchants have a separate plumbing department.

  8. Jane avatar
    Jane

    Thanks very much Colin for your help with this. I’ve sorted it now and fiddling with the billet did the trick plus screwing the locking nuts so hard I was sure the threads or other pieces would break. Touch wood it keeps going for a good while now.

    1. Helpful Colin avatar

      Hi Jane,
      I’m glad you’ve sorted it out.

  9. Nick avatar
    Nick

    This was really helpful Colin. I had problems after pro plumbers did some work fitting a new combi boiler and re-routing cold water supply to the bathroom. Knowing how to dismantle the valve and clean out the solder fragments that were blocking it was a god-send. Plus, I don’t think the diaphragm was ever fitted properly in the first place. It is now thanks to your advice and clear instructions. The cistern now fills in seconds instead of taking an hour to half fill. We’re now flushing properly!

  10. Richard Gulliver avatar
    Richard Gulliver

    Dear Colin,
    I am most impressed with the time that you have taken to generate such a comprehensive site.
    I have an Armitage Ascania cistern exactly like the one in your picture. It is not working ideally. The problem may to be sediment from the water pipes coming into part of the valve. I am tempted to get a complete new Silent Fill Toilet Cistern Inlet Valve. The cistern and contents are now about 10 years old. Could you please either give me the part number fro the entire Silent Fill Toilet Cistern Inlet Valve, or tell me where to look for it on the valve? I have found one on the Screwfix site that looks right, but there is no text on the web page (or on the other sites that I have looked at) to indicate that it is appropriate for an Ascania.
    The description on the Screwfix page is – Armitage Shanks 8½” Bottom Entry Fill Valve Product Code: 98097. The link is http://www.screwfix.com/p/armitage-shanks-8-bottom-entry-fill-valve/98097. Price is £10.49 including VAT, delivery extra.
    With thanks
    Richard Gulliver
    PS I live on a Scottish Island, so buying on line is the only simple option.

    1. Helpful Colin avatar

      Hi Richard,
      First may I suggest that you have chosen the short replacement valve when you should probably choose the long one seen at: http://www.screwfix.com/p/armitage-shanks-9-bottom-entry-fill-valve/45479
      The Ascania cistern is narrow and deep. The one I have spotted at screwfix is 9½” (long/deep) whereas the one you have found is only 8½” (long/deep). I cannot measure mine at the moment and I do not know what part is 9½” (long/deep) but I suspect the thread at the bottom is not included. It might of course be a full depth of water measurement. I will try and find time to remove my cistern lid and check this out.
      I realise the fill valve I have and wrote about is now outdated and the new replacement is all I can see when I search the net. I don’t know if it works exactly the same, or how easily it can be dismantled.
      Good Luck.

    2. Helpful Colin avatar

      Hi Richard,
      I have just removed the lid from my Ascania cistern and found the water level mark in the porcelain is 9″ up from the bottom on the inside. The top of the arm on the valve is 12½” above the bottom on the inside. So my choice of valve would be model 45497. I cannot see any numbers marked in the plastic and with it being an older version any number would probably not mean anything. I found the words “QUIET BALLVALVE” on the clamping nut. And advice about using an inlet restrictor to slow down the water filling the cistern if the water pressure exceeds 1.4bar.

      1. Richard Gulliver avatar
        Richard Gulliver

        Dear Colin,
        Thanks for you extremely helpful advice and apologies for the delay in replying. Google mail has the annoying feature that it adds a second email to the first one in the inbox list, i.e. does not show it separately. Hence it was only today that I spotted that you had sent a second email. I am sure that the valve part number 45497 is the right choice, and will proceed with purchase shortly,
        With thanks again for your wonderfully helpful approach to life.
        Kind regards
        Richard

    3. Andy Wilson avatar

      I have just bought the Screwfix unit and mated the new top half to the Armitage Shanks original bottom half – works perfectly!

  11. Betty avatar
    Betty

    Hi Colin,
    I found your website very usuful I have 2 questions
    Q1 I cannot raise the water level because a stop built onto the adjusting screw is preventing me from turning it clockwise in the tank (Water level 1inch below the mark at present)
    Q2 water is leaking around top cover,clamping nut and arm could this be the reason why the tank is very slow in filling and the anti syphon tube has water dribbling from it when the tank is filling
    Please help

    1. Helpful Colin avatar

      Hi Betty,
      I assume your fill valve has worked OK in the past and is not a new one bought and fitted to replace an old one. Please let me know if it is a new one so I can give alternative advice.
      I suspect your float is adjusted up against the stop in an attempt to raise the water level. When you get the valve working again you will probably have to adjust the float down the screw again or it will over fill.
      Because the water level is low and the float is adjusted to give a high water level the pinhole valve at the top of the valve will be open and so you will have water dribbling out of it. It should not be oozing out from the thread of the Clamping Nut.
      So the question is: Why isn’t water gushing out of the Output Tube which has the flexible flat Anti-syphon Tube (like a narrow plastic bag) attached to it?
      The water flow is being restricted somewhere. I suspect the diaphragm is closed even though it should be open.
      With the water supply turned OFF unscrew the clamping nut and remove the top cover to expose the diaphragm. Check if it is mounted upside down, damaged or grotty. If it is upside down take it out and clean it. Stretch it a bit to check for cracks/holes. If it’s OK reassemble the valve with the diaphragm mounted the right way up and test it.
      Observe how the valve works at http://helpfulcolin.com/how-a-toilet-silent-fill-valve-works/
      If there wasn’t a problem with the valve check if there is some other restriction on the water supply to the cistern.
      Feel free to ask further questions as you proceed.
      Good luck.

      1. betty avatar
        betty

        hello Colin,
        Thanks for you reply it is the same valve,
        I cannot unscrew the clamping nut it is too tight any tips

  12. Betty avatar
    Betty

    Hi Colin,

    Still struggling with the clamping nut, I might have to spray W40 and see if that loosens the nut. The other question is my cistern takes 5 minutes to fill is this normal or is there a problem ?

    1. Helpful Colin avatar

      Hi Betty,
      WD40 hmm. Well it could be all seized up with calcium out of the water. It might just be very tight. It won’t be corroded like a metal nut would be. It’s in a confined space and hard to get a wrench to it. I undid mine in the cistern. I hope Lock Tight hasn’t been used on yours.
      In the end you might have to remove it from the cistern and work at it on a bench and you might have to use a pair of Stilsons or Mole Grips but remember it is delicate compared to brass. If you haven’t got those tools and cannot borrow then it would be cheaper to buy a new valve. They are expensive tools. A flat adjustable wrench will work on a knobbly nut. Stilsons and Mole Grips or a vice are needed to hold the body of the valve. Just turning the nut alone might unscrew it from the nut at the bottom of the cistern if you apply a lot of torque while it is in situ. So do it with the cistern empty.

      It is not normal to take 5 minutes to fill unless you have low water pressure or a restrictor fitted to the inlet. You may have a restrictor when you don’t need one.

  13. Paul avatar
    Paul

    Thank you so much. Followed your instructions and had exactly the same problem, tiny splits in the diaphram. Had a bit of trouble unscrewing the locking nut. Used an old toothbrush to clear off the calcium deposits round it and it came free. half an hour later and a grand total cost of £2.50, new diaphram fitted (it took 20 minutes to get to plumbing shop and back) problem solved. This was following a plumber telling me on the phone that the entire inlet unit needed to be replaced.

    1. Helpful Colin avatar

      Hi Paul,
      Sorry for the delayed reply. I’m glad you had success. I’ve had some good comments from this post.
      Keep your old toothbrushes they can be very useful. To get calcium off dip it in Betterware Multi-Use Descaler. Let it soak in then have another go at brushing it off with more Descaler.

  14. MK avatar
    MK

    Hi Colin – thanks for such a comprehensive article, clearly its been helpful to a lot of people.

    My downstairs cistern has started overflowing and I was searching on the internet for a solution and came across this. Interestingly, the mechanics in my cistern is same as what was posted by National Hunter. The diaphragm has got 18 ridges and there are 18 supports underneath.

    I have checked B&Q and couldn’t find an exact match. I bought the closest one I could find there, http://www.diy.com/departments/plumbsure-diaphragm-washer-dia30mm/184682_BQ.prd, (it doesn’t have the ridges) and tried it but unfortunately it hasn’t worked. Water is still overflowing in to the pot.

    National Hunter – were you able to find the exact diaphragm? If yes, can you please share from where you got it?

    Colin – as my diaphragm is exact same as National Hunter, I believe they are just a different type and ridges are meant to be there. I have examined but couldn’t find any tears, suspect it has gone slightly loose. Ours is a new home so it’s only 2.5 years old. I am unable to seperate the arm from the top (it’s same as the pic from National Hunter,http://i.cubeupload.com/DO3ALo.jpg) so not able to establish if the stopper wedge is damaged.

    Thanks

    1. Helpful Colin avatar

      Hi MK,
      You’ve probably resolved your problem by now but I have just come across this add which might be just what you wanted. Diaphragm with 18 ridges (well I suspect there are 18).
      (Note: I have changed the link above on 17th May 2017, for another on the same site, because the original was no longer valid.)
      I also came across this video: https://www.youtube.com/watch?v=r1U6Xs31lIc&feature=youtu.be

      1. MK avatar
        MK

        Hi Colin

        Thanks for all your help. Yes, the problem got resolved once we got hold of the exact diaphragm (with 18 ridges). We managed to find in a local plumbing store (after lot of failed attempts with various shops!)

        Thanks to your article, we knew exactly what’s required to sort it out 🙂

        Thanks
        MK

        1. Helpful Colin avatar

          Hi MK,

          It’s nice to know you eventually had success. There seems to quite a few different valves these days. I can see it could be difficult getting exactly the right parts for some of them.

          Regards,
          HC

      2. Bill avatar
        Bill

        The later type silent valve design with the twist and lock top ‘develop’ the 18 ridges around the dome of the diaphragm in use. New replacement diaphragms come smooth and the ‘ribs’ form over time due to water pressure pressing the rubber into the shaped casing it fits into.
        Be careful to buy the correct diaphragm as the older types are not compatable with the new type ( but look very similar new ).

        1. Helpful Colin avatar

          Hi Bill,
          Thanks for the info.
          Regards, HC.

  15. Andy Baimbridge avatar
    Andy Baimbridge

    Hi Colin, just wanted to say a massive thank you for this article and the one that explains how the system works. My inlet valve diaphragm went faulty and the big washer underneath the flushing unit had also perished, and packed up just before I was about to go on holiday! With the help of your article, I was able to change them both without the help of a plumber, thus saving time and money, so just wanted to say thank you, I really appreciated your help!

    Best wishes, Andy

    1. Helpful Colin avatar

      Thanks Andy,
      I’m glad I was some help to you. I hope you had a good holiday.

  16. peter cookson avatar
    peter cookson

    Hi Colin, we have an intermitant fault with our system – sometimes it fills normally, other times the valve doesn’t close and just keeps running into the pan without filling. Fiddling around with it eventually? closes the valve. It seems to be a WRAS Macdee. The fill valve and float is DVEO600 and the flushing mech AFV 40100 or 40200. Any advice would be very welcome.
    Regards, Peter

    1. Helpful Colin avatar

      Hi Peter,
      Your description makes me think you have a problem with the flushing mechanism especially after looking up the AFV 40100/40200. Although I’m not familiar with it I understand the flush button operates the valve via a bowden cable (like a bike brake or gear cable). This cable may be jamming up and some people have tried to lubricate it with WD40. I suspect it is difficult to find a place to squirt it in.
      Here is a link to a forum post: macdee afv 40100 flushing system
      Here is another link relating to a lime scale problem: macdee concealed cistern wont stop running after flush?
      If you have to replace it I suspect the AFV 40100/40200 are obsolete since references to a newer version are mentioned on the net. This may not be the cheapest but it may be a suitable replacement.
      Please check it out for yourself: Macdee Outlet Valve Replacement for an AFV40100/200
      (Please Note: I have now linked to an alternative supplier since the original I suggested is now broken as of 06/04/2020.)
      Good luck.

      1. peter cookson avatar
        peter cookson

        Many thanks for your help. Dripped some fairy liquid into cable and it is working a treat.

  17. Marianne Wilford avatar
    Marianne Wilford

    Hi Colin.

    Many thanks for your excellent article.

    May I just add something. When my toilet started leaking into the bowl I replaced the small diaphragm. And after this the toilet was like a ruddy mini waterfall leaking into the pan. I couldn’t understand why it had become worse.

    So I then replaced the large washer under the flush mechanism. It made no difference! I read and re-read your article and couldn’t fathom why the leak was worse than before I tried to resolve it.

    I then remembered before replacing the diaphragm that underneath it – in my float arm cap – there’s a filter unit. Shaped like a small bullet – I’d pulled this out to flush it through as the instructions for the float arm, which I have, said to do periodically.

    Anyway I finally realised I’d not pushed this filter unit back properly into the recess under the diaphragm. Thus the diaphragm couldnt even begin to do its job as it wasn’t being pushed down onto the valve as the cistern filled up! I pushed it firmly in and voila – the waterfall stopped!

    So just in case others also have this little filter unit underneath their diaphragm – ensure you push it firmly back into the recess before replacing the diaphragm. Use a pair of long nosed pliers to twist the filter one quarter turn clockwise once it’s firmly pushed in place. The filter has little lugs on it which you can grip with the pliers.

    I was about to go out and purchase a whole new univalve unit so am happy I didn’t have to! I did a mini victory dance in my bathroom instead.

    Anyway thank you for your fab articles – I have saved your site as a fav for any future plumbing issues I may have!

    Marianne

    1. Helpful Colin avatar

      Hi Marianne,
      Thanks for your helpful comment. I have included some of your paragraphs as a quote, by you, in a new section entitled, ‘Flow Restrictors & Filters In Toilet Silent Fill Valves’, so that people don’t have to wade through the comments to see it.

  18. W roberts avatar
    W roberts

    As ever, ’tis often the simplest things that throw us. My Inlet valve in the UK did not have the red central, plunger type post but a fixed plastic post.
    Basically I found no cracks but just cleaned the diaphragm….PERFECT.
    THANK YOU Colin
    w Roberts

  19. Michael Robinson avatar
    Michael Robinson

    Hi Colin,

    Just used your instructions to repair the inlet valve in my downstairs loo. Great help! Due to my fading peepers, it took a while to spot that the diaphragm was split. I then found an own ‘Plumbsure’ brand replacement at B&Q which works perfectly. Part No. WB540QV3 ‘diaphragm washer for quiet fill valve’.

    Just to say, keep up with the great service. Blogs like yours make the internet great!

    Cheers

    Mike Robinson – Haywards Heath

    1. Helpful Colin avatar

      Thanks for your comment Mike,
      As a consequence I have edited my post to include part of your comment as a quotation and I have improved the B&Q link so that it goes straight to the diaphragm.

  20. Tom Fenwick-Brown avatar
    Tom Fenwick-Brown

    Colin
    I just want to thank you for one of the most comprehensive and helpful articles I’ve seen on the web. Keep up the good work and use any / all of this as you see fit.

    Just one tiny (but important) point regarding your suggestion to, “remove the ‘stopper’ in the arm and turn over to present a new flat surface.” This is not possible as the stopper is hollow and sits on a spindle, so the bottom side is open. I was unable to find a replacement anywhere, so improvised with a shim under the stopper to raise the level and sort the problem. I tried a few tiny rubber washers first but found them too thick. I ended up using a cut out from an old pair of thin rubber gloves, which worked a treat.

    Have you done a similar article on how to replace the whole old unit with a new version?

    Keep up the good work.

    Regards

    1. Helpful Colin avatar

      Tom,

      Thank very much for this info and for your compliment. I haven’t had occasion to remove the stopper and presumed it to be a simple rubber cylinder. I would have thought it would be so simple to wedge a rubber cylinder into the arm. I will modify my post using your info.

      Well I haven’t written how to change the unit but I can since I have experience of putting in the original and of changing similar units in previous cisterns. Watch this space.

  21. Andy Wilson avatar

    Thank you for this excellent article. I have the later model valve for which spares are less easily found. After disassembling the fitting and winkling the diaphragm out, it looked undamaged so I reassembled it to get the same leak. Service packs containing a diaphragm and rubber stopper etc. cost the same as a whole new inlet valve, and I feared breaking some of the feeble plastic parts disassembling it to swap parts out.

    SO, the easiest fix (for £10.50) is:
    – Turn off water.
    – Screw the adjusting screw out of the float.
    – Unscrew the top of the unit.
    – Buy a Screwfix valve ref. 98097.
    – Unscrew the top of this new unit and screw the float off.
    – Screw the new top section onto the old body and screw the float adjuster back in.

    I reckon (bar the shopping) you could do the repair in literally two minutes flat!

  22. Anthony avatar
    Anthony

    NOTE: The valve from screwfix 98097, is a push fit connector.
    If you have a fill valve the same as described within this post, it has a screw connector and will NOT WORK.

    Any body know where to get spares for the valve pictured in this post (old version) ? The toilet is flush with the wall, so I cannot replace the whole ball valve system without ripping out all the tiles and toilet. I basically want to replace everything above the screw connector on the ball valve

    My issue was the toilet was filling slowly, I replaced the diaphragm with the b&q equivalent, as it had torn. After this was refitted the water would not shut off with the float valve, even when trying to manually shut it off. I took the arm apart etc and checked the rubber, pushed it out more etc, but it still doesn’t work. Replacing the whole lot will be far simpler if a spare can be had.

    1. Helpful Colin avatar

      Hi Anthony,
      I came across http://www.discontinuedbathrooms.co.uk/index.htm but I doubt they stock old internal parts.

  23. Anthony avatar
    Anthony

    Follow up!

    After much research I have found that the flush valve in this picture is model number SV62467. I scoured the internet for hours looking for this part and it was discontinued a long time ago, 5+ years as far as I can see, so no one stocks it.
    The replacement does not have a screw thread so is useless.

    I have found one very courteous seller on ebay that is selling thes, no one else on ebay has sold this item in the last year, if you are unable to replace the whole flush valve like me, BUY one now before they are gone for ever – http://www.ebay.co.uk/itm/161878750511

    I have just ordered another 2 – hoping this should last me another 10-15 years 🙂

    My situation:
    Our toilet is flush mounted to the wall and they have boxed in the toilet and all access, so there is no access to the water inlet to take out the whole valve. I’d have to cut out all the tiling.
    My issue was a slow filling toilet, took about 45 minutes to drip fill it and the dripping was driving me nuts as it’s in our en suite.

    Problem:
    The diaphragm was ripped, so I replaced it with the B&Q one above, but I was not convinced it’s the right replacement part as it’s not rigid and lifted off with the water pressure, unlike the original.
    After replacing this the water never shut off, even after pulling the arm up manually. I took the arm to pieces like above and my rubber seemed fairly smooth, I tried to push it out more as above, but it still never shut off.
    I put the old diaphragm back, water never shut off, so then I was left with no toilet at all.

    After ordering the spare valve, I just unscrewed the lowest point, replacing with the whole new mechanism, which includes the diagraphm, arm etc and finally a working toilet!

    1. Helpful Colin avatar

      Happy New Year Anthony,
      You deserve it. You’ve worked hard to resolve that problem.

  24. Adam avatar
    Adam

    Many thanks! Saved me a whole load of aggravation – wish I’d done it sooner!

  25. Richard avatar
    Richard

    Thanks Colin. I took the fill valve apart looking for any wear and tear or damage but couldn’t see anything wrong. My worry was I was going to have to replace the whole unit, taking the cistern and toilet to pieces to be able to replace it. I found your site, looked at the diaphragm and quickly spotted the tear. 10 minutes later and £1.57 later problem solved. Thanks for the clear advice. It’s saved a lot of money, time and frustration

    1. Helpful Colin avatar

      That’s great Richard. I’m glad you were successful.

  26. Lozzie avatar
    Lozzie

    Thanks for your brilliant website which I have now bookmarked. I had a 2-week battle with overflowing on an 8-year old unit identical to the one shown in your photos. With your help I was able to investigate but could find no tear or malfunction in the suspect diaphragm. I went ahead anyway and replaced it with the B&Q (£1.50) one referenced above, problem solved immediately, saving myself an £80 plumber call-out charge plus labour etc. Great stuff!

    1. Helpful Colin avatar

      Hi Lozzie,

      It’s nice to know you got it sorted out. Be prepaired for it to wear out again in a few years.

  27. tkmk avatar

    Brilliant article! Stumbled across your site via searching for how to stop water continuously flowing in my toilet. Managed to get to the rubber diaphragm using your directions and could see a slight split (turning off the water via the fill pipe was also very helpful). Now just have to order a replacement. The images were so useful. Btw – why do the rubber diaphragms tear?

    1. Helpful Colin avatar

      Hi tkmk,

      I hope you complete the job successfully.

      Why do the rubber diaphragms tear? Every time the diaphragm goes up and down the area that tears is bent, straightened and stretched. Eventually the molecules rip apart at a place in the material where they are overworked.

      The real question is how many times should you be able to bend, straighten and stretch this material before the damage is done? I suspect if it were to be used on a device taking a long space journey it would be able to do it millions of times but it would cost a small fortune. What have we here? A twopenny-halfpenny device, so it only lasts a few years. Perhaps a better design or a better material that isn’t prohibitively expensive might make it last longer. Perhaps there is money to be made from its low quality.

      I might include your question in my article.

  28. BD avatar
    BD

    Colin,

    is it possible to get a replacement for the collapsible polyethylene pipe?

    Ours has a small hole in it near the water inlet end and makes an annoying squeaking noise every time we stop is using water elsewhere (our flat has a Grundfos 3.0 Bar Home Booster). So it can be squeaking during the night if out central heating kicks in.

    Thanks

    1. Helpful Colin avatar

      Hi BD,

      I doubt you can actually replace just the pipe. I think you will have to seal the hole with some self adhesive electrical PVC tape when you have dried the polythene.

      1. BD avatar
        BD

        Thanks for the prompt reply Colin (something I seem incapable of!)

        I’ll certainly give that a try.

        If that fails, I might just cut off the polythene and in its place put in a flat piece of plastic or such like – not a tube – that the water can run down so it isn’t splashing into the cistern (hopefully stopping the noise it would otherwise make) which shouldn’t cause a siphoning issue and as there is no hole there should be no squeak. If that makes sense? Or is that a bad idea?

  29. Rob avatar
    Rob

    Hi Colin,
    Thanks for your excellent site, I have just replaced the diaphagm in my SIAMP inlet valve and the slow fill,
    & water hammer are gone.
    I wondered if you know how water passes throught the SIAMP diaphragm as there is no pin. Just has
    cruxiform plastic plug through it’s centre, which seems water/airtight.
    Many thanks
    Rob

  30. Tanya avatar
    Tanya

    Hello, what tool do you recommend to use in order to take off a round “flush valve locking nut” similar to the picture in section above “Cleaning the Parts” what’s labeled the “Clamping Nut?” I’ve tried a pipe wrench, locking pliers, the universal plumbing tool, and a few others…. even with nonslip grip attached to it, it keeps slipping and the round ridges are partially damaged now. Thanks.

    1. Helpful Colin avatar

      Hi Tanya,
      It may be fixed together with some adhesive applied to the screw thread. Or calcium may have built up. I think you will need to take it out of the cistern and work with it on a bench and examine it closely. Be prepared to replace it.

  31. Paul avatar
    Paul

    On the 18 ridges on the twist-lock type: I’ve found one site that seems to suggest that the new diaphragm never had the ridges but they are made by the water pressure pushing it against the ridged housing:

    http://www.cisternfittings.co.uk/ideal-standard-twist-top-ballvalve-diaphragm-washer-please-read-description-913613-489-p.asp

    1. Helpful Colin avatar

      Hi Paul,
      Thanks for keeping us informed.

  32. Ed avatar
    Ed

    You absolutely rock Colin! This is a brilliant tutorial; clear, well-written and comprehensive. Thank you.

    Although I had replaced an inlet valve diaphragm already, a second one (different toilet) in our house started to fail. I took the top off the fill valve to expose the diaphragm and found it upside down! Now I’m not sure if water pressure will invert a failing diaphragm but the toilet had been working fine for years until water began to overflow into the pan so it seems unlikely that the diaphragm was fitted incorrectly in the first place.

    I’m probably going mad but I did have my glasses on at the time :). Whatever, thanks again Colin.

    1. Helpful Colin avatar

      Hi ED,
      There are many different inlet valves out there. Beware: Not all diaphragms that look like mine are like mine.
      Regards, HC.

  33. Dizzy Mare avatar
    Dizzy Mare

    Hi Colin, Following your brilliant instructions, I successfully managed to get the diaphragm replaced and reassembled all parts, turned the water back on, but the cistern would not stop filling, I lifted the arm, still kept filling, I turn off the water. I flushed to get rid of all the water and replaced the old diaphragm having checked it for tears and cleaned there was a plastic white washer which fitted the original diaphragm perfectly, but was loose when fitted to the new diaphragm, I thought this was causing the constant filling hence refitting the original. Nope upon turning the water back on with the original, it does not stop filling. HELP, it’s driving me mad having to use screwdriver and turn water on every time I need to flush

    1. Helpful Colin avatar

      Hi Dizzy Mare,
      Two important points to note:
      1. The diaphragm must be clamped around its periphery so it is watertight all around its circumference.
      2. The thick centre part of the diaphragm must be able to flex down and seal the incoming water pipe in its resting position without any extra downward force. If it sits too high up so it can’t reach the opening it will not be able stop the flow. Was there a plastic flow restrictor or seat for the diaphragm to rest on which has gone missing?
      NOTE: the water should stop flowing when the pinhole in the top cover is closed by the rubber bung at the end of the arm (or your finger if you remove the arm). If you can’t stop the flow with your finger then water must be bypassing the diaphragm in some way.
      Good luck.
      Regards HC.

      1. Dizzy Mare avatar
        Dizzy Mare

        HC.

        I had another attempt this morning, I took it all apart and cleaned everything in the sink, once reassembled it worked perfectly. Yay. Now to fix the other loo, this one carried on flushing after its flushed, I think the ball cock thinging is too high, and it’s allowing water to fill up to the level of the internal overflow, I thought I had fixed it a couple of weeks ago but it’s at it again

        1. Helpful Colin avatar

          Well done DM.
          I presume the other loo is the regular ball cock type. Good luck with it.
          Regards, HC.

  34. Twisterella avatar
    Twisterella

    Hi Colin

    Thank you so much, I would not have had a clue what was wrong without this blog. Took me about a minute to sort out after reading (and getting the part).

  35. John avatar
    John

    Great article Colin .. thank you. I have a slightly different problem in that it takes my cistern about 7 minutes to fill after each flush. I removed the clamping nut (with great difficulty because it was stuck firm) and diaphragm which on inspection looks fine. I gave the diaphragm and other parts a wee clean up and reconstructed the assembly. This time I only tightened the clamping nut hand tight and there is a marked improvement in the refill rate (about 4 minutes). Is 4 minutes normal or should I look to do something else to improve this? Also given that the clamping nut is only hand tight is there any danger of this popping open under the water pressure?

    1. Helpful Colin avatar

      Hi John,
      Have you got a device fitted into the valve input whose job is to reduce the flow? Has it always taken a long time to fill? 4 minutes seems slow to me.
      My first thought is that you should check that the water pressure at the input to the cistern is as good as you think it is? Has some dirt moved up the pipe and blocked the flow through the valve?
      Regarding the clamping nut. If it has at least half a turn on the thread and the plastic is in good condition I’m sure it will hold. After a full turn then I am sure it will.
      Regards, HC.

      1. John avatar
        John

        Thanks again Colin, the water pressure is good … I removed the diaphraghm and when I turned the water supply back on the cistern filled in about 60 seconds. After reinserting the diaphraghm and with the clamping nut even looser than before the cistern filled in about 90 seconds HOWEVER the cistern does not stop filling even although the float arm is as high as it will raise … as if there is not enough force to close the diaphragm. I will visit my local B&Q today and for the sake of a couple of quid try a new diaphraghm. Other than that could it be that the rubber Stopper insert to seal the pinhole in the Top Cover is the problem?

        1. Helpful Colin avatar

          Hi John,
          The rubber stopper could be a problem. If you can get your finger in place you should be able to stop the filling process by putting your finger over the pinhole through which the water leaks out. It takes no effort just a good seal. See: “Cleaning The Parts”.
          Regards, HC.

          1. John avatar
            John

            hello Colin, sorry for not replying sooner. My local DIY store did not have a replacement diaphragm and ended up biting the bullet and bought a new Silent Valve. Without your brilliant article and viewing a couple of videos on YouTube gave me the advice and confidence to replace it myself. Thanks again Colin. Keep up the good work mate. Cheers!

  36. Andy Arthur avatar
    Andy Arthur

    Hi Colin,

    Excellent article and very thorough advice on fixing these valves. The problem is really that this valve is a poor non-standard design which offers no real advantage over different fill valves which are much more reliable. If you want to avoid having to fix these dastardly valves every few years, I would advise taking the things out and replacing them with something much more reliable. We have used Fluidmaster fill valves which are about the same price as a new Armitage Shanks Univalve and just work reliably and rarely require attention.

  37. Chris D avatar
    Chris D

    It’s surprising how complicated getting a new diaphragm can be! Can you Colin or any of your equally grateful readers advise what the correct part number is of the particular one shown held between thumb and forefinger in front of a green background and labelled “The Diaphragm’, because that’s the one I need but seem unable to find. What makes this one special is that it is deeper than the standard Hushflow and has a second square-edged ‘wedding cake’ look to it.
    Also, I’ve not been able to source the little rubber stopper (also known as a ‘billet’ for some reason) that sits in the cap and blocks the pinhole inlet. Does anyone know of a source for those, as it truth I think the indent in that is more likely to be the cause of my leak than the diaphragm! Cheers

  38. Ed avatar
    Ed

    Chris D

    To repair my toilet I bought an INLET VALVE SERVICING KIT PART No SV90167. The kit is available online (Ideal and Amazon) and locally at plumbing hardware centres. There are bits in the kit you may not use and the diaphragm is often the only bit you need! Buy a couple of kits to keep a spare handy.

    Cheers
    Ed

    1. Helpful Colin avatar

      Good idea. Then when the spare gets used buy another ready for next time. They may cost more in the future or go off the market.

    2. Chris D avatar
      Chris D

      Thanks Ed – that’s exactly the sort of info I was after but unfortunately it doesn’t help in my particular case as that was very kit I bought at Day One, only to find that it doesn’t fit! I’ve also sourced the same diaphragm on it’s own from a couple of online sellers who had also assured me that it should be the right part but, as it’s not, the only option seems to be to replace the whole inlet valve (which my wife doesn’t trust me to do so I’ll have to continue to lose water into the bowl unless I come across a passing plumber…).

      I’m not able to copy and paste the image here but the diaphragm I need is illustrated in the tenth photo in this very article, but ISN’T the one to which you refer (of which I have two in front of me). Yours has an inner, the diaphragm itself, and a narrow outer rim, whereas as indicated previously mine [like the one in Helpful Colin’s photo] has an additional ‘tier’ outside the diaphragm, which is why I felt that it was amazing how complicated such a simple exercise was proving to be!

      1. Steve B avatar
        Steve B

        You are correct. The replacement part that Colin references from B&Q (and easily available from many online sellers) is NOT THE SAME as the part that Colin removes (pictured above the words “The Diaphragm”) from the inlet valve. It is thicker. I too would like to know where I can source a mechanically identical part to the one pictured.

  39. Jon avatar
    Jon

    Hi Colin, this is a great article thank you. My toilet normally takes ~30secs to fill but lately it has been intermittently taking much longer (~10mins), what I think is happening is that the pin hole is opening but the diaphragm is not. This is now happening most of the time (every now and again it flushes ‘normally’). The design is slightly different to yours (diaphragm is oriented at 90 degrees), but I guess the principle is the same. What might be the best course of action? Perhaps disassemble and clean?
    Many thanks,
    Jon

    1. Helpful Colin avatar

      Hi Jon,

      Thanks for the positive comment.

      Working parts are always at their best when they are clean. Check for splits in the rubber at the same time. Remove any calcium build up. Check for rubbish that has come along the pipe and wedged in the valve inlet. Has it gone into the spiral restrictor. If you have a spiral restrictor does it work better with it removed?

      Consider that for some reason the water pressure at your cistern is too low. Obviously it wasn’t but now it might be. Are the supply pipes furred up (blocked by calcium build-up within the pipe). Furred up pipes won’t affect the static pressure but the pressure will drop when the water flows because it can’t flow fast enough through the narrow bore of a furred up pipe.

      You can test the static water pressure by disconnecting the pipe from the cistern and attaching a hosepipe in its place (there’s a challenge). Unwind the hosepipe and support it from a height, e.g. from an upper floor, Haul it up a tree, take it up a hill, etc., (lots of hose needed). How high will the hose go before it is too high up for the water to come out of it? Well that is the head of water in metres (meters) above the cistern inlet. You should get the same measurement if you connect the hose to a tap on the same water supply (an easier connection). Always measure from the cistern inlet to the level of the water in the hose. If the pressure is really good you would have to take it to a great height to stop it coming out.

      I think the dynamic head can be measured to the top of the fountain you get by pointing a short hose at the sky.

      Try this site to convert between units of pressure: http://www.convertunits.com/from/meter+of+head/to/bar

      See my discussion with Mal Prodger on “How A Toilet Silent Fill Valve Works“. He had low pressure.

      All the best, Colin.

      1. Jon avatar
        Jon

        Thank you so much Colin, I took it apart and found everything clean, but a split in the diaphragm, like you said. Fortunately screwfix stocked the same part and all sorted, much simpler than I feared!

        1. Helpful Colin avatar

          Hi Jon,
          Not too complex then.
          Regards, Colin.

  40. Roy avatar
    Roy

    Hello Colin,
    First of all congratulations on your expert advice and guidance!
    My silent fill valve problem started when I noticed the fill-up time became very slow (+/- 3mins). Then water started running into the pan after every fill-up.
    Following your guidelines, I suspected the inlet valve might be at fault and tried to undo the clamping nut – impossible! Probably full of calcium. However, I noticed that, when the water is turned off, a full cistern still empties into the pan.
    In fact, where is the internal overflow in the Ideal Standard set-up? I only have 2 parts: the inlet silent valve and the central flush unit activated by the double button in the top (no pipe).
    The toilet is more or less built-in, I can access the stop valve but a lot of dismantling would be necessary if I need to exchange either of the internal units.
    Any ideas?

    1. Helpful Colin avatar

      Hi Roy,
      Regarding the overflow: You can see mine in the picture entitled “Cistern With Lid Removed” in the post “Dual Flush Toilet Cistern Lid Removal”. All you can see is the top where the overflowing water goes in. That pipe is part of the flushing mechanism which it bypasses. The overflow pipe is connected to it at the bottom where the flushing water leaves the cistern, so it doesn’t require an extra hole in the bottom of the cistern.
      In your case the inlet valve is not stopping water from entering the cistern when it is full so it overflows. I have to suspect there is a problem with the diaphragm in the valve since you also have a slow fill. Does it stop filling when you pull the float up by hand?
      General overfilling can be resolved by adjusting the float height but that won’t work if the valve is faulty and continues to let water in.
      Many inlet valves are different to mine and can’t be easily dismantled. You will probably have to remove it from the cistern and see if you can dismantle it on a bench or buy a new equivalent.
      You should be able to remove the inlet valve after disconnecting the inlet feed pipe and undoing the big plastic nut underneath the cistern which holds it in place. You should not need to remove the cistern from the toilet pan or interfere with the flushing mechanism to achieve your goal.
      I hope this helps. Any more questions? Just fire away.
      Regards, Colin.

    2. Helpful Colin avatar

      Roy,
      I have read your comment again and seen the problem from a different angle.
      If you have a faulty flushing mechanism which allows water to continue passing through it all the time the cistern is filling up then it would be slow to fill and water would leak away after you turn the supply off.
      Check if the water is apparently overflowing by going down the overflow by looking at the top of it. If not then the water must be leaking through the flushing mechanism.
      If water is going into the toilet pan without going down the overflow that would be due to a faulty flushing mechanism.
      Changing the flushing mechanism can involve removing the cistern if it is an old design. There are new designs which allow the flushing mechanism to be slit apart and repaired from within the cistern. You’ll have to work this out for yourself.
      Good luck.
      Regards, Colin.

      1. Roy avatar
        Roy

        Hi Colin,
        Thank you for your prompt replies.
        1) I thought one reason for the continuous flow of water might be the rubber stopper in the pivot arm on the inlet valve which appears to rather indented BUT putting my finger on the pinhole did not fully stop the water. So this makes me think the “famous” diaphragm is probably at fault. However, I am unable to unscrew the clamping nut and would hate to break it. If I can unscrew the top part of the unit (which contains the diaphragm) I might try what one of your correspondents suggested, to buy a complete new inlet valve and just replace that upper part. What do you think?
        2) It appears that the reason for the water running continuously into the pan is not the overflow system but the bad seal made by the rubber at the bottom of the flush mechanism. The mechanism has what appear to be 2 clips on the outer casing which look as though the moving part can be turned and removed for servicing the rubber seal. Am I correct?
        Thanks for any advice.
        Roy

        1. Helpful Colin avatar

          Hi Roy,

          1) I think my inlet valve is so outdated that yours will be made in a different way. Whereas my clamping nut had a real screw thread I can’t be sure that later models do. In the days when these things were made of brass calcium and corrosion really did weld them together (plumbers should have greased the thread) but I think that with plastic if you feel it’s about to break, as you apply a torque, then it’s not being held by calcium and it won’t be corroded. Plastic, with less friction, will free up much more easily. What I am saying is if it won’t unscrew it must be clipped together. Have you tried turning it the other way?

          If you can buy exactly the same valve then yes replace just the faulty part. When you’ve got the new one in your hand you may be able to figure out how to dismantle it. Then you will know how to take the old one apart.

          2) Because I’m not a professional plumber I don’t get to see all the mechanisms available but I know some can be split to enable servicing. This is a good idea because removing the cistern from the pan and dealing with the big spongy rubber seal that stops flushing water shooting out all over the floor, and cutting the corroded nuts & bolts, and replacing the rusty securing plate can be a messy and long winded business.

          I don’t know why any rubber seals on the flushing mechanism should deteriorate but I do know that the piston used to lift the water over the top of the syphon, which consists of a plastic frame attached to a metal spindle and a flexible plastic diaphragm laying on that frame, does fail. The flexible plastic diaphragm tends to tear and then it can’t lift the water properly. That’s when you have to pump the flushing handle up and down to make a toilet flush. Sometimes you can get away with replacing the flexible diaphragm with a piece of thick polythene sheet cut to size with scissors, but it won’t last as long as the original. It’s flexible so it can fold out of the way and let the water go past on the downward stroke and then lay flat and seal the piston on the upward stroke.

          Regards, Colin.

  41. John Bull avatar
    John Bull

    Fistly the unifil valve which supercedes yours should NOT have dimples in the diaphragm. These dimples form as the rubber stretches with the water pressure over the plastic, and are the precursor to diaphragm failure. This could be argued to to be a design feature, as the new type of diaphragm seems to last a mere four years (over a sample of two fill valves).

    Secondly, the internal overflow has been used abroad for a long time. It was UK legislation that blocked its adoption in this country.

    Thirdly, congratulations on a fantastic, detailed article. You don’t assume knowledge in the reader, so this could be understood by someone with no technical knowledge, yet you go into details that I find interesting (and I have a lot of technical knowledge). I look forward to exploring more of your site.

    1. Helpful Colin avatar

      Hi John,

      Thanks for your comments. You’ve added to the knowledgebase on this site.

      I’ve never been happy about the dimpled diaphragm. It seems like a bad design to me.

      I didn’t know the Internal overflow was a legislation issue. It’s typical of authority to hold back the future.

      Kind regards, Colin.

    2. Don avatar
      Don

      Well guys, I have had to replace the diaphragm (the rubber washer with a red pin in it) on my inlet float valve and obviously googled it, one of the comments stated that your diaphragm should have ridges in it for the updated twist cap type float valve (not a threaded cap).
      Wrong answer!
      I purchased a service pack and found the diaphragm was smooth, so called Armitage Shanks and was told that there is no such animal as a diaphram with ridges, the ridges mould in to the unit when you replace it and the water pressure forms the ridges, that’s the way they work.
      So replace it with the correct part number for your float valve with a smooth diapham and bingo job done.
      The problem is if its been working for some years and for some reason you take out the diaphragm to check it, it will not locate back into its original position with the ridges lining up with the ridges on the inside of the valve body, so you will need a new diaphragm, A SMOOTH ONE.

  42. Lea avatar
    Lea

    I know this was posted some time ago but I’m hoping someone can help. I have the same system and it’s taking for ever to fill the cistern. It never used to be like this and the flow hasn’t been adjusted. Any ideas on what it can be?

    I know nothing about the internals of cisterns but have learnt a lot so far.

    – the women of the house

    1. Helpful Colin avatar

      Hi Lea,

      Reasons for slow fill:
      1. The inlet valve is in some way faulty. Check the parts of the valve that can be replaced such as the diaphragm. Is the float dropping correctly after flushing.
      2. Low water pressure. Has the water pressure at your place dropped for some reason. Check modifications to pipework for new extensions or appliances.
      3. Blocked pipework. Has a foreign body entered the water supply and travelled to the inlet valve and blocked it up. Has calcium furred up the pipes.

      Good Luck, HC.

  43. Tanya avatar
    Tanya

    Hi Colin,

    This site is brilliant! I’ve learnt so much! Your instructions are clear and led me to find that I indeed had a split in the diaphragm in my water inlet valve. Mine is the 18 ridge one, so I’ve just ordered one using your link. I would never have found the problem without your website advice and would have ended up with an expensive plumbers bill. Thankyou!

    Tanya

    1. Helpful Colin avatar

      Hi Tanya,
      Thanks for the compliment.
      I hope you’re successful and solve your problem.
      Regards, Colin.

      1. Tanya avatar
        Tanya

        Hi Colin,

        The part arrived this morning. Fitted in 5 mins. So easy. All fixed now, no more running toilet. Thankyou so much!

        Tanya

        1. Helpful Colin avatar

          Hi Tanya,
          It’s great to hear the good news.
          Regards, Colin.

  44. Lawrence Grasty avatar
    Lawrence Grasty

    what a fantastic resource! thank you Colin

  45. Atul Kumar avatar
    Atul Kumar

    Standard diaphragm with 18 ridges — You saved my day man

    Thanks , purchasing this

    1. Helpful Colin avatar

      Hi Atul,
      I hope it goes well for you.
      Regards, Colin.

  46. Julie Street avatar
    Julie Street

    Hi Colin, just to let you know the new “ridged” Armitage Shanks diaphragm is not ridged when you buy it, the ridges appear after it’s fitted due to the water pressure on it’s seating. I’m a plumber, lost count of the number I have fitted, but I still from time to time forget that although the new (twistlok) filling valve diaphragms look exactly the same as the old (screwlock) ones……they aren’t! There is also no significance to whether the pinhole is red or white (other than to the date of manufacture). I am constantly bemoaning the fact that it would be so much easier if they made the new style ones a totally different colour so we could tell the difference. But in the wacky world of plumbing, that would be far too sensible………………….

    1. Helpful Colin avatar

      Hi Julie,

      Somewhere in all the comments I have been advised in the past that the ridges in diaphragms are caused in this way and they are normal when bought.

      With regard to differences between the screw-lock and twist-lock valves I’m glad to benefit from your knowledge. Someone is in email contact with me and they have a twist-lock valve. They have a new diaphragm with a white pin but they haven’t resolved their problem of continual filling causing overflow. I will advise them to read your comment.

      Regards, Colin.

  47. Ewan avatar
    Ewan

    Hi,

    I have the old valve just like the one in the picture. I had to replace the diaphragm in both cisterns here about 7 years ago when they were maybe 6 years old. Just tried to replace one of the diaphragms again using a part from Wolsley picked up locally (Product Code: C40985) but had problems. On first fill, the valve worked correctly but after that, instead of opening and allowing the water in, it just sprayed water out the top of the valve and didn’t fill the cistern. Taking a closer look at the diaphragm part, I noticed it had slightly different dimensions. It was still the old style (correct) version for this valve but not made with identical dimensions to the part it was replacing. It also seemed to be made of a different material. The original replacement was like older rubber with a white powdery material on it whereas the new part was shiny black more like neoprene and I suspect less stretchy.

    The old diaphragm still works although is showing significant signs of wear so I wan’t to replace it before the loo goes “out of order”.

    Just wondering if this a known problem. It seems like the genuine parts are hard to come by and I see some comments from people on Amazon with similar problems.

    I think the problem is with the material that the diaphragm is made of and the slightly different dimension but not really sure.

    1. Helpful Colin avatar

      Hi Ewan,
      Your quite right when you describe how they used to be packaged. The white stuff would be talcum powder (French chalk). It was always used to stop rubber perishing when in storage.

      I have not been able to get the correct diaphragm with a red pin for some time.

      I added a section to this post entitled ‘Replacing Fill Valve Diaphragms In General’. This highlights the problem with those with a white pin.

      Anyway, I went to the website of Kingsway Plumbing: https://shop.kingswayplumbing.co.uk/armitage-hush-flow-diaphram-washer-1838-p.asp
      I mentioned them in my post as a possible supplier but failed to take my own advice when I couldn’t get a diaphragm. There I bought 3 red pin diaphragms at the weekend and they have been dispatched on 3rd June. I will see what arrives and keep you informed.

  48. Ewan avatar
    Ewan

    Hi Colin,

    Be very interested to know what the parts you receive are like. Since leaving my comment, I phoned Armitage Shanks and was told that they don’t make the valve or any spare parts any more so it’s likely that they are made by other companies. I swung by Screwfix (part supplied by Arctic Products) and they kindly removed their part from the bag. It was identical in every respect to the Wolsley (Center) part that I already have. I am suspicious that there is now only one manufacturer of these parts.

    I also had some correspondence with an ebay company who it appeared were supplying genuine parts. They were unaware that the parts were not genuine and took down the ebay page. After some investigation, it was discovered that their parts came from another company and were not original manufacturer. They are going to send me a couple of parts as a “thank you” for bringing it to their attention. I strongly suspect I’ll just get more parts like the one I have that doesn’t work.

    I also saw a different supplier on Amazon market place where they were presented as genuine parts yet the reviews below all repeated that they didn’t work.

    From what I’ve read, from various sites, the colour of the pin is to do with manufacturer’s batch and not the original supplier. But I’m not sure I believe this because my original two and every photo I have seen on line with red pins also have powdery rubber and every white pin version is shiny black.

    I’ll keep you posted on the two they are sending me and if they are the same, I’ll do some more investigation as to why this type doesn’t work in my valve.

  49. Rich Booth avatar
    Rich Booth

    Hi there,
    We have one of these in our en-suite and recently the system has started overflowing despite installing a new washer. I know the washer isn’t to blame as it works on a identical toilet in the house. What could the issue be ?
    Thanks

    Richard

    1. Rich Booth avatar
      Rich Booth

      I must add that nothing else has changed on the system, the float remains at the same height as previous…
      Cheers

    2. Helpful Colin avatar

      Hi Rich,
      Things that are flexible change with time. Rubber and plastics compress with continual force applied.
      So has the water level gradually been rising and now it overflows? Pull the float up with your hand to see if the incoming water gets cut off.
      If it does then adjust the float so it is further down in the water. The water should then cut off before it gets to the current level.
      If it DOESN’T then either the pinhole at the top of the valve is not being closed when the float is at its highest or there is a problem inside the valve which is usually diaphragm related since there isn’t much else in there – except dirt or calcium maybe.
      Regards, Colin.

  50. John O'Farrell avatar
    John O’Farrell

    Hi Colin,
    I have had the same experience as Ewan in his post of 2 June 2019 with exactly the same part from Wolsley. I have now ordered a couple of ‘red pins’ from Kingsway Plumbing and will investigate the problem further when they arrive and I get the time. Did either Ewan or you have any success with these diaphragms? Thanks for a brilliant site and for all your efforts in helping the wider amateur plumbing community!

    Regards

    John

    1. Helpful Colin avatar

      Hi John,
      I modified the post “Repairing A Toilet Silent Fill Valve” a few months ago after testing diaphragms with white pins in my fill valve which should use a red pin diaphragm. Please read the section “Replacing Fill Valve Diaphragms In General“. It explains how they may be made to work.
      Regards, Colin.

      1. John O'F avatar
        John O’F

        Hi Colin,

        Thanks. When I received the red pin diaphragm from Kingsway plumbing I set about replacing the white pin diaphragm I had fitted in June this year (the original was a red pin but I couldn’t find a red replacement). I was surprised when I opened up the valve and found that the white pin had separated entirely from the diaphragm and had dropped down into the valve body. This is probably why water was spaying out of the pin head area at the top of the valve. Why did the white pin become disconnected from the diaphragm I wondered? I had fitted it the correct way around. Manufacturing failure? Pressure too high at some point during the fill process? Having read your detailed description on how the valve works this seems unlikely. In the past I was told by a plumber that there is a pressure protection valve fitted on the water supply into the house which prevents the pressure rising above 4.5 bar – but I couldn’t find the valve when I looked for it today. The red pin diaphragm is working well – so far! The conclusion has to be if you have a red pin diaphragm then always replace it with the correct colour.

        1. Helpful Colin avatar

          Hi John,
          That’s all very interesting. I wouldn’t have expected that to happen. If you hadn’t had another look inside you’d be scratching your head for a long time to work it out.
          I very much agree with you about swapping diaphragms with those of the same colour. The white ones I’ve got are a very different shape to the the red ones. So in my opinion they obviously can’t be swapped and then be expected to work in the same way.
          Regards, Colin.

  51. SWCE avatar

    Thanks for giving and useful information in your blog, I have given good information, I have read your blog, I liked it very much, I have been following your blog for two years and I love your blogs, I get a lot of information from our cleaning company too. Makes floor cleaning equipment If you have time.
    please visit us;

  52. Andy avatar
    Andy

    Great article Colin. You certainly are Helpful. Thank you for helping me fix my leaking cisterns.

    1. Helpful Colin avatar

      Thanks for the compliment Andy.

      Regards, Colin.

  53. Roy avatar
    Roy

    Hello Colin, I am very impressed with the clarity of your explanations, but I can’t seem to find the answer to MY problem: I have the old Armitage Shanks/Ideal Standard inlet valve (I think the reference is SV62467) which is in 2 parts and has a screw clamping nut on the top part, which itself screws into the lower spindle. It’s quite difficult to replace the whole inlet valve unit with the new (twist top) version because the WC is tiled in. Replacing the diaphragm has not cured the problem of water overflowing into the pan. Do you know anywhere I could purchase the old version valve, so that I could just use the (screwable) top part? Thank you.

    1. Helpful Colin avatar

      Hi Roy,
      Thanks for the compliment.
      I believe I have the original type in my cistern and that was installed about 13 years ago. I’m making the point that it’s an old model. I can’t get proper diaphragms for it anymore. I can see a time in the near future when I will be changing it for a new one. The only way you’ll get an old one is by enquiring with plumbers or merchants to see if they have one on a dusty shelf somewhere. My merchant became buildbase and I feel they had a clean sweep especially since they moved the plumbing office to another site. Even internet sellers who claim to have the correct diaphragms with red pins send me ones with white pins and they aren’t the same.
      If yours won’t stop overflowing then I can only say that I have nothing to add to the post I have written and the replies I have given to others about how to try and force the valve to the OFF position, and how to adjust the float position to set the water level so it doesn’t overflow.
      Kind regards, Colin.

  54. plumbing installation red avatar

    Thanks for this blog. I learned some tips about this blog. I had experienced these problems last week thanks to my friend who help me with my problem. I hope you post more blog helps us. So that we can learn more. Thanks for the ideas you shared with us. It is a big help not just for me but for all the readers who don’t have any ideas about this kind of tips.

  55. Bob Harris avatar
    Bob Harris

    Hello Colin, Your blog is incredibly helpful – keep up the amazing work!
    I’m in the process of trying to replace the diaphragm in my (old-style) Armitage Shanks silent-fill cistern. I’ve removed the top part of the inlet valve and am waiting for a replacement diaphragm to arrive via mail order. In the meantime I thought it might be a good idea to take out and clean the filter in case it’s clogged – the local water is not particularly hard, but it might be useful to check the filter while the inlet valve is partly dismantled.
    The problem I’m having is that I cannot undo the lower plastic clamping nut – I’ve tried by hand, using a piece of thin non-slip rubber sheet, and I’ve tried using a plastic tipped variable wrench, but access is limited and I can’t get a good grip on the nut. I am very wary of doing any damage to any of the plastic fittings at this point. I’ve tried pouring some hot water over it to try to ease it, but to no avail. I wonder if you have any tips or hints for shifting a stubborn part like this…

    1. Helpful Colin avatar

      Hi Bob,
      Sorry I don’t have an easy answer. If you’re operating in conditions where something might break I can only recommend removing the whole valve so you can work on it on a bench.
      If you succeed perhaps some grease (maybe silicon grease or WD40) could be applied to make it easy next time.
      Good luck in these hard times, Colin.

      1. Bob Harris avatar
        Bob Harris

        Hi Colin,
        Well I gave up trying to shift the lower plastic clamping nut for fear of wrecking the valve and
        just waited for the replacement diaphragm to arrive. When it did, it was, of course, one with a white pin. My original diaphragm had a red pin, and having read the various comments in your blog, realised that I had a very slim chance of success. Whereas the original diaphragm fitted tightly in the little red plastic holder, the new white-centred one was quite a loose fit. So, no surprises – the new diaphragm failed dismally: water leaked out through the top cover when filling, and no amount of manual pressure on the float arm would stop the flow.

        So, it looks as if I might have to replace the entire valve, which is what you did, I believe.
        Can you provide any details about the model you used, and where you got it? Also, did your replacement valve screw onto the top of the existing vertical plastic standpipe inside the cistern, or did you have to replace the standpipe as well? As the underside of my cistern is very difficult to access (it sits directly on the back of the WC pan), the ability to replace the standpipe from the inside of the cistern is quite critical.

        My plumbing skills are rather limited, and in the current pandemic situation I’m not sure if I’ll be able to (or want to) call out a plumber. So any details of your new valve and any words of wisdom will be most appreciated.
        Many thanks in advance.

        1. Helpful Colin avatar

          Hi Bob,
          Sorry you’re having a hard time of it.
          Yes, I have written a post advising how an inlet valve can be replaced but I have not replaced this one in this toilet. I have taken it out, cleaned it and put it back. To write that article I’ve drawn on my experience of assembling this toilet from scratch and i’ve worked on other inlet valves on toilets and header tanks. So I feel the info in my post is valid. I might have to replace mine in the future because I’m on my last red pin diaphragm.
          However because I was sent some white pin diaphragms instead of red I tested one and it seemed OK to a degree. What I had to do was adjust the float by a large amount. I didn’t leave the white one in place while I still had a red one I could use. I will try it again when the red one fails.
          In my case the diameter of the red and white ones was the same so I didn’t have any leakage around it. The lengths were different. That’s why I had to make such a large adjustment to the float.
          Also The picture in “Replacing A Toilet Fill Valve” section “2. Bottom Entry Fill Valve” isn’t a picture of my valve. It’s a picture of the later model where, I understand, the top twists a few degrees to unlock it as opposed to mine which is a nut with a screw thread. I’ve had to rely on comments from others to grasp how the newer model functions. You have talked about unscrewing the valve mechanism from the top of the standpipe in the cistern. Well I don’t think mine comes apart like that. Mine dates back to being a pre 2006 model. The standpipe is all moulded with the valve and I think there were two different heights available at the time for two sizes of cistern. Mine was supplied with the toilet by the builder’s merchant.
          So we get down to which one I would choose as a replacement. I would probably remove the old one and take it to a traditional plumber’s merchant and drop it on their counter and take their advice on what the best replacement was. I would take with me the height of the waterline from the bottom of the cistern.
          I suspect you wouldn’t want to take it out of the cistern until you have a replacement so you would just have to tell them the water level height. Under the present restrictions you may be able to order online. It may be best if you can talk to the merchant on the phone about the height.
          Right, I’ve had a look at Victoria Plumbing. They have two interesting models whose heights can be adjusted to suit all cisterns (I hope): The Viva Skylo Bottom Entry and Viva Skylo Dual Entry.
          Victoria Plumbing have explanatory videos for these models which look good.
          Hope all this helps.
          Regards, Colin.

  56. mike markin avatar
    mike markin

    Hello Colin, I am a newcomer to your amazing site, hope I am following the etiquette. I have a rare problem with my SIAMP 99B inlet valve. Now elderly but was a physicist and at last understand from your superb posts how those diaphragms etc work. But they are not my problem! Just recently as the inlet valve shuts off after a flush and refill a tiny hissing stream of water begins out of what looks like a small air bleed on the body of the valve, and runs permanently. I have several new, correct diaphragms, a new lever arm and insert, and also the ability to swap key pieces with an identical, working cistern. None of the new pieces solve the problem, all of the old pieces still work perfectly in the other cistern!
    I can find no mention anywhere of this small bleed and am at a loss to know what it does. (attaching a rubber tube to it and blowing or sucking suggests it is a ‘blind’ hole, but it clearly is not when the cistern is full.)
    It is visible in many photos and diagrams of the 99B, on the main plastic body of the valve, just above the lever arm, and just inboard of the threaded portion leading to the diaphragm. About 1cm long with a 1 or 2 mm hole. (the manufacturers via their website were unable to explain its function!)
    In normal times I would ask a plumber or fit a whole new unit myself, but under total lockdown I cannot receive visitors and am wary of a flood if I disturb the bottom fitting!
    So, any thoughts about this possible function and how I might shut it off would be hugely appreciated! All good wishes, Mike

    1. Helpful Colin avatar

      Hi Mike,
      I’m not familiar with this brand of valve but I’ll do what I can to help.
      You’ve indicated that it’s a bottom fill valve so if it’s a Compact 99B it may look like this: null
      or if it’s a Compact OD99TBP it may look like this: SIAMP Compact OD99TBP
      In both cases I have circled the suspect hole. Please let me know if I got it in the wrong place.
      I presume the two valves you refer to are in every way identical and the good one has no water escaping from this point.
      It may be that the faulty one has a moulding fault where the plastic wall at the bottom of the spigot hole was made too thin and has, for whatever reason, given way with time leaving you with a hole.
      If that is the case you will need to plug this hole. To do that you will need to stop the water entering the cistern and dry the plastic. You would then need to rough up the inside of the hole in the spigot. An appropriate size (2mm) drill bit might do it. Roughing up plastic offers free valency electrons for a suitable adhesive to bond to. You’re probably aware that there are many plastics which don’t bond with adhesives if they aren’t a solvent. I would want to fill it with polyester resin (Isopon), Araldite or some other epoxy resin.
      I’m thinking while I write and of course the simplest action might be to plug it with a matchstick which could be easily removed if that action turns out to be in error.
      Another method would be to fill the hole with hot plastic from a glue gun. Obviously I don’t know what you have available.
      I hope my thoughts on this are some help to you in these difficult times.
      Regards, Colin.

  57. Charlle avatar
    Charlle

    Hi Colin,
    Your webpage proved invaluable to fixing my cistern.
    The cistern was taking forever to fill and using your guidance I was quickly able to attribute it to the diaphragm valve.
    I bought a replacement at Amazon:
    https://www.amazon.co.uk/gp/product/B00B0FP74S/ref=ppx_yo_dt_b_asin_title_o00_s00?ie=UTF8&psc=1
    And fitted it the very evening it arrived
    I was a little concerned that it was described as 32mm rather than 31mm but it proved to be nothing more than the awkward conversion from inches to mm
    The clamping nut took some grunt to shift but your web page gave me courage in my convictions

    Thaks again
    Charlie

  58. Bob Bell avatar
    Bob Bell

    Good stuff. Thanks.

    I am a Chaterered Building Services Engineer. Our 3 toilets (and bathrooms) are Armitage Shanks (AS) and were delivered direct from the factory in 1996. They came with all the AS fittings. One of the two Tiffany 1775 toilets was making a squealing noise as it finally filled. A change of diaphragm and some cleaning did not fix this completely so I ordered a direct replacement for a Tiffany 1775 (it is embossed on the tank lid) from FixTheBog. It was more expensive than a Torbeck but it was genuine.
    When I went to fit it, the shank (feed pipe) was 1/ 7/8″ not the original 2″ and the silencer pipe was on the wrong side and fouled on the tank wall – not a retrofit at all. I have checked and all the other bottom feed AS valves here (Tiffany 1775) and in my neighbour’s house have a 2″ shank. Without replumbing I could not connect the water feed without a 4mm gap! I might have been able to swap the position of the silencer pipe through 180 degrees but there was no point if the connection is too short.
    FixThe Bog says it is the right valve for a Tiffany 1775 but the facts say it is not. I would have liked nothing better than for it to fit. I went out and bought a Torbeck – cheaper and no problem.
    I am sure that FixTheBog acted in good faith when they said it was a replacement for an AS Tiffany 1775. If they had published the shank length I would not have bought.
    FixTheBog offered a full refund but this does not include my postage from them or back to them, so I am £5.50 short.
    The moral here is don’t be beguiled by offers that something is a retrofit. Check the shank length. The spec might have changed or maybe Ideal Standard has rationalised its products when it took over AS.

  59. Chris Briggs avatar
    Chris Briggs

    Hi There
    Having problems altering the fill level. Using the hexagonal adjustment nut but the plastic which stops it being screwed down too far meets the plastic below very quickly and before it allows water to get into the fill level. IT is almost as if the long threaded plastic stem which the hexagonal nut sits on is too low and near the bottom. Any ideas before I give up and call a plumber in please?

    1. Helpful Colin avatar

      Hi Chris,
      Here’s a picture of mine taken today.
      I take it yours is screwed down until the float is touching the bit of plastic labelled “Stop” in the picture. It’s stuck on the side of the screw thread like an afterthought. More up to date versions may be different.
      If the inlet valve is new then it might be too short for your cistern. They do come in varying lengths because cisterns have varying depths of water by design.
      If it’s an old inlet valve then I would have expected there to be a problem where you were trying to push the float down further to make the water stop filling before it overflowed. In your case if it is old then the only part that really deteriorates in use is the diaphragm. You’ve not said if you’ve had the diaphragm out or not.
      As you can see from various comments getting the correct diaphragm can be difficult. So good luck.
      Regards, Colin.

  60. Martin avatar
    Martin

    Hi, I am really struggling to find a diaphragm for my ideal standard toilet. The old one, which is now In bits, is like the red pin one in your comparison photo. The replacement I ordered look like the white pin one. None of the illustrations look like the one in your picture! Plus I’m trying to not go to the shops cos of Covid.

    1. Helpful Colin avatar

      Hi Martin,
      I empathise with you about going to the shops. I’ve not been to my DIY haunts yet.
      I think you have a very poor chance of getting a red pin diaphragm. I’ve tried to buy them and been sent white pin ones.
      Because of that I’ve tested a white pin one in my valve and written about it in the section “Replacing Fill Valve Diaphragms In General”. Following Pic. 8 I wrote: “So I have tried a white pin diaphragm in my fill valve which should have a red pin diaphragm in it. It did work after I had adjusted the Float Adjusting Screw considerably. I had to screw it out of the float by about 3 cm.” I’ve highlighted that paragraph.
      I’m sorry I have little more to offer apart from suggesting you get a new valve.
      Regards, Colin.

      1. Bob Harris avatar
        Bob Harris

        Hi Martin, I was in exactly the same position back in April. I could not find any red-pin diaphragms, but got hold of some white ones as the only option. I found that their fit in the valve was not great, giving leakage out of the top of the valve and failing to close off the supply when the float arm was at its upper position. I adjusted the float arm as Colin described, but still had leakage through the valve.

        In order to get a more snug fit for the diaphragm in the red holder, I wound some doubled-over PTFE tape around the central area of the diaphragm, so that it was held tightly in the red holder. I also wrapped some around the outer perimeter in an attempt to stop any leakage around the outside. When I tried this I found that the leakage through the top during filling was hugely reduced, and that the valve did actually shut off cleanly.

        The valve has been working in this way since April. It does have an occasional slow, scarcely audible drip into the cistern, but nothing too serious. I realise that this has to be regarded as a short-term solution until I can get the entire inlet valve replaced. But in the present COVID situation that will have to wait until I can more safely arrange a plumber’s visit.

        I hope this is of some help. Regards, Bob

        1. Helpful Colin avatar

          Hi Bob,
          Thanks for helping Martin with some wise words.
          Regards, Colin.

    2. Helpful Colin avatar

      Hi Martin,
      Just letting you know that Bob Harris has tagged on a worthwhile message for you so please revisit my post and follow the comment thread you started.
      Regards, Colin.

  61. Antony Reid avatar
    Antony Reid

    Who is the manufacturer of this particular inlet valve?

    Not once has it been mentioned in any post, I need several parts but because I’m unable to access the underneath of the systern to replace the whole unit my only option is to purchase a replacement and use the parts I need, I just need to know the manufacturer, a name of the valve might also prove useful as would a place of purchase.

    Thanks for any help you can offer.
    Antony

    1. Helpful Colin avatar

      Hi Antony,

      As far as I am aware the fill valve supplied with my Armitage Shanks Ascania toilet was supplied by Ideal Standard. The supplier was Lakes Builders Merchants, now part of Buildbase, Parcel Terrace, Derby. The model I have was popular around 2006 but has since been superseded. I’m sorry I didn’t make a note of the original part number. I think it’s unlikely that you will get any parts for it unless you find someone who deals in used parts.

      Regards, Colin.

      1. Antony Reid avatar
        Antony Reid

        Thanks for your reply Colin, yeah my house was built in 2006 so I believe your info is accurate, I’ve seen the updated version of this inlet but it’s of no help to me, your pictures are the only ones I’ve found on the net,
        Oh well, I’ll have to rip the whole we out and start again, this is what I’ve been trying to avoid.

        Thanks again.

        1. Helpful Colin avatar

          Good Luck with that one Antony.

  62. Sa avatar
    Sa

    This help column is phenomenal. Solved the problem with replacing diaphragm with a new one advised in the description. Also introduced a small flat circular plastic piece at the base of the stopper rubber To improve protrusion from the arm. I had the feeling that stopper rubber went in too much and unable to close pinhole. All actions made possible thanks to what I learn reading this page. Than you.
    Loads of water waste will be avoided thanks to this.

    1. Helpful Colin avatar

      Well done SA,
      I think padding out the rubber stopper a little bit is a good idea.
      Regards, Colin.

  63. Ned avatar
    Ned

    Hi Colin,
    Looking at the images I think I might have same model of inlet valve as presented on pictures.
    However, I am failing to unscrew the clamping nut, no matter how hard I try. I don’t see any detent which might prevent opening it. Did it fuse over the course of many years?

    https://imgur.com/a/lAr7Y9n

    1. Helpful Colin avatar

      Hi Ned,
      Please look at my post entitled, “How A Toilet Cistern Silent Fill Valve Works.
      Look in the section, “Basics About The Valve.” There is a picture of a valve entitled, “Toilet Silent Fill Valve With Bottom Entry.”
      This valve does not have a screw cap. Those like mine with a screw cap are older. I couldn’t find a good picture to depict mine so I used this one. The head where you would expect to find the screw cap is much thinner. I think there is just a small twist required to unlock it. I would presume it is anticlockwise but I don’t know. I haven’t handled one.
      If yours is one with a screw cap it will have a fatter head. The only thing that can stop it turning is calcium build up on the outside. Both parts just have a regular plastic screw thread. The cap is like a nut so you can get a spanner (wrench) on it but you would need another wrench to hold the body still or it may come adrift at the bottom where it’s fixed to the cistern.
      If you’re really struggling you may have to take it out of the cistern to work on it on a bench to prevent breaking the valve.
      When you reassemble it put a lubricant like petroleum jelly on the thread to help you undo it next time.
      Regards, Colin.

      1. Ned avatar
        Ned

        Hi Colin,

        Thanks for your useful suggestions, – I think mine is with fat head, might be around 50mm in diameter. I don’t have wrench with such big jaw – looking at some DIY shops for one.

        I think it is calcified, and even if I could get better grip on it without wrench, I fear I could break the whole thing. Especially as I see that a pipe coming out of the toilet is moving slightly as I move it. I am not sure if the whole inlet could be removed – seems as if sealed to bottom, does not show signs of letting go.

        To make it more difficult, I don’t see a way to turn off water only for toilet. Pipe coming into the toilet does not have any control to turn water off, the only way to stop it is to turn off cold water for whole house (Ireland).

        So my best bet might be a wrench. I wonder if it can be decalcifed if I am able to somehow apply warm water + vinegar?

        1. Helpful Colin avatar

          Hi Ned,
          I think you could make good improvements here on a nice summer’s day. By that I mean employ a modern flexible connector with a built in tap at one end. Then you can always turn just the toilet off.
          I’ve worked on all my feeds to sinks, toilets, washing machines, showers, etc. over the years and put some form of tap on them.
          Calcium is very hard and difficult to remove. The problem with any liquid is it runs off and fails to do the job. We need someone to make descaler in the form of a gel. You might chip some of it away with a small screwdriver. I use Betterware descaler until its all used up. Betterware are out of business now. Its main purpose was for descaling Steam Irons and Kettles, etc. Search the net for Multipurpose Descaler.
          You might be able to use Mole Grips for a wrench, but they tend to chew the plastic up with their teeth. They may bite into the scale. They may also grip the tube while a spanner is used on the nut. Working in a confined space is a big issue. That’s why taking the valve out of the cistern can help. Trouble is when you’ve got to have it working again at the end of the day. You wouldn’t want to remove the valve only to find the rubber sealing washer was damaged and couldn’t be re-used without you had a spare one.
          Good luck Ned.
          Regards, Colin.

          1. Ned avatar
            Ned

            Hi Collin, I was able to unscrew it with set of pliers, guided by your suggestions and instincts. I examined black rubber thingy with red dot, and black rubber is indeed damaged, has a mouth opening some 1,5 cm wide.

            The thingy itself is ~32 mm in diameter and some ~10mm tall (black piece part), by any chance you know which model is it?

            And yes – installing a tap sounds like a good idea to me 🙂

            Thanks Colin!

            Images: https://imgur.com/a/jYC69sG

            1. Helpful Colin avatar

              Hi Ned,
              I’m glad you got it dismantled. Well done. And you can clearly see the problem.
              Regards, Colin.
              P.S. See my reply to your next comment.

  64. Ned avatar
    Ned

    I am looking at

    old model
    https://www.fixthebog.uk/armitage-shanks-32mm-1-1-4-inch-hushflow-uv-cistern-inlet-valve-washer-quite-valve-hushflow-float-diaphragm-univalve-sv21267-washer/

    new model
    https://www.fixthebog.uk/armitage-shanks-ideal-standard-univalve-qt-cistern-inlet-fill-valve-diaphragm-washer/

    and am bamboozled, but seems that i fall into description where i needed to unscrew the fat top to get to it, which might indicate old model?

    Also seems to me after blowing up the image many times, that they have slightly different profile looking from bottom.

    1. Helpful Colin avatar

      Hi Ned,
      In my opinion the red one is the one you want. All the white ones I’ve seen have got different height dimensions. But I have tried a white one and it seemed to work after I made a big adjustment to the float height.
      See Pic. 8 in Repairing A Toilet Silent Fill Valve.
      I’m using my last red one now. Then I’ll start on the white ones and see how it goes. I think I got mine from Fix The Bog. They’ve changed their site wording since I last looked and it seems like they are trying to help. All you can do is follow their instructions and see what happens. I’ve not found a red one for a long time.
      Regards, Colin.
      P.S. I bet you need the old one ‘cos the one you removed is red. But it may be prudent to buy one of each.

  65. Ned avatar
    Ned

    Hey Colin,

    I thought so. I might get both of them just to be safe, but I bet on the red one. I checked other 2 toilets which I have. They are all different 🙁 But one of them might be candidate for a white one. The other ones are not an issue yet.

    Btw, I was able to apply glue on the cut that my valve had, I used water resistant B-7000 glue which originally I used for mobile phone diy. Cut was clean and I was able to apply it carefully with magnifying glass. I left it only for cca 1 hr, as water flow there is killing me, but seems my temporary fix is holding up, toilet fills up and stops perfectly.

    So thanks again for your help, I liked informativeness and detailed approach. Keep up the good work!

    1. Helpful Colin avatar

      Hi Ned,
      It’s been a pleasure helping you.
      Great perseverance.
      Regards, Colin.

  66. Ned avatar
    Ned

    Hey Colin, just for these who will come here and wonder.

    Don’t try to glue it like I did, Water found the way through it in less than a day
    .
    “Fix the Bog” delivery is expensive DHL but it came from UK to Rep. of Ireland in 1,5 days.

    So I post the image for clues which one is old and which new model.

    It seems to me and proven by examining and comparing my old valve with 2 ones from Fix the Bog that the old one has flat rim, while new model has visible extrusion.

    https://imgur.com/gallery/EFocqGJ

    I hope it helps.

    1. Helpful Colin avatar

      Hi Ned,
      Well I hope it does the job for you. I’m glad it didn’t take too long to arrive. I know there are issues getting stuff to Ireland.
      Have you had to make a big adjustment to the float position?
      Regards, Colin.

  67. Chris avatar
    Chris

    Hi Colin,

    Just wanted to say thanks. My 10 year old fill valve had stopped shutting off the water. I assumed I would have to change the entire unit which would have been horrendous as due to the (essentially concealed) position of the mains pipe it would effectively have required dismantling the toilet. Never actually realised you could just change the diaphragm.

    Old one had a red pin with ridges. I ordered what I thought was the same fill valve (based on the picture on the webpage) but they actually sent me a newer model which had a white pin. Swapped the new diaphragm in, required some adjustment to the level as you say, but all good now.

    Looking forward to reading your post “How A Toilet Cistern Silent Fill Valve Works” with the diagrams and such – who knew these things could be so complicated!

    Cheers,
    Chris

    1. Helpful Colin avatar

      Hi Chris,
      I’m glad you had success.
      The post you are about to read is my best deduction based on simple principles. If there’s anything you don’t like about it just say.
      Regards, Colin.

  68. Nick avatar
    Nick

    Hi Colin,

    I think I have worked out the mystery of the two different diaphragm valves and the ridged valve. It seems that the valve dimensions were changed when they changed the valve housing over from a screw fitting (Hush Flow) to a quarter turn fitting (Univalve). According to one supplier (fixthebog) the colours (red or white) don’t matter at all (they just change with year of manufacture) but you do need the larger diaphragm for the newer type quarter-turn valve housing. And the ridges, which are only found in the quarter turn housing, seem to be simply the diaphragm wearing over time, so the rubber forms itself into the ridges. Take a look at the info bottom right of this page

    https://www.fixthebog.uk/armitage-shanks-32mm-1-1-4-inch-hushflow-uv-cistern-inlet-valve-washer-quite-valve-hushflow-float-diaphragm-univalve-sv21267-washer/

    I hope that saves someone some pain.

    Nick

  69. Huw Pritchard avatar
    Huw Pritchard

    I have a Siamp fill valve which was, well, not filling, or doing it at a snail’s pace

    I replaced the damaged diaphragm washer, but this hasn’t worked

    It seems to me there is just not enough water being sucked up quickly enough by the filler into the tank. If I leave the water turned off for an hour or so, then switch it on, the tank will fill quickly enough, without needing a flush. If I flush again though, immediately after doing this, no water enters the tank

    I’ve done my best to screw the new wash in tightly, aligning the various parts of the assembly. There is a slight dribble from the assembly, but I wouldn’t have thought it would make that much difference

    Any ideas?

    1. Helpful Colin avatar

      Hi Huw,
      I’m not familiar with the Siamp valve but I found these two videos.
      1. This video describes your problem but it has a faulty valve. You’ve replaced yours so you might have to look more closely: https://www.youtube.com/watch?v=2eyB9L-GcR8
      2. This video just describes how to fit a new valve. It may or may not help: https://www.youtube.com/watch?v=FyK08nwy9Os
      Please let me know how you get on. Good luck.
      Regards, Colin.

  70. Huw avatar
    Huw

    Aha! The first video you suggested made me think afresh about what exactly was happening, and where it was happening

    I had a look again, and discovered a small blockage in the tiny pinhole in the bits that hold the lever. I picked this out with a sewing needle, reassembled the bits, and hey presto – fills up nicely now

    Can’t stop flushing it now. We have family coming over later so I’ll make sure they all use it 🙂

    Thanks as every for your inspiration and support!

    1. Helpful Colin avatar

      Hi Huw,
      Success feels good, eh?
      Regards, Colin.

      1. Huw Pritchard avatar
        Huw Pritchard

        Thumbs up!

  71. Andrew Carroll avatar
    Andrew Carroll

    Awesome help.

    I am struggling to unscrew the clamp on the silent fill valve. I have moved the arm out of the way.
    I’m paranoid about snapping the unit.

    Any advice?

    Thanks

    1. Helpful Colin avatar

      Hi Andrew,
      If it’s like mine it should unscrew but petrifying calcium may be jamming it. Grease the plastic thread with some petroleum jelly or silicon grease when you reassemble it.
      If it’s a twist and turn cap: Go to “Repairing A Toilet Silent Fill Valve” Picture 15. This is apparently what the cap looks like when it has been removed. I have never seen a real one but maybe it can be turned either way to remove it. Sometimes caps like this have to be pressed down before they will turn.
      There is also a video of a plumber taking one apart on that post following picture 15. Watch which way he turns it.
      Good luck.
      Regards, Colin.

  72. Phil avatar
    Phil

    Hey Colin.
    This is how all help articles should be written. Thank you.
    My problem was that the cistern continued to fill (and overflow into the bowl) following a flush.
    Inspecting the diaphragm washer, I could see no sign of splits or calcium build up, (the toilet is 11 years old so it’s doing pretty well!), so I assumed wear or hardening of the rubber.
    I took the valve apart and replaced the red pin diaphragm with the white pin diaphragm (part 1331J from Screwfix)
    This did not fix my problem, and so my search brought me to your amazing page.
    Only at this point did I realise the presence of the pin hole and rubber seal at the top of the lever arm.
    On inspection I noticed that there was a pronounced concave ‘hole’ moulded into the rubber from the pin hole itself.
    The rubber seal sat about 2mm into the white plastic housing. Here I removed the seal from the plastic body. I took a small square of PTFE tape and screwed it into a small ball and shoved it into the rear of the seal. On reassembly, the seal now sat about 1mm into the housing, thus closing the gap between the seal and the pin hole.
    This seemed to fix my problem and without your, and others’, help I would’ve not have been able to work out where the problem was.
    Many thanks

    1. Helpful Colin avatar

      Hi Phil,
      Thanks for keeping us all informed.
      It seems like a reasonable fix to me.
      Regards, Colin.

  73. Mark Roscoe avatar
    Mark Roscoe

    Hi Colin
    Thanks for a very informative website. I have the same problem with the cistern keep filling, albeit very slowly. The inlet valve I have is exactly the same as in your pictures so I built up the courage and dismantled the inlet valve (compression style fitting). I found the diaphragm badly perished. I have replaced the diaphragm with great difficulty as it was jammed-in (red pin) with a new diaphragm (white pin) Part SV21267. This appears to have made the situation far, far worse as water pours into the cistern with no sign of the water flow stopping. Can I therefore please ask:-
    1. Have I missed a trick somewhere?
    2. Do you know what the part number of the inlet valve is so I can buy a new one and replace the whole top fitting assembly?

    Many thanks
    Mark

    1. Helpful Colin avatar

      Hi Mark,
      I’m sorry to hear you’re in this difficult situation.
      1. Have you missed a trick? The domed head of the pin must face towards the incoming water to be the right way around.
      2. No I don’t know the part number. It is so outdated I doubt you’ll get the same model.
      After fitting a white pin diaphragm be prepared to make a lot of adjustment to the float level. However with the float out of adjustment you should be able to get the water to shut off by closing the small hole at the end of the cone by operating the leaver controlling the rubber stopper manually or by covering the hole with your finger or something similar. That will prove if the new diaphragm is suitable.
      When I next have a diaphragm problem I will try using a white pin diaphragm that I have ready. If it fails I will be prepared to start afresh with a completely new inlet valve.
      If you can compare your white and red diaphragms you will probably find that the black rubber parts are not identical as I have found.
      I got my white diaphragms from ‘Fix The Bog’ as I recall.
      Good luck. I’m sorry to say you’ll need it.
      Regards, Colin.

      1. Mark Roscoe avatar
        Mark Roscoe

        Hi Colin, many thanks for the reply.
        I have dismantled the assembly again.
        The diaphragm is the correct way round (dome of the pin facing the incoming water). I could not compare the two diaphragms exactly as the one fitted had badly perished, but they looked very similar size wise.
        I have re-assembled everything, slightly tighter than before, but do not expect it to achieve anything.
        I have ensured that the “silent-fill” arm and inlet tube are fully secured, (this appeared not to be fully located). So I will try again!!!

        Just tried it and it shuts of fully. Could it have been the output tube/anti-syphon tube not being correctly fitted?

        Once again, many thanks.
        Mark

        1. Helpful Colin avatar

          Hi Mark,
          It’s nice to know you’ve had success.
          I think that if the anti-syphon tube was badly fitted you may get noise and water sprayed around, but it would work normally and shut off.
          Maybe the extra tightening has sealed the diaphragm in its location. You don’t want water passing around its outer edge. Bob Harris seems to have had a problem in that area.
          Regards, Colin.

    2. Bob Harris avatar
      Bob Harris

      Hi Mark,
      I had the same problem nearly two years ago.
      The red pin diaphragms seem pretty much extinct now.
      Like you, my initial fitting of the white pin version failed dismally.
      However I managed to get it working by winding some doubled-over PTFE tape around the central area of the diaphragm, so that it was held tightly in the red plastic holder. I also wrapped some around the outer perimeter to stop any leakage around the outside. When I tried this I found that the valve did actually shut off cleanly.
      It might be worth trying this before you go down the route of replacing the whole valve.
      Good luck and best wishes, Bob

      1. Mark Roscoe avatar
        Mark Roscoe

        Hi Bob
        3 days in and everything is working as it should. I have no idea why it’s working now but didn’t on the first try. Perhaps the extra tightening did the trick.
        Thanks to you and Colin for your support during this endeavour.

        Many thanks
        Mark

  74. Andy G avatar

    Hi Colin, I’ve just had the problem of my Armitage shanks toilet filling up really slowly, I took the filling float arm off by unscrewing the head , found the washer with a red centre pin showing, I looked online before removing it , and so many sites show these rubbers with red plastic centres and white , also the information says it does matter what colour the plastic centre is, well after buying two white centre rubbers , the centre pin tip is slightly bent over, and the tip is flattened , the red original unit is a straight pin sharp straight tip, but I tried the new white pin rubber, and the cap once fitted showed leaking around the top of the cap, but it worked after lifting the float arm up several times , BUT after a day , not filling again , took the cap off and the white plastic pin out of the rubber had gone ! Not in the cistern , but once the rubber removed and the water slightly turned on the plastic pin came out the incoming fill stem ,this happen twice over several days , I’ve hunted , and hunted and finally found a red plastic centre smooth rubber in a old plumber merchants , it cost £2.50, but I’d have paid £10.00 for it , they hadn’t any more spares , once fitted perfect, ps I had changed the rubber billet in the arm as well that came from fix the bog , with the white plastic centre rubber. Why can’t you get the red centre rubbers anymore

    1. Helpful Colin avatar

      Hi Andy,
      Congratulations for trying really hard to get the correct diaphragm. I’ve observed them getting harder and harder to obtain. I can only presume that valve is seen as obsolete. I’ve still got my original from 2006, but many diaphragms later I’m considering a new valve next time around. My problem is with the height of the cistern. I need a 14inch high bottom fill valve, so I am limited to certain brands.
      Again, well done.
      Regards, Colin.

      1. Ewan avatar
        Ewan

        Very impressed that Andy managed to find a red pin version. The rubber is a different material and I think that’s what makes the difference. they last much longer. I managed to get some samples of the white pin version about 4 years back. I am on the second one now and that is starting to show signs of failure where the filling process takes longer and longer to start.

        I think the valve assembly is now obsolete and unless you have a rarely used cistern, then the white pin diaphragm needs replacing regularly. I have bought three more to keep me going as I have become quite adept at replacing them quickly and the cistern is in quite a tricky place to replace the whole valve assembly.

        1. Helpful Colin avatar

          Hi Ewan,
          Bottom fill valves can be tricky to access especially if the toilet’s in a corner. I like how modern valves often have a 45° cone as a seal. I’ve fixed cisterns in the past with flat seals and had to use Red Hermetite wax to get a good seal.
          Your correct – I think this valve is obsolete.
          Thanks for your comment.
          Regards, Colin.

  75. Andy avatar

    Hi Colin, amendment , so many sites show these rubbers with red plastic centres and white , the information says it does not matter what colour the plastic centre is, as it’s a manufacturing age indication, I don’t know if that’s true for the later type quarter turn arm release, but the early fully screw type fill units look like only the red centre straight centre pin diaphragm rubbers will do the job, unless anyone knows different . Ps thanks for the blog.Andy

    1. Helpful Colin avatar

      Hi Andy,
      I think your conclusion is correct. I have the original full screw fit valve and my red diaphragms have measurably different dimensions to white ones. Mine started out with a red one, now I’m on my last one. I’ve never handled one of the quarter-turn models, so I have to rely on comments like yours to give me a good picture of how they behave.
      So, thanks for the information.
      Regards, Colin.

  76. Chris avatar
    Chris

    Just to say thanks for the information – allowed me to fix my issue with a bit of taking apart and cleaning
    Cheers!

  77. michael edwards avatar
    michael edwards

    hi colin i replaced my red type washer with a white after 2 days this failed as the as the plastic white pin had pushed through the washer into the water fill pipe. any ideas thanks

    1. Helpful Colin avatar

      Hi Michael,
      I’m sorry I can’t account for this. Do you think water pressure caused it or something else?
      Will the pin just fit bak in? Perhaps another new one will be OK.
      I’ve always thought there’s no real substitute for one with a red pin.
      I will probably change my fill valve completely when I get my next problem. My problem will be getting one with an extra long stem.
      Regards, Colin.
      P.S. Sorry for my late reply.

  78. michael edwards avatar
    michael edwards

    thanks i intend to change the fill valve at the weekend not worth messing with these white 3 have failed

    regards michael edwards

  79. Ewan avatar
    Ewan

    Hi,

    I’ve had that problem too. I had an old worn washer with a red plastic insert so cut it out and put it in place of the white insert. This worked ok and didn’t fall out. But overall, I’ve had quality issues with a number of the white plastic insert diaphragms. I recently bought four and only two of them worked ok. The other two seemed to have a delay before the fill started which got worse over time and one of those was the one I replaced with the red insert. So it seems that the quality issue is with the black neoprene moldings not the plastic bit in the middle.

  80. Neil avatar
    Neil

    Really helpful guide, thanks very much

Leave a Reply

Your email address will not be published. Required fields are marked *

This site uses Akismet to reduce spam. Learn how your comment data is processed.