Preface
This post describes: Replacing a Toilet Fill Valve with a new one.
I have also written another article about How A Toilet Silent Fill Valve Works which is appropriate to a specific type of fill valve.
Introduction
I have already written about making a Toilet Silent Fill Valve Repair, but whether a toilet fill valve is silent or not it can’t always be repaired. So I have written this article about replacing a toilet fill valve to help those who need to get a new one.
“This operation can involve spilling CLEAN water. So be warned and be prepared.” — HC
Tools Required
Not all procedures described here have to be undertaken, but to cover all procedures you may require:
- Rags or old towels to mop up water,
- A bucket to collect more water than you expect,
- Small, medium and large adjustable spanners,
- A locking wrench,
- A flat bladed screwdriver,
- A stopcock extension handle,
- A torch.
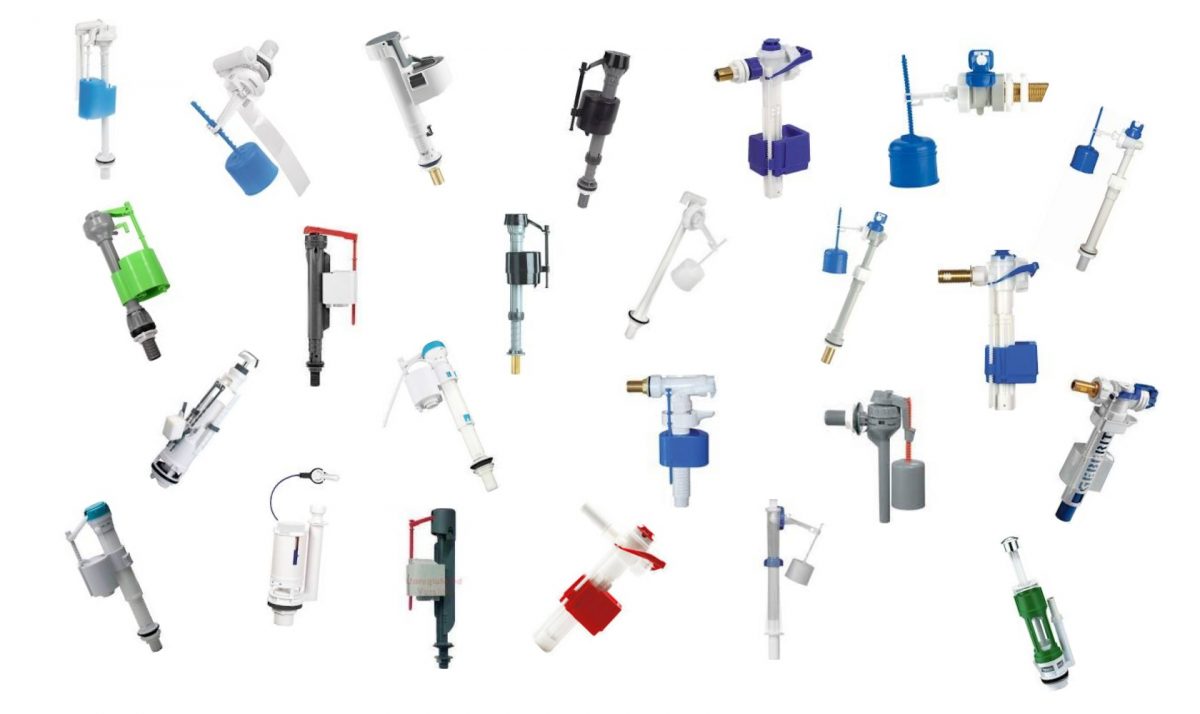
Buying A New Fill Valve
There are two basic types of fill valve:
- Side Entry,
- Bottom Entry.
1. Side Entry Fill Valves

These are fixed in a hole on the side of the cistern above the water line. They can be very accessable when replacing a toilet fill valve.
This was the common method used in the past when toilets and bathrooms were not so esthetically pleasing as they are today and visible pipes were acceptable. It’s common when the cistern is not close coupled to the pan.
Making a good seal is not quite so important because the water level is usually below the level of the hole in the cistern. The valve can also be worked on with water in the cistern if necessary.
2. Bottom Entry Fill Valves

These are fixed through a hole which is always below water in the bottom of the cistern. So these are not so easy to access when replacing a toilet fill valve. Even so, bottom entry with a close coupled pan is, in my opinion, most desirable. It allows the cold feed to be mostly out of site and can be very neatly done when a flexible hose is deployed.
However the fixing of the fill valve in the bottom of the cistern must be watertight. The seal is effected by use of a compressible synthetic rubber washer placed on the thread first before the fill valve is presented to the hole from the inside of the cistern. These washers are sometimes conical on the side presented to the porcelain. That helps them to centralise in the hole which is usually slightly larger in diameter than required for the screw thread. The nut on the outside of the cistern may have a ridge moulded on it which is a good fit in the hole to ensure the fill valve is centralised.
Bottom entry fill valves are made with different heights according to the cistern shape. Some cisterns are low and wide and others are tall and narrow. They may hold the same volume of water but the water levels in differing designs may have a 50mm or more height difference. That means they can’t be served by a single fill valve design, so there has to be more than one length of stem available.
Upgrading The Fill Valve
It’s usual to replace like for like when replacing a toilet fill valve but times move on and some old brass fill valves (especially side entry brass ball valves) are perhaps best replaced with modern plastic valves that take up less space and can be silent and quick to fill.
The Size of The Fill Valve
It’s important to make sure that the new fill valve can operate in the space available with the cistern lid in place. e.g. a modern small fill valve could be replaced with a plastic ball valve (it might be cheaper), only to find the top of the ball fouls against the cistern lid before it shuts the water off. Then money and time are wasted.
Where To Buy A Fill Valve
A new fill valve can be bought from:
- online shops (found on the internet by searching for “toilet fill valve”),
- builders merchants (found in Yellow Pages/Phone Book or on a trading estate),
- DIY shops (found in Yellow Pages/Phone Book or in a retail park),
- hardware stores (found in Yellow Pages/Phone Book or on the high street).
Before Replacing A Toilet Fill Valve . . .
Take Water Out of The Equation
If you want to stay dry and keep your floor dry when replacing a toilet fill valve you must turn OFF the cold water supply to the toilet, then empty the toilet cistern by flushing it.
Provide An Alternative Facility
You must also consider how you will provide an alternative toilet facility for occupants of the property in the short-term (and in the long-term in case it doesn’t go too well).
Remember you can always flush a toilet with a bucket of water which can be filled from a bath tap, and it doesn’t have to be cold water or drinking water, i.e. the bucket could be filled from a nearby stream, pond or well. (Be careful not to fall in the well – use a rope.)
Turning OFF The Cold Water Supply
Here are six methods of turning off the water supply before replacing a toilet fill valve:
- a flexible hose isolating valve,
- an inline isolating valve inserted in the fixed rigid pipework,
- the mains stopcock for the premises in the form of a traditional tap handle that can be turned,
- the mains stopcock for the premises in the form of a stopcock operated by a remote switch (these don’t require electricity),
- the external stopcock in the street provided by the water authority.
- desperate people may try a pipe freezing kit designed to freeze the water in the pipe to create a temporary blockage to hold the water back. I have never been that desperate.
They are shown in the order of ease of use:
- devices 1 and 2 may or may not be available but could be provided for future use while replacing the fill valve,
- devices 3 and 4 should always be available but maybe hard to locate.
Below is a detailed description of each:
1. A Flexible Hose Isolating Valve

The best way to turn OFF the water when replacing a toilet fill valve is with a local stop valve. If one exists it could be part of a flexible hose. It can be turned off by turning the screwdriver slot a ¼ turn (often in either direction) until it is across the pipe. See below:

This doesn’t affect the water supply to other parts of the property. Then the hose can be uncoupled from the fill valve.
If old pipework has a rigid connection to the cistern without a local stop valve then it can often be easy to fit a hose with a stop valve at one end. There is then the benefit of the stop valve and a better seal to the fill valve than a rigid connection gives. The last 150mm to 200mm of pipe to the cistern have to be cut off and the pipe end cleaned of any paint, dirt or corrosion. The tap end of the hose will then fit on the pipe with a compression fitting.
2. An Inline Isolating Valve

Alternatively the 15mm feed pipe could have a stop valve, with compression fittings, inserted in a nearby location. It can be turned off by turning the screwdriver slot a ¼ turn (often in either direction) until it is across the pipe. This doesn’t affect the water supply to other parts of the property.
3. The Mains Stopcock (Stop Tap)

Without an individual stop valve the mains stopcock may have to be used. First it has to be located. It will be mounted on the incoming water pipe at or very near to the point where it enters the building or apartment and usually near the floor. This is likely to be:
- under the sink,
- in a larder or cupboard beside the sink,
- in a downstairs toilet,
- in a cubby hole,
- under the stairs,
- next to another service such as gas (but don’t turn the gas off by mistake),
- in your neighbour’s premises (when premises have been divided in two) and may cut their water off too,
- for a flat – outside the rooms of the flat. It might also affect other flat’s water supplies. Check with neighbours before using it.
“My stopcock was in the larder next to the sink unit when the house was built. It’s still the same one, in the same place, but I demolished the larder and put a tall oven unit in its place. So I cut the back and bottom shelf away when I installed it to expose the stopcock and adjacent gas meter.” — HC
Who Is Responsible For That Stopcock?
In any premises responsible person should ensure that the stopcock can be turned off by anyone who may have to do it. That person should make others aware of where the stopcock is located and how to turn it off and ensure that it is in a fit state to be used and can be turned off.
“It’s important that all responsible household members know how to turn off their stopcock in case there is some unexpected water leak while they are in charge of the premises.” — HC
For those who have no knowledge of stopcocks here is a short video of a plumber demonstrating the turning OFF and ON of a stop tap.
Here is some advice from the UK Housing Executive.
Freeing Up The Mains Stopcock
The mains stopcocks in old properties sometimes haven’t been turned off for years and they can be corroded and covered in lime scale (from persistent leaking) which prevents them from being turned by hand. Then, when force is applied by a wrench the cock handle breaks off leaving a square ended spigot to be turned with an adjustable wrench.
Tip: When it is known in advance that the water will have to be turned off at the mains stopcock it can be given the once over a few days before the fill valve is changed. It may need to be made to turn in stages so it doesn’t break.
Be warned too much force with a wrench can break an old mains stopcock so that you end up with a gusher. That could cause endless damage to a great kitchen or ruin rooms below if it is upstairs or in a flat.
Check if such damage would be covered by insurance.
These stopcocks can be made from brass or gunmetal. Gunmetal is best because it doesn’t get weakened like brass by dezincification.
Try and scrape, chip or hack any calcium/corrosion off the spindle that has to be turned. At the same time try not to damage the metal with cuts into it from hardened steel as that may make it difficult to get a good seal around it later. Wrap some fine wet and dry abrasive paper around it and twist it on the spindle with thumb and fingers to clean the metal.
Lubricating The Spindle
If it won’t move immediately put some WD40 (or thin vegetable oil) on it a few days in advance. Then when a few days have passed try turning it with a strong hand. There is absolutely nothing to be gained by applying enough force to break it. Loosen the gland nut with a small adjustable spanner. If it just begins to give a fraction you’re onto a winner. Work it clockwise to shut the water OFF. The spindle will go into the stopcock and appear shorter (that’s why it needs to be free of calcium/corrosion – to let it go in.) Then work it anticlockwise a bit. Once you’ve made it budge you should be able to improve its travel by working it back and forth.
Tip: Use vegetable oil to lubricate since mineral oil can degrade some synthetic materials over time (e.g. synthetic rubber) used to make the gland. Can WD40 degrade it? Who knows.
Safety Notice: If WD40 or oil is used while the stop valve in the street is turned off then it could get past the gland while the water is at low pressure and contaminate the drinking water supply. So when the water supply is turned on, and back to normal, let the water run fast out of all the taps for a few minutes to flush any contaminant away.
The Gland Around The Spindle
The stopcock spindle comes out through a synthetic rubber gland and a gland nut. This gland is squeezed against the spindle when tightened (turning it clockwise) so that water doesn’t leak from around it. The spindle needs to be clean and smooth with a constant diameter along its length. A rough surface will wear away the gland when the spindle is turned. By loosening the gland nut (turning it anticlockwise) the stopcock may leak around the spindle but it will free-up easily. This doesn’t matter while trying to free up the valve. You can always tighten it later. Mop up the water with a rag or an old towel.
Tip: With a stopcock make sure any anticlockwise turns on either the handle, spindle or gland-nut don’t turn anything else. Especially if they are seized ensure that only those parts move. Do not let the Head Gear of the stopcock unscrew. If it comes apart in the middle, water will gush out sideways at full mains pressure. It would be extremely difficult to reassemble the stopcock to stop the water flow under those conditions. The supply to the premises would have to be turned off in the street first. Meanwhile there would be a very big flood inside the premises.
When the stopcock is working again, and the job is done, open it to the fully open position and just close it a fraction of a turn so it isn’t jammed open. Then tighten the gland nut sufficiently to prevent it leaking along the spindle.
When The Stopcock Handle Is Missing Or Broken Off
If the stopcock handle is found to be missing or breaks off, due to too much closing torque being applied while it’s seized, a small/medium adjustable spanner, or a locking wrench, will have to be used to turn the spindle. The spindle has a square end to it where it would normally engage with the handle. Apply the spanner or locking wrench to that point. Adjust the spanner to be a good fit else the spanner will slip and round off the corners. If the valve is already in this condition it is probably seized up and exceptional torque will be needed. Only grip the flats with a locking wrench else the teeth marks in the spindle will eventually damage the gland.
A stopcock seized to this degree creates a dodgy situation. It may not be possible to turn it off. If the metal of the body of an old stopcock fractured due to excessive torque being applied it could result in unstoppable gushing water. It may be best to turn the water off in the street. See device 4 below. This may need the assistance of a regular plumber or the water supply company. It may also be best to replace a severely seized stopcock with a new one.
Why Do Stopcocks Get Manky
Stopcocks and associated pipework get damp due to condensation caused by warm air in the room and cold water flowing through the pipe. That cools the water in the air causing the water in it to condense on the pipe. Dust in the vicinity then adheres to the surface and dissolves in the condensed water to form corrosive chemicals that eat into the brass over time.
4. A Mains Stopcock Operated By A Remote Switch

This type of stopcock is operated by a remote switch which looks like an electrical switch. The switch is on a wall-plate and is usually mounted on a wall in a more convenient place than the valve but near to the valve.
The switch is connected to the valve by a mechanical (Bowden) cable which has a wire that moves relative to its sheath when the switch is operated. At the stopcock end this relative movement turns the cock on or off with the aid of the water pressure available in the pipe.
5. An External Stopcock In The Street
The worst circumstance is when the only means to shut off the water is with the stop valve in the street because the mains stopcock in the property, where the water supply enters, is faulty and can’t be turned off.
Below is a video demonstrating how to locate, gain access to, and operate the Stop Valve in the street – produced by Affinity Water.
If a stopcock is too deep in the ground to reach an extension key may be required (see below). They are 1m long and can be obtained from B&Q or Tool Station. The handle may have a pointed end to insert in a hole in the street cover and lever it open. Otherwise the lid can be opened with a flat bladed screwdriver.

Tip: When a stop tap in the street is directly connected to a water meter in the same hole then that tap will only serve the property to which the water meter belongs. Be sure it is your water meter and you can happily turn it off. Only taps without a water meter can serve more than one property.
6. Using A Pipe Freezing Kit To Block A Pipe
As a last ditch stand a pipe can be blocked that feeds water to a cistern by freezing some of the water inside it. This would block the water from flowing out when it’s disconnected.
I’ve never done this so I am not an expert. I can’t think what would drive me to do it. But who knows a professional might start doing this if asked to fix a problem. So be aware You may not want them to do it in your premises.
Freezing pipes is done using a Pipe Freezing Kit of which there are many available. You can visit a builder’s merchant or DIY store to see what they have. Whatever kit is used I can only advise following the instructions to the letter and watching a few videos. See one below:
If it all goes wrong (the ice melts after disconnecting/cutting the pipe) there may be a lot of water around.
So if there is water flowing out of a freshly cut pipe it could be stopped by:
- temporarily wrapping a rag or towel around it,
- putting a brass cap with a compression fitting on the pipe,
- putting a tap on the pipe,
- in an emergency – hammer the pipe to crush it flat.
See the detail below.
1. Wrapping A Rag Or Towel Around The Leaking Pipe
Wrapping a rag or towel around the pipe can stop the water spraying all over the place. This can contain it so it can be collected in a bucket or just make a puddle on the floor.
2. Putting A Brass Cap On The Pipe
Before starting the work obtain a brass cap with a compression fitting of the correct diameter for the pipe.
Due to the force of the water two people may be required. Two wrenches will also be required.
With the nut and olive in situ on the thread and water spraying everywhere remove any burrs and force the cap on the pipe. Hold it on against the force of the water and tighten the nut at the same time. Done well it will stop the water completely.
3. Putting A Tap On The Pipe
Before starting the work obtain a tap with a compression fitting of the correct diameter for the pipe. It could be a stop cock or small isolating valve from which a pipe could ultimately be run to the cistern.
I don’t mean a tap should be obtained in advance from a merchant (unless a tap is ultimately to be fitted). I’m just suggesting anyone who does plumbing, from time to time, may have an old tap in the shed which could be used as a temporary measure to hold the water back.
Due to the force of the water two people may be required. Two wrenches will also be required.
With the nut and olive in situ on the thread and water spraying everywhere remove any burrs and force the tap on the pipe. Hold it on against the force of the water and tighten the nut at the same time. (The tap could be open towards a bucket to relieve the pressure.) Done well it will stop the water completely when the tap is closed.
4. In An Emergency – Hammer The Pipe To Crush It Flat
This is only a temporary measure to reduce the flow of water to a drip.
NOTE: It can only be done if the pipe is made of malleable copper (usually 15mm pipe). 22mm pipe is often hardened and won’t crush (but it may crack and make the situation worse).
If the pipe is running along a wall place a suitable block of wood between it and the wall. The block will be an anvil. Press the pipe against the block to hold it against the wall and with 1lb (or heavier) hammer hit the pipe to squash it flat. It will probably continue to drop afterwards so be prepared to deal with that.
The squashed part of the pipe will have to be replaced when a permanent repair is made.
Disconnecting The Pipe From The Fill Valve
Flush the cistern, after turning the water supply off, to empty it. If a side entry valve is being replaced then unscrew the pipe connector from the valve with an adjustable spanner. Locking Pliers will damage the nut (so avoid them if it’s a nice shiny chrome one). It may be necessary to hold the valve to stop it turning in the cistern if the connector is corroded or painted. A strong person might hold it with their hand and protect their hand with a glove or rag. Some valves have a hexagonal flange which can be held by an adjustable spanner, pipe wrench or locking pliers within the cistern.
Save The Sealing Washer To Be Reused
When the connector is disconnected from the fill valve be careful to collect the sealing washer and save it to be reused if it’s made of synthetic rubber. If it’s a fibre washer then use a new one when the pipe is refitted. Fibre washers compress permanently when tightened and may fail to make a good seal if re-used.
A small amount of clean water will leak from a flexible hose. Have a towel on the floor and a rag ready to mop up. Put a bucket or other container in the place where the open pipe will drip.
If the water was turned off some distance away there could be quite a bit of water coming out of the pipe if air can easily get in to replace it.
Disconnect The Overflow Pipe
Modern cisterns have an internal overflow, but many older cisterns have an external overflow which passes overflowing water into a pipe that leaves the building through a hole in the wall. The pipe used could be lead, if it’s very old, but more likely it will be ¾ inch plastic connected with an elbow. That will just need pulling apart unless it has been glued. A plastic pipe glued together may have to be rebuilt with new pipe and elbows.
Disconnecting A Close Coupled Cistern From The Toilet Pan
Sometimes work to replace the fill valve can be done with a close coupled cistern in situ. However better access to the fixing nuts may be obtained by removing the cistern from the toilet pan.
The two are held together by two bolts emanating from the bottom of the cistern. These pass through two holes in the back of the pan and may have plain nuts and washers on them or they may have wing nuts and washers. Ideally there should be steel washers and soft rubber or plastic washers to prevent the steel components cracking the porcelain of the pan.
It’s likely that the nuts and bolts will be rusted together and hard to undo. This is another instance when penetrating oil and time may be required.
Tip: When using a can of penetrating oil with air in it (half full) the oil won’t flow upwards out of the spout onto a downward pointing screw thread. So put some oil in a saucer and use an artist’s paintbrush to apply it to the thread up near the nut.
Tip: When nuts and bolts are in damp locations they are always likely to go rusty so it’s advisable to apply grease or petroleum jelly to the threads so that they can be undone in the future.
There will probably be a couple of screws holding the cistern to the wall. They will need removing too. They should be visible with the cistern lid off about 50mm below the top. Be careful not to over tighten and crack the porcelain (use plastic washers). (See my post about Dual Flush Toilet Cistern Lid Removal.)
Connecting To A Fill Valve
One standard for fill valves is the screw thread where the pipe connector is attached. The clamping nut(s) also run on this thread. It is ½ inch BSP a typical size used for connecting 15mm (½ inch) copper pipes to taps on basins using a parallel thread. The outside diameter of the thread is actually 21mm. Cold water is usually supplied at a sufficiently high pressure to feed it through a 15mm copper pipe. This size of pipe is easily adapted, with appropriate fittings, to a ½ inch BSP thread because the bore remains the same throughout.
Old Tap Connectors
In the past the connector to the fill valve would have been rigid in the form of:
- a soldered fitting,
- or a compression fitting.
1. A Soldered Fitting

This comprises a short section of copper pipe with a flange on the end and a clamping nut. The water seal would have been a hard fibre washer squashed between the flange and the end of the fill valve. These are not intended to be tightened more than once because they squash permanently into a new shape when tightened. So undoing and re-tightening, though possible, can result in a leak in the form of a slow drip from the thread or the hole in the back of the nut.
The type of connector shown here has a capillary fitting. It would have been soldered to the incoming feed pipe cut to exactly the right length so that the connector just reaches the fill valve.
2. A Compression Fitting

Alternatively a compression fitting made of brass would be used fitting on the fill valve in the same way but having an olive and nut to clamp it to the pipe. Easier to fit (no soldering) but uglier with the extra nut.
There can be a problem with the compression fitting and the 15mm pipe. 15mm pipe is usually annealed copper and soft so it can be bent easily. That type of pipe collapses under pressure from the olive and can have problems sealing. So be prepared with PTFE tape to bind around the olive if necessary.
Tip: With the fill valve end tightened first a very good water seal can be obtained at the end of the fill valve. The olive on a Compression fitting will adjust itself and seal as it is tightened onto the pipe.
Tip: Don’t over tighten a compression joint on 15mm soft copper pipe. The pipe will continue to compress and the seal won’t get better. Over tightening will just crush the pipe. It might be necessary to wrap it with PTFE tape. Remember there are two seals. One is between the pipe and the olive. The second is between the olive and the fitting, NOT between the olive and the nut.
New Flexible Tap Connectors
If the stopcock has to be used to turn off the water supply to the cistern while replacing a toilet fill valve, why not install a flexible tap connector with an ON/OFF valve built in?

Flexible tap connectors are the modern way. They don’t require painting and they don’t get verdigris on them. Some have an ON/OFF tap built-in to facilitate disconnection without turning off the mains stopcock but if there is already an isolating valve in the pipeline a flexible tap connector without a built in valve can be obtained. A flexible tap connector makes disconnection and re-connection easier than with a rigid fitting when future repairs are undertaken.
Process for replacing a rigid tap connector with a flexible one:
- Obtain a suitable flexible connector,
- Cut the old connector off and prepare the end of the pipe,
- Fit the flexible connector to the end of the fixed pipe,
- Fit the flexible connector to the Inlet Valve.
1. Obtain a suitable flexible connector
NOTE:
- They have a compression fitting at the valve end and a tap connector with a sealing washer at the other end.
- They come in ½ inch and ¾ inch tap sizes – choose ½ inch here.
- Get one with an isolation valve built in.
- They come in many different lengths.
- Get one long enough to give a nice looking connection.
- Using it to replace an adjacent pipe bend often looks neat.
- Having it straight and vertical should look OK.
- A straight horizontal one may sag and look odd if it’s too long.
2. Cut the old connector off when replacing a toilet fill valve

The old connector would have to be cut off the pipe, ideally with a pipe cutter. If a suitable pipe cutter isn’t available and can’t be got into the location to do the job then a junior hacksaw may have to be used. This is always seen as a bad method of cutting pipes because the copper particles produced can get into the water supply and, in this case, get inside the new valve and then clog the filter (if there is one) or stop it working/sealing correctly. So be very careful to remove the copper particles afterwards.
Tip:
How to clean up the old pipe when replacing a toilet fill valve
If the pipe has previously been painted the paint will need removing with coarse grit paper. Change to medium or fine when the copper becomes exposed so as not to ware it away. The objective is to get to the original pipe where the olive will be and where it enters the connector.
3. Fit the flexible connector to the end of the fixed pipe
4. Fit the flexible connector to the Inlet Valve
Reference
1. Encyclopaedia of Toilets
Check out this Encyclopedia of Toilets. Part of InspectAPedia.
Leave a Reply