Opening Dual-Flush Toilet Cisterns

Opening Dual-Flush Toilet Cisterns

Preface

This post describes: Opening Dual-Flush Toilet Cisterns to maintain the inlet valve and flushing mechanism.

Introduction

If you have tried opening dual-flush toilet cisterns you may have found the lid was held down by something. But what? There are no clips or screws.

Traditional porcelain cisterns flushed with a handle have their lids held down by gravity.

Opening Dual-Flush toilet cisterns, like my Armitage Shanks1 Ascania, can be difficult. They have their lids held in place by the Geberit Flush Button Mechanism2. The Button Socket, mounted in the cistern lid, is held down by a plastic screw attached to an internal part within the cistern.

This article gives advice on this type of dual-flush toilet cistern lid removal.

Opening Dual-Flush Toilet Cisterns for Armitage Shanks Ascania Toilets

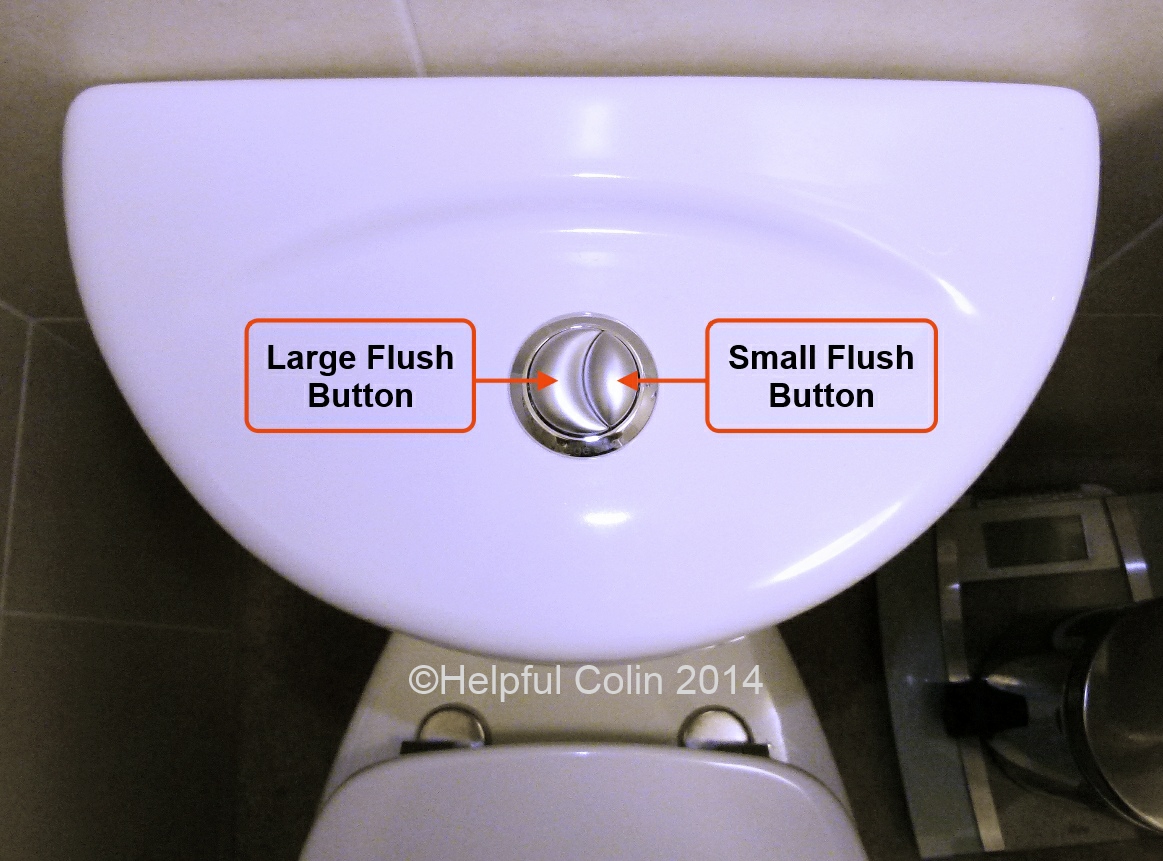
To open an Armitage Shanks1 Ascania cistern, start by extracting the two buttons from the Button Socket.

Extracting The Dual-Flush Buttons

Push one button down all the way and keep it down (the toilet will flush). Turn your finger so that your fingernail engages with the side of the other button. Both buttons have a finger nail notch on the side. Dig your nail into the notch and pull out the button. The button will click out of position ready for removal from the socket. My buttons have a long thin rod of plastic attached which reaches down to operate the real buttons inside the cistern. Be careful not to break them.

Pic. 1 to 5. Removing The Buttons
Opening Dual-Flush Toilet Cisterns
Pic. 1. Pressing down the Large Flush Button to engage fingernail with the Small Flush Button.
Opening Dual-Flush Toilet Cisterns
Pic. 2. Clicking it out with a fingernail by pulling it up.
Opening Dual-Flush Toilet Cisterns
Pic. 3. Lifting it slightly.
Opening Dual-Flush Toilet Cisterns
Pic. 4. Lifting it a long way up. Grab it and pull it out.
Opening Dual-Flush Toilet Cisterns
Pic. 5. The Small Button has been remove. Take hold of the large button and pull it up too.

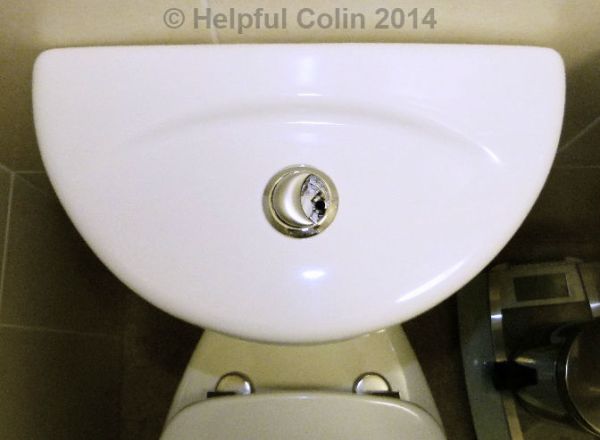
Now with your forefinger of the other hand engage your fingernail in the other button in the same way and pull it out with a click.

The Button Socket (Silver Cup)

Look into the socket and you will see a plastic screw that has up to now escaped you. It is the one that holds the lid on. It shouldn’t be over tight. unscrew it anticlockwise helpfulcolin.com with a screwdriver having a wide flat blade 1mm thick. Don’t chew up the soft plastic of the screw with a screwdriver that is too small.

The silver button socket mounted through the lid has no thread in the screw hole. The screw is just a tight fit so it doesn’t easily drop out. The thread into which it screws is in a flat plastic Sliding Plate held aloft by a frame, referred to as a bridge, attached to the flushing module/valve below the Button Socket.

Wash and clean all parts before reassembly.

NOTE: Cleaning fluids running into the Button Socket will drain through holes into the cistern for flushing away.

You can see all the parts below:

Pic. 6. Both Buttons Removed
Opening Dual-Flush Toilet Cisterns
Pic. 6. Both Buttons Removed

The Sliding Plate In The Bridge

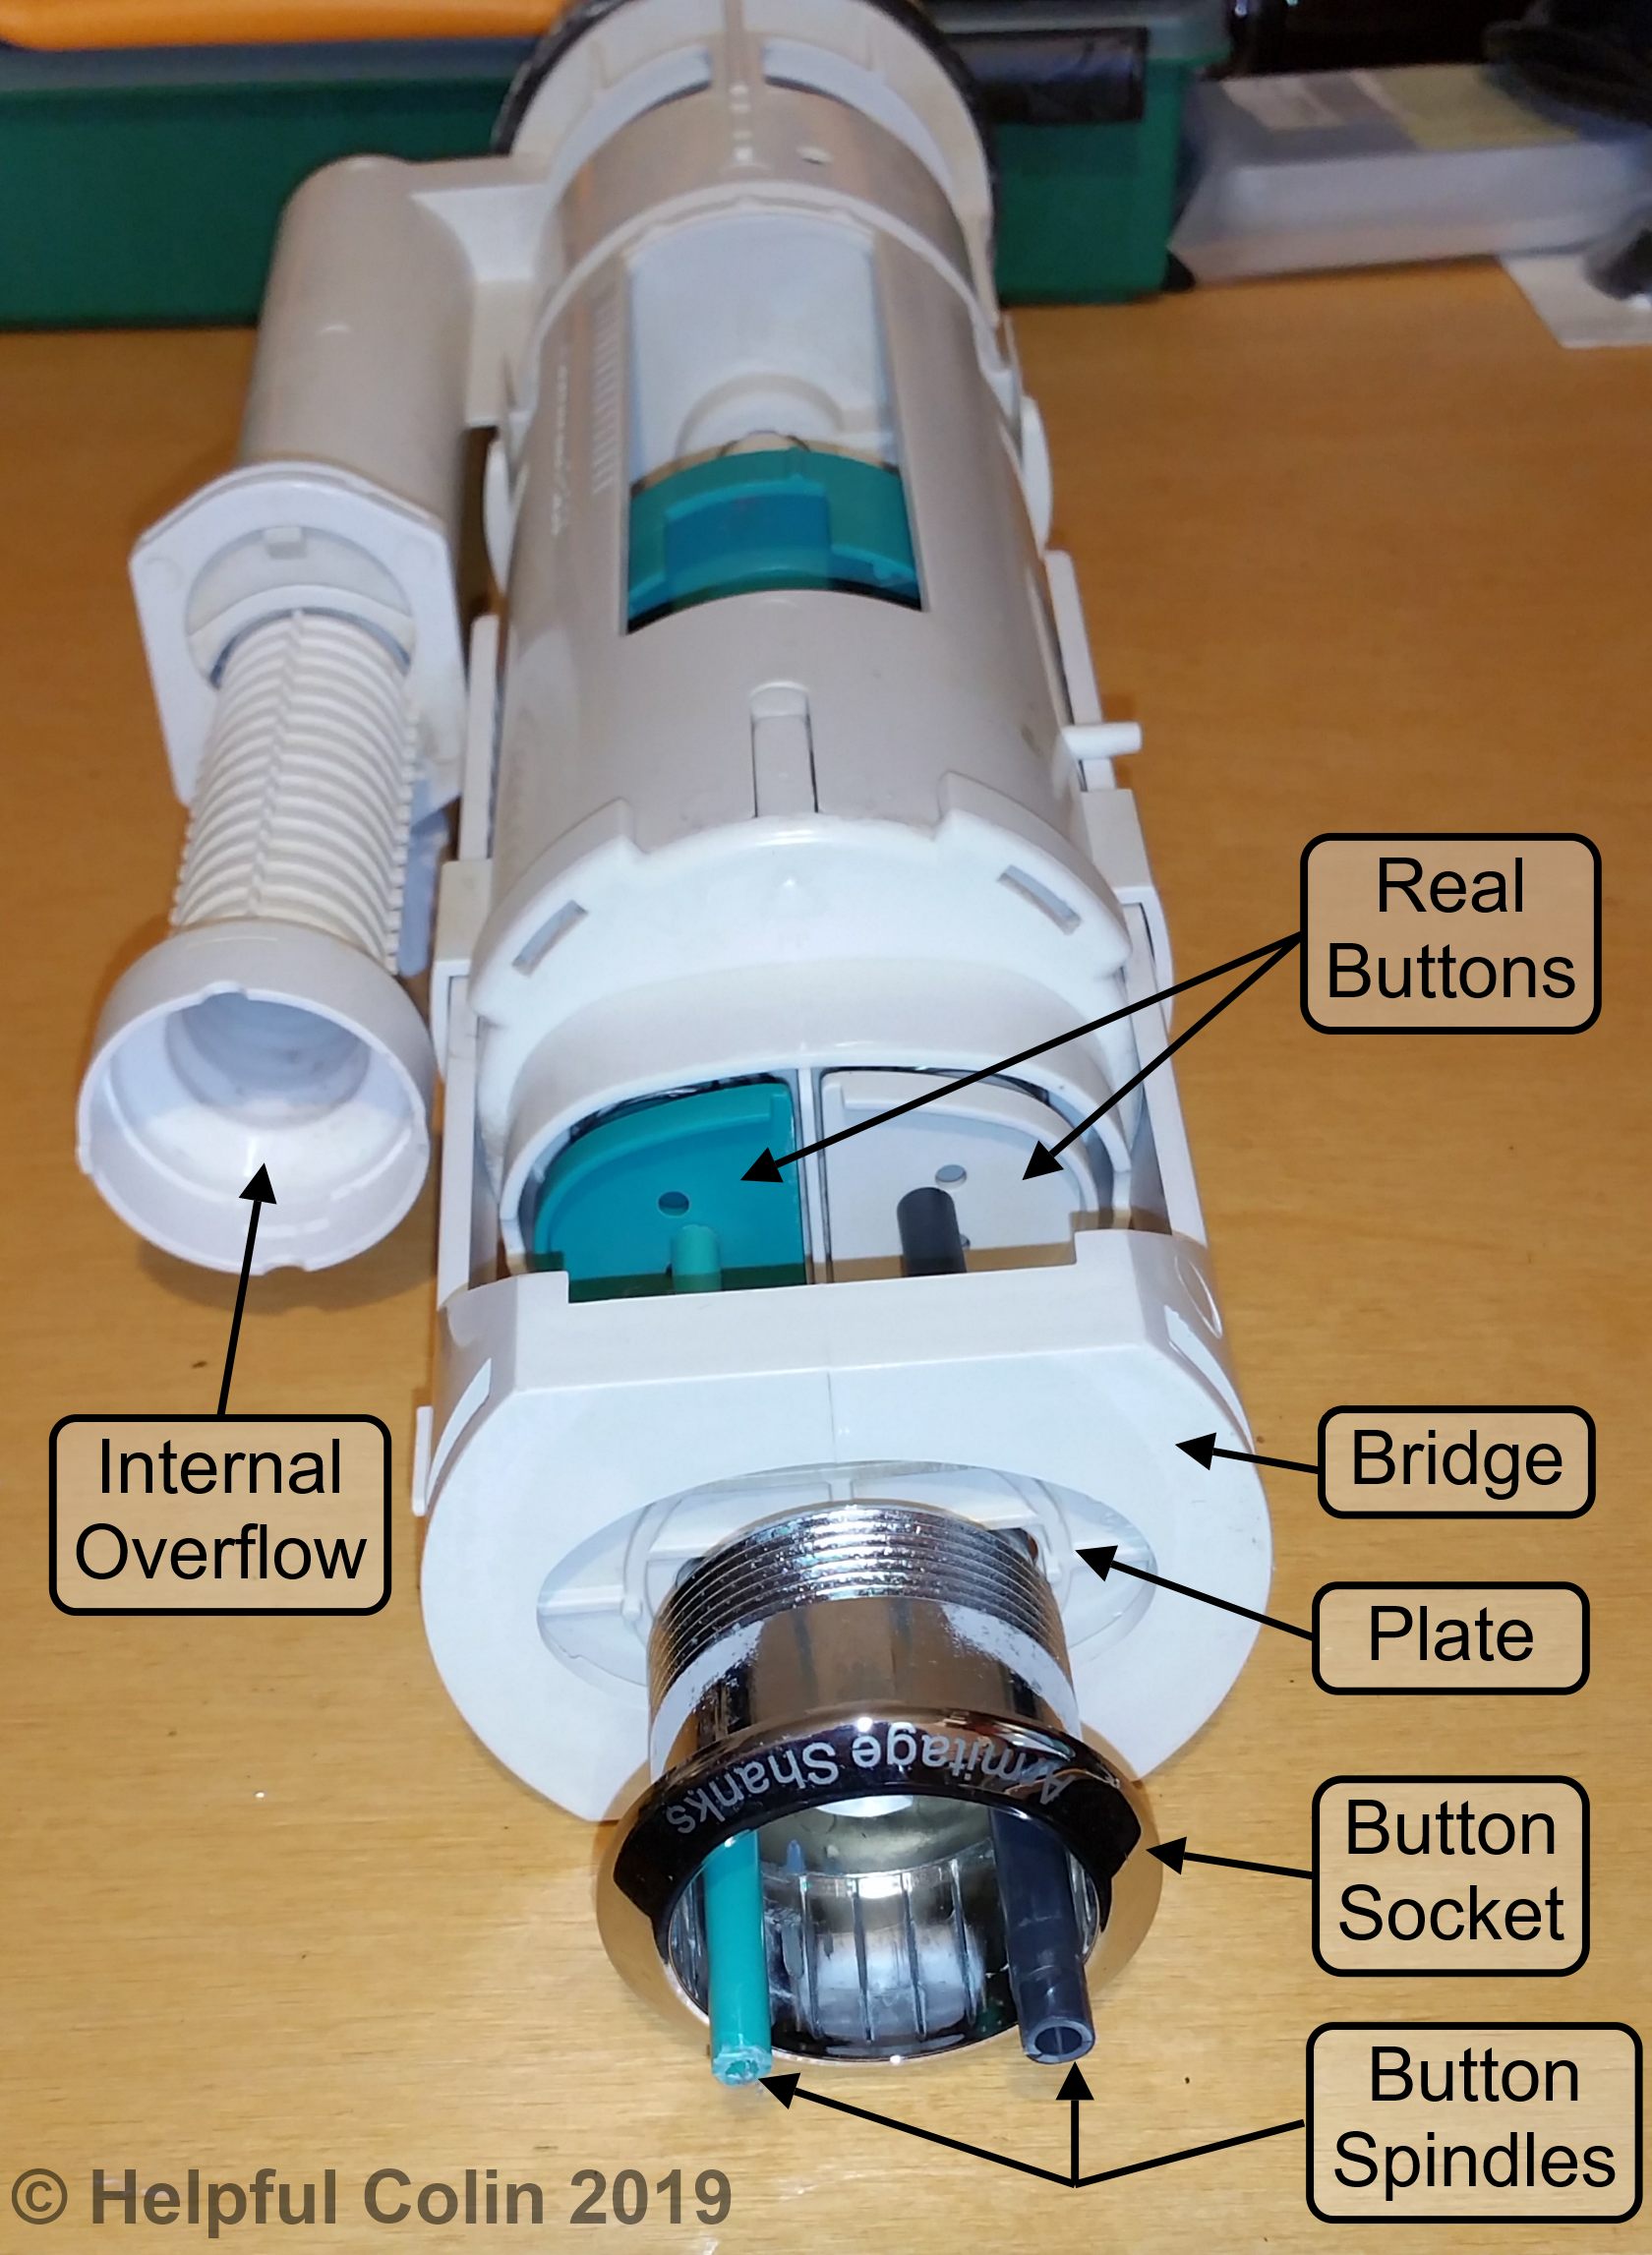
See the cistern below with the lid removed and the internal parts labelled:

Pic. 7. Cistern With Lid Removed
Opening Dual-Flush Toilet Cisterns
Pic. 7. Cistern With Lid Removed

The Sliding Plate in the Bridge (Height Adjuster) is loose. It moves around horizontally so that its holes align with the Button Socket in the lid.

Be careful not to accidentally push the Bridge down. It ratchets down easily but is hard to draw back up. The picture below should help with this:

Pic. 8. How to raise the Bridge on The Flushing Mechanism
How to raise the Bridge on The Flushing Mechanism
Pic. 8. How to raise the Bridge on The Flushing Mechanism.

The Bridge has two ratchets, one on either side of the mechanism.

To lower the Bridge:

Just push it down gently and it will click into place 7.25mm lower down. (7.25mm is the distance between holes in the ratchets.)

NOTE: Due to flexibility of the Bridge plastic one side may go down with one more step than the other side. The Bridge seems to tolerate that but the highest side needs pushing down until both sides are at the same height.

To raise the Bridge:

Squeeze the buttons on both of the ratchets’ pawls (pointed to in the picture). That will press the pawls into the mechanism together to disengage them from the ratchets. Then pull the Bridge up. This is difficult because the plastic is a bit too strong to squeeze. I have failed to squeeze them both at the same time, even with the mechanism out of the cistern. When the mechanism is in situ, it may be easier using a ‘third hand’ to pull the Bridge up while using both hands to squeeze.

My advice: Squeeze one pawl at a time and raise one side of the Bridge by one notch, then repeat with the other pawl. The plastic is flexible enough for the pawls on opposite sides to be one notch out of step. Any more than that and the plastic may break.

Ultimately the Bridge needs to sit just below the Button Socket. The Sliding Plate also has two holes through which the Button Spindles3 pass on their way to engage with the real buttons below.

Aligning The Holes In The Plate With The Button Socket

When assembling the buttons, start with the Bridge high up on the rachets. When the cistern lid is put on it will push the Bridge down to nearly the correct height. Then look through the hole in the cistern lid to see how the sliding plate is positioned. Shine a torch down there to illuminate it.

Use a pointed tool like a thin screwdriver, pencil or button spindle inserted in the central hole. Move the plate and centre the three holes to receive the Button Socket.

In order to engage the large white screw with the thread in the Plate the holes in the Button Socket (silver cup) need aligning with the holes in the Plate. This is done by using the buttons’ spindles to keep the holes aligned while tightening the screw. See the picture below:

Pic. 9. How to align the holes of the Button Socket & the Plate
How to align the holes of the Button Socket & the Plate.
Pic. 9. How to align the holes of the Button Socket & the Plate.

The button socket can then be attached and the big white screw can be turned to engage the thread. Then the Button Socket can be pushed down into the lid ratcheting the Bridge lower as it goes down. The screw can then be tightened to finish the job by pulling the Button Socket down and the Bridge up trapping the lid between them.

NOTE: When fitting the spindles in the holes the black one has a larger diameter than the green one.

NOTE: The buttons can remain on the spindles so long as each button is rotated 180° to produce a gap between them. Then a screwdriver will fit in between to reach the big white screw.

NOTE: If the cistern lid has been prised off (or just forced upwards) by someone who doesn’t know how it is held in place, then the Sliding Plate, Bridge or some other part could be cracked or broken and will need replacing2.

Flushing The Cistern With The Lid Off

To flush the cistern with the lid removed poke something suitable through the holes in the Bridge’s Sliding Plate and use it to push the flushing buttons down, e.g. use a button with spindle attached, a screwdriver or press with a finger where space permits.

Reference

1. How to change a Geberit Flush Button and Valve

Here you can see a plumber performing a dual-flush toilet cistern lid removal while working on a Geberit Two Flush Button Outlet:

In the video you can see how the outlet valve splits in two, with the lower part remaining in the cistern, while he adjusts the height of the bridge.

2. Encyclopedia of Toilets

Check out this Encyclopedia of Toilets. Part of InspectAPedia.

Footnotes

1. Armitage Shanks are now part of Ideal Standard.

2. Parts for the Geberit Flush Button Mechanism used by Armitage Shanks and Ideal Standard can be obtained from Amazon and other suppliers as follows:

Geberit Dual-Flush Valve with Internal Overflow and Buttons

Geberit Dual-Flush Valve Push Buttons

Geberit Dual-Flush Valve Bridge

Geberit Dual-Flush Valve Base Sealing Washer

Geberit Dual-Flush Valve ONLY without Internal Overflow or Buttons

For other suppliers search under GEBERIT, TWICO, Ideal Standard or Amitage Shanks.

These parts may also be available from builder’s merchants, DIY stores and hardware shops.

3. Button Spindles are cut to length according to the size of the cistern that the flush valve is installed in. The spindles are hollow and so stainless, brass or nylon screws may be inserted into the bottom of the spindles to make their length adjustable, particularly if they are cut too short.


END OF POST

Comments

66 responses to “Opening Dual-Flush Toilet Cisterns”

  1. Brian avatar

    Thanks, the info was most useful

    1. Helpful Colin avatar

      Hi Brian,
      I’m glad I was able to help.

  2. Matt avatar
    Matt

    Thanks, Brian, this has had me stumped!

    1. Matt avatar
      Matt

      Sorry, Colin!

      1. Helpful Colin avatar

        Hi Matt,
        I presume you’ve now got the lid off.

  3. Laith avatar
    Laith

    Hi there, I removed the small and large button but no spindles came out with them (I haven’t got your make)? Although I am not quite sure what is wrong with the toilet as we have just moved 2 weeks ago and was working fine but now seems to fill up very slowly? Can you help me please?

    1. Helpful Colin avatar

      Hi Laith,
      Have you got the top off yet. Once I take my buttons out I can look down into the silver cup they sit in and see the head of a big white plastic screw. I then unscrew it with a big wide flat blade screwdriver. Use one big enough and you won’t damage the plastic of the screw head. Once that screw is out I can lift my lid off.

      Please let me know if you make progress or not.

    2. Helpful Colin avatar

      Hi Laith,

      Have you made any progress removing your cistern lid?

      I wondered if the slow filling of the cistern was due to:
      • The float staying up when the water level drops in the cistern. This could happen if calcium built up on the parts, removal being the solution. Apart from chipping and scratching it off with various tools you can try to dissolve it with Betterware Multi-Use Descaler.
      • A stop tap, specifically for the toilet, partly turned off. You can see the type I refer to in my post Toilet Silent Fill Valve Repair & How It Works. Work the stop tap if you’ve got one, i.e. turn it off and on again in case any debris has built up in it. It may be only turned on a bit to restrict the flow. Set it where you want it when you’ve worked it. While on the subject of stop taps, is the main stop tap for your property on sufficiently. If you’ve just moved in you may want to find out if it is in good working order, doesn’t leak at the spindle and fully on. Also will it turn off and stop the water flow when you want it to. Don’t break it by forcing it if it won’t turn. You won’t want a gusher.
      • A blockage due to pipe damage, e.g. a 15mm copper pipe feeding a flexible connection to the cistern projects through a hole in a wall at a low level and someone has stood on it and bent it so that it has flattened and hardly any water can get through.
      • I have seen fill valves that are supplied with a restrictor which screws inside the input orifice of the valve to reduce the diameter of the input from 15mm to something much less, say 5mm. This makes the cistern fill more slowly and quieter as a consequence. That smaller hole could more easily get blocked by debris from the water supply. Is your cistern supply from the mains or a header tank? The latter being more likely in a high rise block. You’re more likely to get debris from a header tank.

      1. Laith avatar
        Laith

        Hi Colin
        Many thanks for the info but unfortunately the wife had a go and balled things up!! Both buttons are out, but no spindles nor screw visible (I could email pics if you want). I can’t even put the buttons back as the “catchment” for the small button is not visible! So now I am completely stuck and a shout for a plumber is due tomorrow!

        1. Helpful Colin avatar

          Hi Laith,
          Sorry to hear your having difficulty. Yes, please send pics. I might learn something. I have unfortunately only dealt with my own modern cistern, but I think some principles are common. By that I mean gravity usually holds the top down on porcelain cisterns but the buttons have got to be well aligned to operate the parts inside so they have to be screwed or clipped to them to work. It is as a consequence of this that the button mechanism holds the lid on. Otherwise we would all be able to just lift the lid to check what’s going on inside. I’m very interested to know what is inside the cup that holds the buttons. So many plastic things clip together these days. Knowing how to undo clips without breaking them makes life a lot easier.
          Is there anything else in the cup besides the buttons that is removable and covering up any clips or screws? Good luck and watch how the plumber does it.

  4. peter avatar
    peter

    Thanks Colin,it is most helpfull now to try and get it to work.

  5. Sharon avatar
    Sharon

    Thank you Colin! I had broken mine and couldn’t work out how to put it back together but you have saved me a lot of hassle and frustration!

  6. Tina avatar
    Tina

    Hello we have recently had new toilet fitted but the half\full flush button has worked loose how do we tighten it please

    1. Helpful Colin avatar

      Hi Tina,
      Well if you just had it fitted I’m sure you can ask the plumber to take a look at it. He must surely guarantee his work. I am not familiar with all types of button. They don’t all work the same way or fix onto the cistern in the same way. Whether you ask me or anyone else about this I’m sure photographs of the problem will help you to get an answer.
      Good luck.

  7. Terry avatar
    Terry

    Thank you so much. I could not figure this out at all.

  8. Peter avatar
    Peter

    Hi Colin, I have basically the same problem. I tried to take off the buttons on top but think I may have damaged them, (I was trying to fix the water still flushing for a long time after I had flushed the toilet) it looks like the casing for the buttons has snapped and the rest of it is inside the cistern. I can’t take the lid off the cistern as it all seem to be all part of the cistern, its not silicone on. I now don’t have any toilet to use, unless I use a big bucket of water to flush it.
    please help

    1. Helpful Colin avatar

      Hi Peter,
      I’m sorry to hear you have this problem. Since I am not familiar with your cistern and I am not a regular plumber I can only advise you to employ a plumber to fix this. If you don’t know which one to choose I recommend you search for one out of your local council’s Trusted Trader list. You should be able to see it on the internet.

      Good luck.

  9. Deedee avatar
    Deedee

    Hi!

    I managed to remove my buttons (I have an Imperial porcelain toilet), but the head of the plastic screw doesn’t have a gap for a screwdriver to open it. For lack of a better way of explaining, the head instead looks like a Phillips head screwdriver bit. So it’s the reverse and unless I used extremely thin long-nosed pliers which I can’t seem to get, I doubt I could grasp the head? Do you have any ideas of what I could do instead please?

    1. Helpful Colin avatar

      Hi Deedee,

      That thing like a Philips screwdriver tip might be a peg sticking up through a hole with some splines on it which need to be squeezed together to release it and extract the button cup. Here is a diagram Releasing a peg in a hole using a tube 
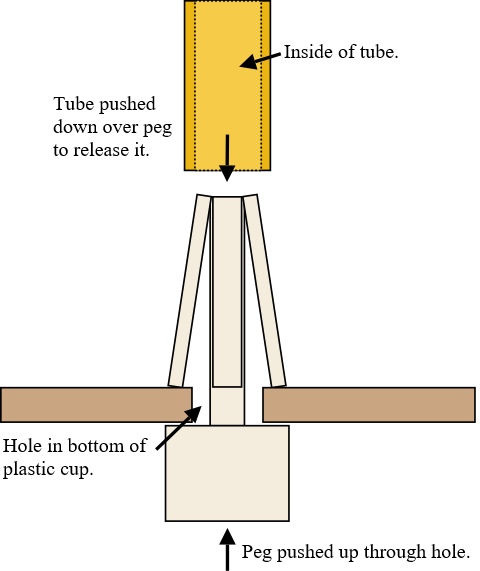
showing how the correct size tube could be pushed over the peg to squeeze the splines together all at the same time so they will pass back through the hole. If you don’t have any suitable tubing try a wooden dowel with a hole drilled in the end.

      Good luck.

    2. Helpful Colin avatar

      Hi Deedee,

      Sorry if my previous explanation sounds silly and you are convinced it is some kind of screw, then please try to photograph it and send me the picture.

      Regards, Colin.

      1. ashwini avatar
        ashwini

        Thanks colin. Im Ashwini from india. I was not able to figure out how to do this. Your blog was a great help. Thanks again and god bless.

        1. Helpful Colin avatar

          Hi Ashwini,

          I’m glad to have been some help to you.

  10. David Jackson avatar
    David Jackson

    I have Toronto BTW close coupled toilet and cannot get off the cistern lid. I have pressed down the large button there is no way to get a finger nail or small screw driver under other button so frustrating.

    1. Helpful Colin avatar

      Hi David,

      Sorry but I haven’t yet found a solution to your problem.

  11. Kayleigh avatar
    Kayleigh

    Hi. I dont know if I will get a reply. However I took my buttons out. The rods had screws in which inverterbly attached it all regardless and I could not get these past the ‘sliding plate’.

    My sliding plate unfortunately had a massive crack within, so me trying to pull the rods caused these screws to impact on the plate and cause it to break.

    Is this crucial in the construction of the toilet button lid bit? If so any idea where I can get a new one? Thanks.

    1. Helpful Colin avatar

      Hi Kayleigh,

      The plate you mention has a hole in the centre with a screw thread to receive the plastic screw which holds the silver cup for the buttons in place. The screw and cup together hold the cistern lid down. The plate has probably been cracked by either over tightening the screw in the silver cup or (more likely in my opinion) by someone not knowing how to remove the cistern lid and lifting it up with force to try and remove it.

      The consequences of not having a plate are:

      There will be no way to hold the cup and buttons in their correct location. The lid will stay in place due to its weight. The buttons will be available to be pressed down and used, but they will be free to rotate and if they do the rods may engage the wrong buttons below or bridge across the gap and operate both buttons and just generally be a problem.

      You could remove the plate and try gluing it with a solvent based adhesive for that type of plastic but you would have to be very delicate when tightening the cup screw in the future. Of course the adhesive might block the screw hole if the break passes through it. A new part would be ideal. You would have to buy the complete flushing mechanism and replace all of it or just use the new plate.

      To get a new part you can search the net, visit DIY or hardware shops or builders/plumbers merchants. If I come across a good place I will let you know.

      1. Kayleigh avatar
        Kayleigh

        yeah it does seem that to be the reason. and frankly it doesnt look like theyve been ever changed. though my grandparents assured me it was last year. i think the builder has damaged then. the buttons, rods and button holder are much older looking than the cup part.
        however did work to it last year has actually put screws at the end of the rods. unsure why so going to purchase some new buttons with rods.
        i completely can understand now the reason for the sliding plate i didnt think of it how you mentioned.
        so you cant just buy a new sliding plate?
        unfortunately the bit fallen off did actually drop down and kind of flushed away (i am a clumsy sod)
        im just pretty disgusted to think the plumper would have put in a new flushing system lastyr. but the state of the sliding plate says older. :/
        thanks for you help.
        im going to look out for a sliding plate. if anyones got one handy i neeeeed one. 🙂

        1. Helpful Colin avatar

          Hi Kayleigh,

          Maybe the screws in the end of the rods are to make them longer. If the plumber cut them short or found they were causeing the problem because they were a bit short then the screws in the end (which presumably can be adjusted to stick out more or less) may have solved the problem. Making the rod length adjustable is a good idea.

          1. Kayleigh avatar
            Kayleigh

            Hi me again 🙂
            So everything went on from before…
            However, and only for the past couple of days, its almost as if the flush isnt fully flushing to the point its taking 3 or 4 goes to get tissue down…?
            Any ideas. Ive relooked at it all. At first i thought was the floaty not filling up which still may be an issue.
            But watching it flush and drain it only went down 3quarters and not fully empty. Any idea how to fix?
            Cheers again 🙂

            1. Helpful Colin avatar

              Hi Kayleigh,
              Sorry to here things aren’t going so well.
              On 7th July you said, “Unfortunately the bit fallen off did actually drop down and kind of flushed away.” Well that ‘bit’ may have got sucked up into the works of the flushing mechanism when water flowed out of your cistern and be causing the problem you have now.
              This has turned into a big problem but you may be able to fix it if you remove the valve so that you can see if something is broken or jammed in it. Ultimately you may have to replace it. Look at this video for help: How to fix a push button cistern, that does not flush, without removing the cistern. It’s not the best video and the plumber in it should use a bigger screwdriver so he doesn’t damage the plastic screw. Also the first valve he demonstrates has a broken clip for holding the valve in place. You may spot it.
              You may also like this video showing a different flush to mine but it may be like yours: Toilet cistern still running after flushing?

  12. Kayleigh avatar
    Kayleigh

    where do i get a new sliding plate?

    1. Helpful Colin avatar

      Hi Kayleigh,

      This looks like the part containing the sliding plate that you need: Geberit Sliding Plate and Support

  13. David avatar
    David

    Hi Colin, thank you for taking the time to write and manage your instructions and blogs. They are very helpful and interesting. Hope you can help- I have a dual flush cistern, not sure of the make. I have removed the 2 buttons using your guidance but the white prongs underneath them did not come out at the same time and I can’t remove them. I assume the screw I need is under them. Can you help please? Thanks David

    1. David avatar
      David

      Can anyone help me here please?

      1. Helpful Colin avatar

        Hi David,
        Sorry I cannot give a good reply just now but I will study your problem and give a better reply later.

    2. Helpful Colin avatar

      Hi David,
      Because I am not a regular plumber I haven’t met too many types of flushing mechanisms. Your mechanism doesn’t sound like mine. Maybe the whole prong thing unscrews.
      My advice is to look carefully at your flushing mechanism parts that you can see and try to ID the particular one you have by using Google Search to search for Images. Use search phrases such as ‘dual flush’, ‘toilet flushing mechanism’, ‘toilet buttons’, ‘dual toilet buttons’, etc.
      If you are lucky enough to find yours make a note of the brand and type by looking at links from the picture you have found and re-search for more images and information on that particular one in the hope of finding your answer.
      Another method might be to visit a plumber’s merchant and show them the parts you have extracted and ask if they can ID the mechanism.
      I’m sorry I can’t give better help.

  14. David Mitchell avatar
    David Mitchell

    Hi Colin
    Trying to lift off the WC cistern lid, I have removed the large and small flush buttons, but there is no screw head below. There is what looks like a screwhead but it has no slot for a screwdriver.
    Would you glad of your advice.
    Thanks, David

    1. Helpful Colin avatar

      Hi David,
      Sorry my reply is delayed.
      I mentioned this to my nephew and he immediately suggested something I too had thought of.
      Someone may have replaced the screw with a toothed plastic peg. I have come across these things used to hold together flat-pack chipboard furniture or plastic parts in cars or electronic components to chassis or circuit boards, e.g. https://www.nyfast.com/306-fir-tree-clips
      They come in many styles. If that’s what you’ve got you may have to try and pull it out with long nosed wiring pliers. Something might get broken so good luck with that.

      1. David Mitchell avatar
        David Mitchell

        Thank you very much for your reply.
        I decided to take a photo of the WC cistern with the flush buttons taken out, so that you can see what it looks like.
        it doesn’t really look as if there’s room to pull anything out.
        Is there any way I can send the photo to you?

        Thankyou
        David

        1. Helpful Colin avatar

          David, you can send a photo to helpful.colin@btinternet.com please.

  15. Mike Lee avatar
    Mike Lee

    Hi Colin,

    When having unscrewed my top dual flush out of the cistern lid I find that it’s an all in one with a rod connected and a smaller rod inside which moves freely. All I did was unscrew the dual flush and then put it straight back in but now the two buttons have dropped like they’ve just been pressed and they won’t come back up!

    Can you help me please?

    Thanks, Mike

    1. Helpful Colin avatar

      Hi Mike,
      Are the two rods you mention for the small and large flush or are they for one of the flushes and therefore need coupling together with a plastic tube so that pushing one down pushes the other down below it? Have some parts come adrift and fallen in the cistern? You can send me a photo to helpful.colin@btinternet.com if you want.

      Regards, HC.

      1. Mike Lee avatar
        Mike Lee

        Hi Colin, Thank you for taking the time to reply.

        I’ve actually sorted it now but it was a rod within a rod and they push the buttons back up when the syphon rises.

        Kind regards,

        Mike

  16. Steve avatar
    Steve

    I have a top flush toilet when the buttons are removed there is just one central shaft into the toilet but no screws how is this one removwd anybody any idea am stumped

    1. David Mitchell avatar
      David Mitchell

      I think what you need to do is to get your thumbs onto the central shaft (the circular metal shaft) and turn it anti-clockwise. This will release it from the flush unit beneath, which it is screwed into. You should then be able to lift the metal shaft out, and then the cistern lid will lift off.

  17. Greg avatar
    Greg

    I didn’t know what a ‘sliding plate’ was, but I knew it was broken. Thankfully, your site showed up in a google search, and now I can order a replacement. Thanks much!

  18. Jim avatar
    Jim

    Hi Colin, I found your explanation to be very helpful and it solved the problem for me. I’ve read through the other comments too and see that you go out of your way to help others, despite some of the posters being rather demanding! Well done for that Sir, you have my respect and I’d like to wish you and your family a very happy Christmas. Best wishes for a prosperous 2017, Jim.

    1. Helpful Colin avatar

      . . . And a Merry Christmas to you too Jim.
      With kind regards from Helpful Colin.

  19. Andrew avatar
    Andrew

    Thanks Helpful Colin.
    That cistern had me scratching my head as to removing the lid.

    1. Helpful Colin avatar

      Thanks for the positive comment.

  20. Kirsten avatar
    Kirsten

    Hello Helpful Colin!

    I have read everything in your blog, and I want to ask you this, why the heck has cisterns become so complicated ????? I had trouble with mine after I moved in, managed to get into the cistern, but failed at putting it all back together again. Two hours of sweat and backache later I gave up and my son had a go. Even he found it very difficult, and he is a professional engineer!
    I now have a cistern with a very loose dual flush button; it works, but dangles about and I darent touch anything else. I would have liked to be able to put a bleach block in though !!!!

    1. Helpful Colin avatar

      Hi Kirsten,

      I’m sorry to hear you had so much trouble.

      I think the main reason for modern cisterns being like they are is: People require them to fit into smaller spaces than they did years ago. Fill valves had a long arm with a big ball float on in the past. That took up a lot of space. So now these have been compacted into a much smaller volume.

      Then there is the requirement to save water by not flushing large amounts down toilets. That led to there being a choice between a large or small amount of flushing water. Consequently you now get selection buttons and complex mechanisms instead of leavers to actually move water about. Also people want to have hidden cisterns and remote buttons. These all add to the complexity.

      I suppose a bleach block interferes with the volume of water. When it’s used up you’ll want the water level to be where the manufacturer intended. When the block is new you’ll want the water level to be slightly higher.

      Then you’ve to keep removing the lid to replace it.

      Good luck.

      Regards, Colin.

  21. Jacqui avatar
    Jacqui

    Hi. After removing the two silver flush buttons there is no screw to undo. Any tips on how I continue to be able to remove the cistern lid. Jacqui

    1. Helpful Colin avatar

      Hi Jacqui,
      I think you buttons must be a different brand or model to mine. Other people have removed buttons and not found a screw. I suggested that in the absence of a screw someone has inserted a plastic stud to hold the silver cup to the apparatus underneath. Is there anything like a stud in the middle?
      The silver cup could be moulded in 2 pieces which screw together. You’d have to look very close to it to see if there is the end of a screw thread anywhere.
      Sorry I’m not much help. There are many different types of flush mechanism. You’ve only got to search the net and you’ll find dozens.
      Regards, Colin.

  22. Skye avatar
    Skye

    I’ve been trying to work out how to get my damn cistern lid off for a couple of years, so I can put a bleach block in there! Thank you! That was really helpful, Colin.

  23. Tien Lee avatar
    Tien Lee

    Thank you! It helped me so much. Clear pictures and instructions. My brand is ROCA and it used a Philips head screw but had the same general construction.

  24. Emma avatar
    Emma

    Hi Colin,
    I have a toilet exactly same with one shown in this post (the last picture not the video in ref.). I’ve done what you suggested and it was very helpful. Thank you very much.

    Now the problem is I can’t screw the button socket back. I can’t see where the plastic screw is aiming and the ‘sliding plate’ is moving all the time.

    I’ve gone through all the comments and it seems no one has this problem. Did I miss something?

    Thank you .

    1. Helpful Colin avatar

      Hi Emma,
      Sorry for the delayed reply, but I have edited my post to improve it and I may add more yet.
      It was lucky for you that, due to my own problem, I have my cistern dismantled and could take more photos of the flushing mechanism.
      Please go to the section “The Sliding Plate In The Bridge” and read it now. Your bridge may be pushed too far down. No problem, this now explains how to raise it again.
      Please send another comment if you still have difficulty,
      Regards, Colin.

    2. Helpful Colin avatar

      Hi Emma,
      I have more or less finished editing the post. I added another picture.
      One important point is I have changed the title from “Dual Flush Toilet Cistern Lid Removal” to “Opening Dual-Flush Toilet Cisterns”. This may mean it’s not so visible, under the new title, in search engines for a while.
      Regards, Colin.

    3. Helpful Colin avatar

      Hi Emma,
      Just re-edited the section “Aligning The Holes In The Plate With The Button Socket” to clarify it.
      Regards, Colin.

  25. Huw avatar
    Huw

    Excellent guides Colin – so clear and straightforward

    I think you are supposed to cut back the length of the spindles. I’ve just bought a replacement pair, as I managed to break the black one. These are 17.5 cm, much too long for my cistern and mechanics.

    Can I just cut these new ones back to match the old size, or do you know how long they should be? Should the grey one be longer than the green one (which actually is intact so I can keep it)

    As far as I can tell I have a E622 6 litres cistern

    1. Helpful Colin avatar

      Hi Huw,
      There are many different cisterns into which these valves are fitted so the spindles have to be cut to fit. Fit them and measure how much protrudes then cut that amount off. Here you can see me using a vernier depth gauge to measure the excess:
      Measuring the button protrusion.
      The vernier scale enlarged.
      Zero on the vernier scale is between 8mm & 9mm. The line on the vernier scale which aligns with a mm line is 0.5 so the amount to be cut off would be 8mm + 0.5mm = 8.5mm. See Zipper Slider Repairs – Using The Vernier Scale for more vernier info.
      Regards, Colin.

  26. Jon Walter avatar
    Jon Walter

    Thanks Colin, very clear instructions and a huge help. Otherwise I’d have broken the cistern for sure. Now I am a DIY god in the eyes of my wife – a rare thing lol. Cheers Jon

  27. Karen avatar
    Karen

    Hi Colin, I’ve had a leak from a dual flush toilet- a leaky washer and screw coming from a hole in the bottom of the cistern. I think that i can fix it but i can’t get the lid off. I’ve taken the buttons out but there is no screw, just a spindle. Can you help at all please?

    1. Helpful Colin avatar

      Hi Karen,

      Please take a look at this YouTube video. Your buttons might be the type filmed here: https://www.youtube.com/watch?v=vT5KwJ2A2eU

      Regards, Colin.

  28. scott avatar
    scott

    Thank you.
    I think my system has a leaking doughnut?
    So becoming more aware of aspects/removal of potential parts of the lid and system. Real helpful and communicated a a level for a real beginner.
    More reading and research before I remove anything.
    Just cleaned the loo and floor area en getting ready.
    Thank you once again buddy.
    Scott

Leave a Reply

Your email address will not be published. Required fields are marked *

This site uses Akismet to reduce spam. Learn how your comment data is processed.