Introduction
Here are two zipper slider repairs that can be done when the pull tab has come off and either:
- the crown (or lug) is lost,
- you still have the crown (or lug).
This post is an edited compilation of two posts I wrote on this blog in the past describing the repair of Zipper Sliders. I have updated the references and deployed WordPress SEO (Search Engine Optimization) by Yoast to improve visibility on the internet.
Naming Zipper Parts
Before I describe the way in which I fixed these broken Zipper Sliders, let me refer you to some websites which clearly name and describe all the parts of a zipper just so you know what I’m talking about:
- YKK — The Fastening Products Group, (a global company),
- Bag’n Telle — Handbag Zippers & Their Applications, (blog by Don Morin — designer),
- Outdoor Fabrics Zipper Tips — Quest Outfitters, Sarasota, Florida, USA,
- Zipper Source — Bespoke Zipper Manufacturer, Chicago, Illinois, USA.
Description of Normal Zipper Slider Assembly

The crown runs through the loop at the end of the Pull Tab and is fixed in place by hooking one end over a hook at one end of the slider body, and then two dimples pressed into the sides of the crown at the other end force the crown metal into the sides of the hole running through an upright post. These dimples prevent the crown lifting off the post.
Right – you can see the body with the hook at one end and the upright post with the hole in it at the other:
The History of My Broken Zippers
The two repair methods shown below were applied to separate zippers. The first was on a waterproof outer coat and the second was on a fleece.
Reported in my previous blog post of 12 Jan 2012

“I walked out of the house the other day and zipped up my coat and then the toggle came away in my hand. Was this a good coat ruined, yes? No! Today I fixed it.”
HC
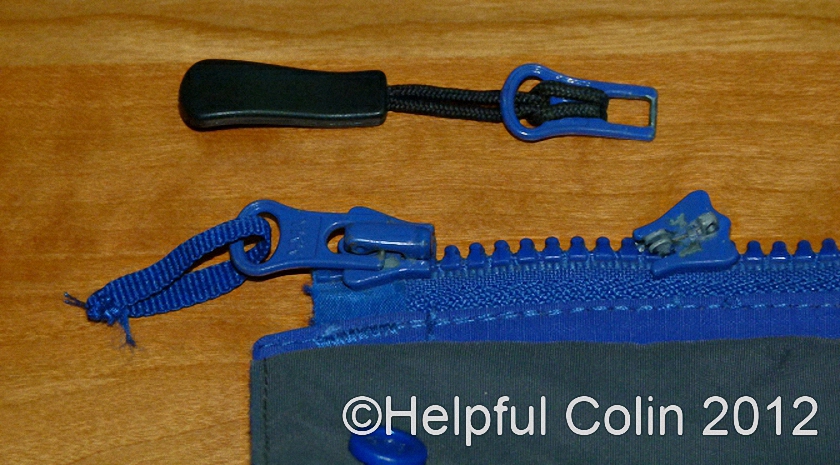
See the picture on the right. That’s what it looked like broken and I lost the crown at the time.
This was fixed by using Method 1 below.
Reported in my previous blog post of 20 May 2013

This is a similar problem to the one I had before but it has a different solution because I didn’t lose any parts.
In the past the Pull Tab of this broken zipper’s slider broke where it fits under the Crown. I fixed that by soldering a copper wire loop to it. I then had to remove the crown from the Slider Body and squeeze it back on after fitting the Pull Tab in place. It may have been the removal and refitting of the crown that damaged it so that it later dropped off the Slider Body. Fortunately I caught all the parts when It happened. See the repaired Pull Tab right.
This was fixed by using Method 2 below.
My Zipper Slider Repairs
Method 1 – Without A Crown

If you look closely at the broken fastener on the right you will see it has two little hooks to the left end and a small hole in a post to the right end. These are normally used for holding the crown on.
Using Copper Wire To Hold The Toggle
The hole was a little more than a millimetre in diameter so I found a short length (10cm) of 1mm diameter copper wire from house wiring cable and threaded it through the hole until it was midway along its length.

Then I made a tight 180° bend in the wire making it look like a hairpin. I then threaded the loose toggle over both ends of the wire bringing it right down to the piece on the fastener with the hole. I then rotated the wire in the hole until the hook on the fastener lay between the two open ends of the wire. Then using pointed wiring pliers I held one end of the wire tight and threaded it under the hook, forcing it to bend as I went so it was firmly hooked to the left end of the fastener. See next image below:

This was going better than expected so I snipped off the excess wire with these small wire cutters:
After Pinching The Wire Tight

This is the result after I pinched the wire tight against the hook with the pointed pliers.
At this stage the zip worked again but it would have come apart on its own because the soft copper wire would bend out-of-place. So I soldered the wire ends together where they overlapped.
Note how clean the copper wire is. One cannot expect to solder tarnished copper.

Before soldering it I applied flux paste to the copper wire using a penknife. I rubbed it in the area where I wanted the solder to bond as you can see on the right.

I applied solder with a small temperature controlled iron set to 400°C. The heat had to be applied carefully and quickly so I could solder the wire but not melt the plastic teeth of the zipper. I chose to use a high temperature to make the solder melt and flow quickly. As soon as I took the soldering iron away I blew ferociously onto the parts. Looking back I should have dunked them in water to cool them quickly so the heat didn’t spread to the plastic. Afterwards I cleaned the flux off with a dry cloth.

Here you can see the finished result after painting with some paint suitable for plastic models. I managed to get an exact colour match but the shop only had it in matt finish.
Method 2 – Using The Original Crown

I decided I could re-attach the crown to the slider with a pin threaded through holes in both. The crown has no holes in it just two dimples which originally wedged in the holes of the post on the slider body to hold it in place. I drilled holes in those dimples the same diameter as a dressmakers pin. Then I re-assembled the crown and tab on the slider and held them in place with a pin threaded through the holes of the crown and the slider. I bent the pin over where it exited the hole in the crown and cut it off. See the picture of the ‘Repaired Zipper Slider’.
The pin measured 0.6mm dia. so I drilled a hole 0.65mm dia. to allow some slack.
Determining What Size Hole To Drill
Before drilling the holes through the dimples of the crown I measured the diameter of the pin I was going to use with external calipers thus:

These calipers were given to me by my son who received them whilst on a works visit from school at age 15 years. They have a Vernier scale allowing measurements down to an accuracy of 0.05mm. They have been incredibly useful to me over many years and saved me from spending on an expensive steel version.
The large calipers, at the bottom left, measure the external size of things and the small ones, at the top left, measure the internal size of things. There is a pin on the far right (not seen in this view) which is used as a depth gauge.
The zero on the part which moves right is the pointer which points to the mm scale on the part which moves left to give the measurement.
Using The Vernier Scale
The widely spaced marks and numbers on the part which moves right constitutes the Vernier scale.
When using a Vernier scale you have to look carefully and decide which graduation on it aligns with a mark on the normal measuring scale (the one marked in millimetres). In this case the 6 mark best aligns with a graduation. All the other graduations are not quite inline. This represents 0.6mm above the main scale graduation to the left of the zero point on the Vernier scale. The previous graduation on the main scale to the left of zero on the Vernier was, in this case, zero mm. So in this case 0.0mm + 0.6mm = 0.6mm the diameter of the pin.
Drilling The Holes In The Crown
On the strength of this measurement I decided to drill a hole 0.65mm in diameter using a 12 volt model maker’s drill as shown below:

The crown was clamped in a small vice fixed to my desk. I drilled by resting the drill conveniently in the dimple on each side to drill two holes, one from each side. A clearer picture of the drill and bit is shown below:

The silhouette below shows the drilled hole in the crown where the dimples were originally:

Here it is with the pin threaded through it:

HSS Twist Drills Size 0.3 To 1.6 mm
Although I’ve had the drilling equipment for some time this is the smallest hole I have drilled to date. The drill bit was taken from the following selection available from Micro Mart:

These fine drill bits are hard to grasp and when loose on a smooth surface roll about all over the place. So, they need to be contained in this special box or they would soon be on the floor and get lost.
The container has a moulded black plastic back with a groove for each drill bit. This is covered by a transparent sliding plastic cover through which the bits can be seen. On the top edge of the cover there is a protrusion with a hole in it. The cover can then be slid along until the hole aligns with a particular bit. Then, when so aligned the container can be tipped upside down to release the selected bit which drops out through the hole. All the other bits remain contained. I do find it a bit stiff to operate because the container is not such a good quality but I approve of the principal which works well.
Leave a Reply