Mira Shower Thermal Switch Replacement

Introduction

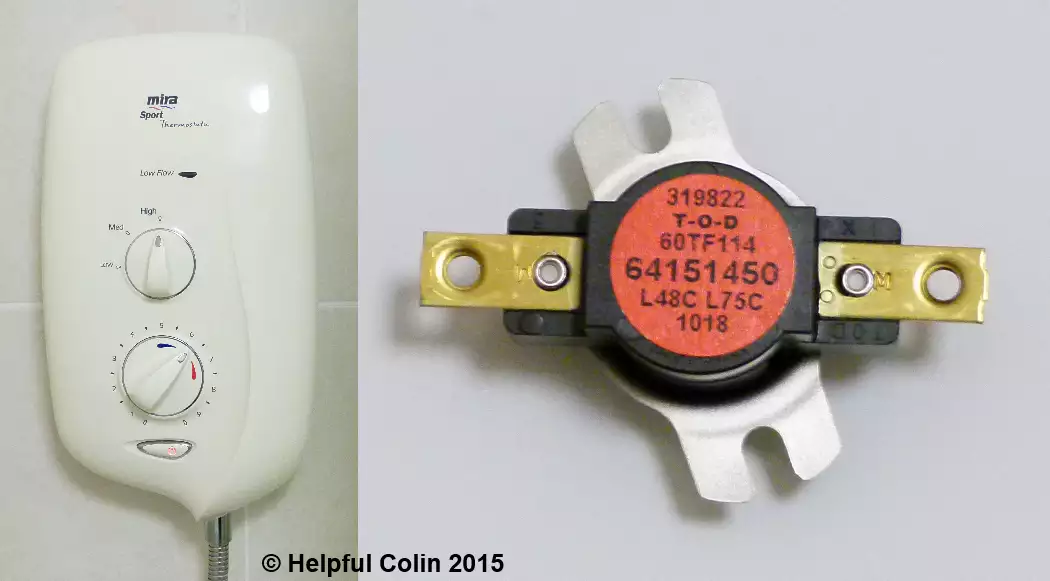
This article advises how I have replaced a Mira Shower thermal switch in a MIRA Sport 9kW Thermostatic Shower on several occasions.

Originally I installed a MIRA Sport 9kW Thermostatic Shower as part of a new bathroom and had it tested and certified by a qualified electrician on 1st May 2007. I was very pleased with it and it worked well for three years until June 2010 when it developed a fault.

I found that in the middle of taking a shower the water would go cold for a few seconds and then get warm again. On the first few occasions I wondered if cold water being drawn off by other taps and appliances was lowering the water pressure to the shower and so causing it to operate incorrectly (although the low pressure light was not illuminating). As the days went by the problem got worse and my wife ended up washing shampoo off with cold water. I knew then that I would be in bad books until it was fixed.

I had to determine if this fault could be fixed or if I would have to replace the entire shower unit. For this I needed to take a look inside the shower unit.

Taking A Look Inside

WARNING: There is a danger of electric shock which can cause DEATH when working on an electric shower if it is not fully isolated from the mains supply.

DISCLAIMER: All people working on electric showers do so at there own risk. I take no responsibility for other people’s actions. If you are not qualified to work on electric showers then invite a person who is qualified to do the work.

REMEMBER: People who work on showers are responsible for the safety of those who use them.

“Beware of counterfeit copies of The IET Wiring Regulations.” — HC

BATHROOMS IN THE UK: These have specific EQUIPOTENTIAL EARTH BONDING requirements to ensure that a dangerous potential cannot exist between any metal fixtures, e.g. pipes, radiators, taps, light fittings, showers, etc. Many old bathrooms fall short in this area and must be brought up to date when an electric shower is fitted. See BS7671 and the Institute of Engineering and Technology (IET) Wiring Regulations. BEWARE of counterfeit copies of The IET Wiring Regulations1.

Before looking inside I:

  1. turned off the shower using the Isolating Switch in a cupboard outside the bathroom and observed that the light behind the shower button went off at the same time.
  2. operated the Test button on the Residual Current Device (RCD), also in a cupboard outside the bathroom. In most cases the RCD can be found inside the consumer unit adjacent to the  Miniature Circuit Breakers (MCB’s). NOTE: pressing the TEST button of an RCD in a consumer unit may disconnect other circuits in the house, e.g. circuits that carry power to a freezer (which you wouldn’t want to switch off) or a computer (which you would want to shut down first.)
  3. switched the 40Amp MCB, devoted to the shower, in the consumer unit to the OFF (down) position. This involves pushing the lever down from its normal working position.

Since the wiring to this shower was familiar to me I was happy with these isolating procedures. Had it been an unknown situation I would have tested the voltage at the shower cable terminals with a known working meter to see if there was any voltage between:

  1. the LIVE terminal and the NEUTRAL terminal.
  2. the LIVE terminal and the EARTH terminal.
  3. the NEUTRAL terminal and the EARTH terminal.
  4. each terminal and some alternative earth, e.g. the taps or pipework.

SAFETY NOTE: If a switch or MCB is labelled ‘SHOWER’ it doesn’t prove it is the shower switch or MCB. So it is important to be vigilant and check it does isolate the SHOWER.

Tools For Replacing A Mira Shower Thermal Switch

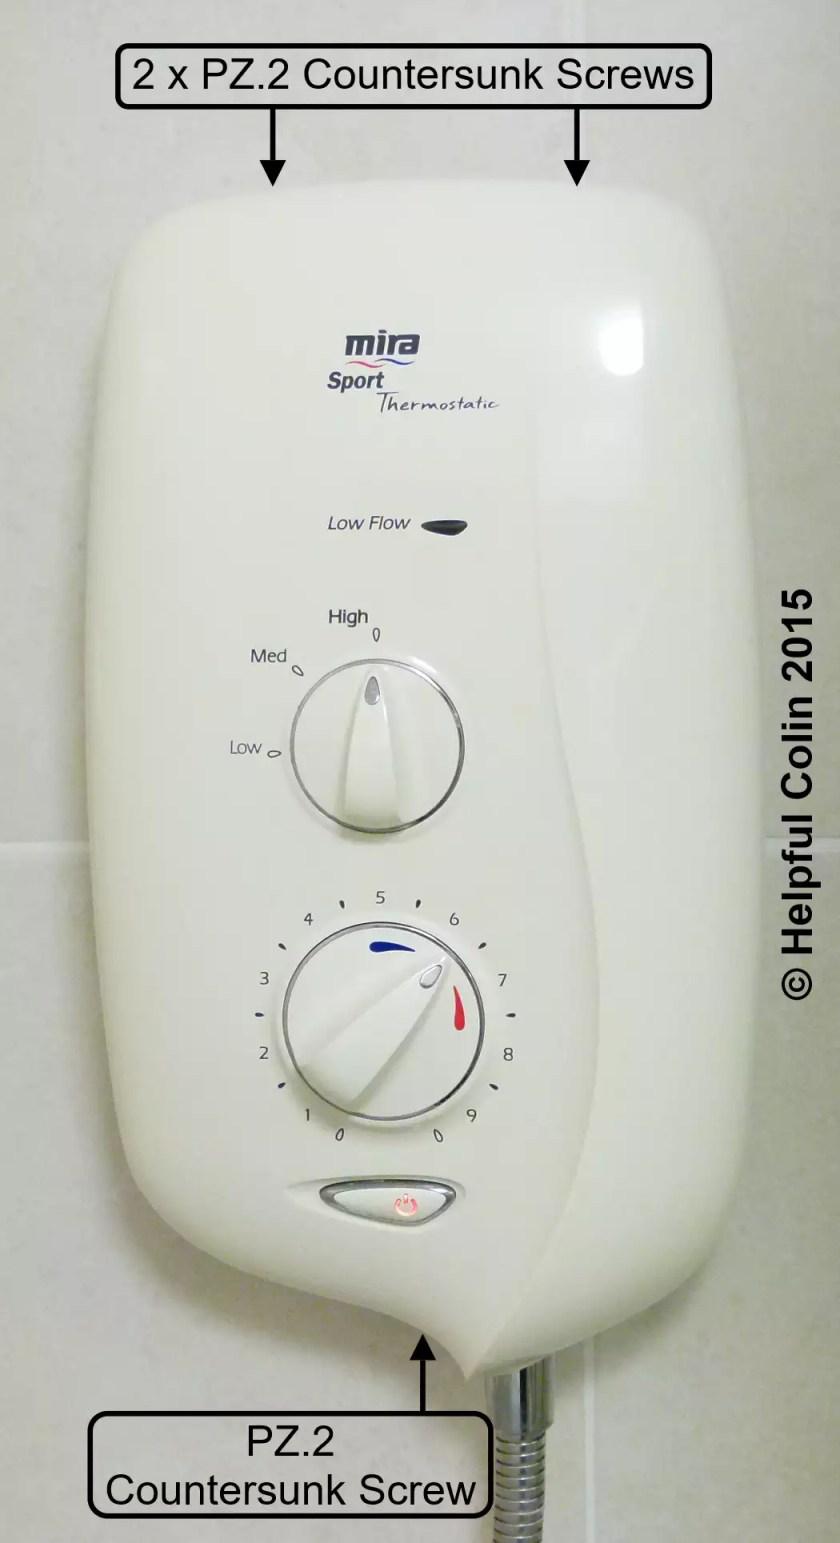
Three Posidriv PZ.2 screws hold the case front cover on and all the electrical connections and fixing screw for the thermal switch are made with TORX T-15 screws. So the tools needed are a HEX driver with a PZ.2 bit and a T-15 bit as shown below.

Draper Hex Driver with PZ2 & T15 Bits

Removing The Front Cover

“First I closed the plug hole in the bath before removing any screws.” — HC

mira shower thermal switch
Mira Sport Thermostatic Shower Front Cover Screw Positions

An electric shower has to be installed with the cover removed so that the water pipe can be connected and the electrical connections made. So I was familiar with the layout of the components already having previously mounted the shower on the wall some years before.

The front cover has the Power Setting Switch knob, the Temperature Setting Control knob and the ON/OFF button mounted on it. These are all plastic pieces which engage with the actual control mechanisms on the inside.

Three PZ.2 screws hold the cover in place. They are not visible to an observer looking straight at the front of the shower. The axis of the screws is vertical. Two enter the main case, which is bolted to the wall and has all the working components fixed to it, from the top. They pass down through lugs on the inside of the front cover and on into more of the main case plastic.

Similarly the third screw passes up through a hole in the case immediately to the left of the outlet hose and passes through a lug on the front cover before entering more of the main case plastic.

After removing the cover I carefully placed it in the wash basin nearby without moving the control knobs. I have found it to be a slippery customer so the wash basin’s shape held it well.

“Avoid moving the control knobs and the Front Cover will easily fit in place.” – HC

Looking For The Problem

mira shower thermal switch
Shower With Front Cover Removed

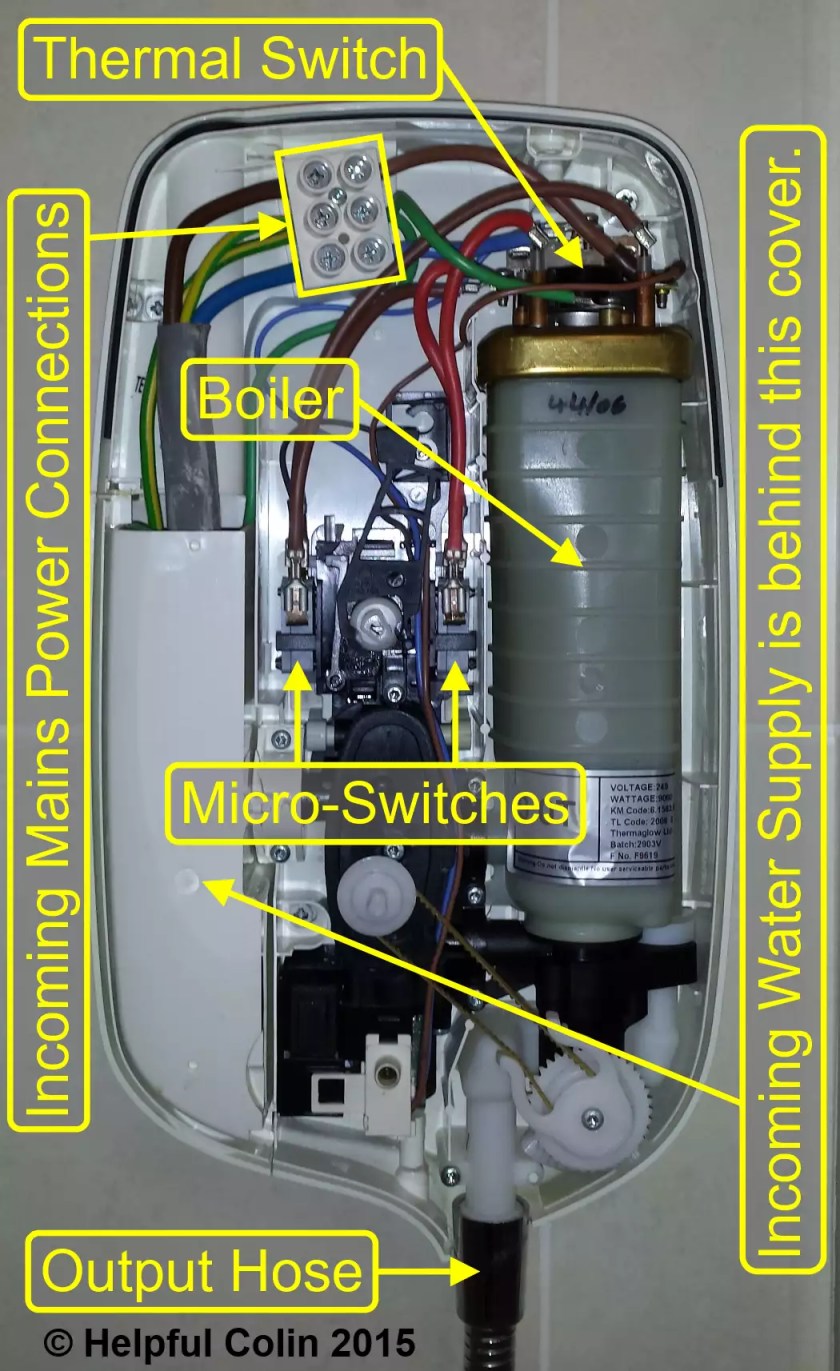
Once I removed the cover from the shower case I examined the shower but couldn’t find any broken plastic parts. There are many moving parts, e.g. levers and gears associated with the various controls, any of which could have broken and prevented the shower from functioning correctly.

However I did find two components which could deteriorate over time and might be cheap to replace. They were the micro-switches which turn the power ON/OFF and the Mira Shower thermal switch which protects the Heater Tank from overheating.

A Corroded Mira Shower Thermal Switch

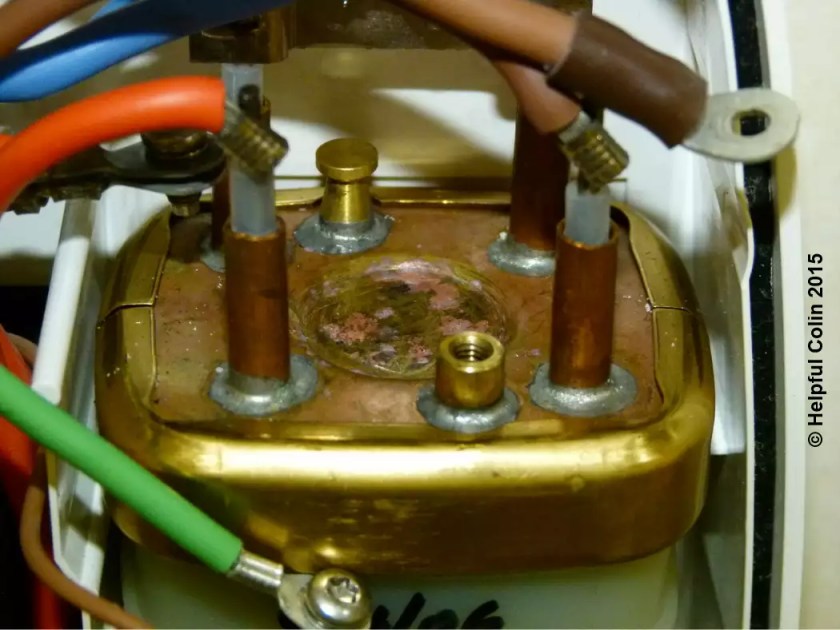
After removing the Mira Shower thermal switch it became clear to me that it needed to be replaced regardless of whether it was the cause of the immediate problem. It appeared to have become wet with condensation and the bimetallic disc, which bends as it gets hot, had corroded. It comes into contact with the top of the Heater Tank which is made of copper and so electrolytic corrosion occurs when moisture gets between the two different metals. Also electrolytic corrosion occurs between the solder and the copper where the heating elements protrude. and are soldered in place.

mira shower thermal switch
Heater Tank Showing Electrolytic Corrosion After The Thermal Switch Was Removed

Obtaining A New Mira Shower Thermal Switch

I set about locating a supplier of Mira Shower parts and found the Shower Doctor who could supply the Mira Shower Thermal Switch 416.41. From the Shower Doctor’s current web site I was able to determine that there have been several models of Mira Sport showers and my model is post-2006 & ante-2011.

NOTE: At the time of writing the Mira Shower Thermal Switch 416.41 costs £13.94. Back in October 2010 I realised there was an ongoing problem requiring me to obtain several Mira Shower thermal switches so I bought four at £7.32 each.

UPDATE: As of 06/03/2022 Mira Shower Thermal Switch 416.41 is not available from the shower doctor but is available from alternative sources which you can find by searching for it.

Removing The Old Mira Shower Thermal Switch

NOTE: Before disconnecting any wires I made a record of which wires were fixed to the three connections involved, i.e. the two connections for wires to the switch and the one connection for the earth wire. Initially I made a drawing and described the wires by colour and thickness. Today it would be easy for most people to take a digital picture (photograph).

I found the thick brown and red wires fixed to the tag on the left would not stretch over to the tag on the right so they couldn’t get mixed up. The thick brown wire, going to the tag on the right, was the only thick wire that reached that far. It wasn’t difficult to remember that the thin brown wire went to the same tag as the thick brown wire.

NOTE: My shower model has not got an overheating neon light. It appears that some models do have one. The Shower Doctor doesn’t distinguish between the two models as far as I can see. I have seen a Shower Doctor picture with an extra thin black wire connecting to the tag on the left and on the right. I presume these go to the overheating neon light such that when the Mira Shower thermal switch is closed the neon is shorted out. Then when it opens, due to overheating, current flows through the neon to light it.

“I had still got the plug hole closed while I carried out the next stage.” — HC

Some people advise un-mounting the Mira Shower thermal switch before disconnecting the wires from it. This is because they have difficulty getting the TORX T-15 bit into the heads of the screws holding the wires to the connection tags. Personally I found it best to keep the Mira Shower thermal switch mounted while loosening the connection screws. I found there was enough flexibility  in the parts to allow me to get my hex driver in position and having the Mira Shower thermal switch firmly mounted made it easier to loosen the screws. After I had removed the brown and red wires I unscrewed the mounting screw that held the Mira Shower thermal switch in position together with the earth wire. Then I could lift the Mira Shower thermal switch out of its place.

Cleaning The Top of The Heater Tank

Before putting a new Mira Shower Thermal Switch in place atop the heater tank it must be cleaned of any corrosion. While doing this I think it is important not to put deep scratches into the copper surface or to leave any strands of wire wool lying around in the shower for these reasons:

  • Damaging the copper surface may interfere with the seating area and impair the thermal conductivity between it and the thermal switch.
  • Strands of wire wool are very fine and may ledge across electrical connections and conduct electricity when power is applied. With the circuit fused at 40 Amps it’s unlikely that a thin strand of wire wool will trip the circuit or blow the fuse but the wire wool will glow hot, melt and burn. The melting and burning may do further harm inside the shower.

I started by wrapping a damp cloth around my finger and giving it a good rub. This got rid of the salts. Then to clean it a little bit more I resorted to a green fibre scouring pad but not wire wool. I wiped it again with the damp cloth afterwards to collect any remaining debris.

helpfulcolin.com
Green Fibre Scouring Pad
mira shower thermal switch
Heater Tank With A Clean but stained Top

Putting A New Mira Shower Thermal Switch In Place

What happens to a faulty Mira Shower thermal switch on its way out is not a big issue, but getting a new Mira Shower thermal switch into place without damaging it is.

“It’s important to get a new thermal switch in place without damaging it.” – HC

WARNING

mira shower thermal switch

There are warnings on the Shower Doctors web site and on the packaging for the Mira Shower thermal switch. They warn that it will be ruined if the bimetallic disc is pressed in. So don’t be tempted to press it like a button.

mira shower thermal switch
New Thermal Switch Underside. DO NOT PRESS IT.

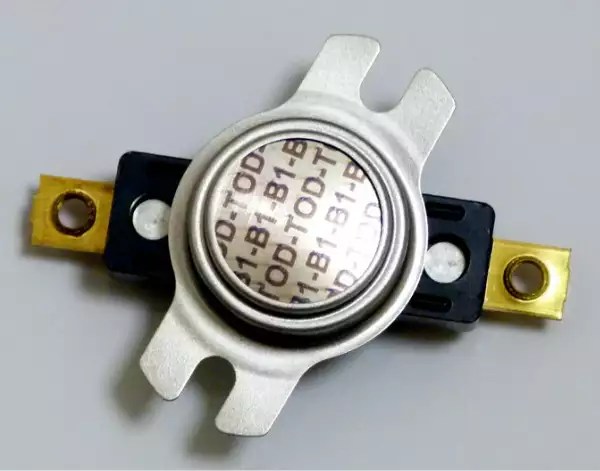
This refers to the shiny silver-coloured printed disc on the underside of the Mira Shower thermal switch which you can see here. Not the orange label on the plastic topside.

So BE WARNED it is easy to accidentally press it in while manoeuvring it into place. It could get squeezed while struggling to get it through the rat’s nest of wires or pressed against the point of a heating element.

Below are four pictures of the Thermal Switch in consecutive positions while it is being placed in position atop the Heater Tank.

mira shower thermal switch

Pic.1. I Got the Thermal Switch into this position by threading it in from above the wires.

mira shower thermal switch

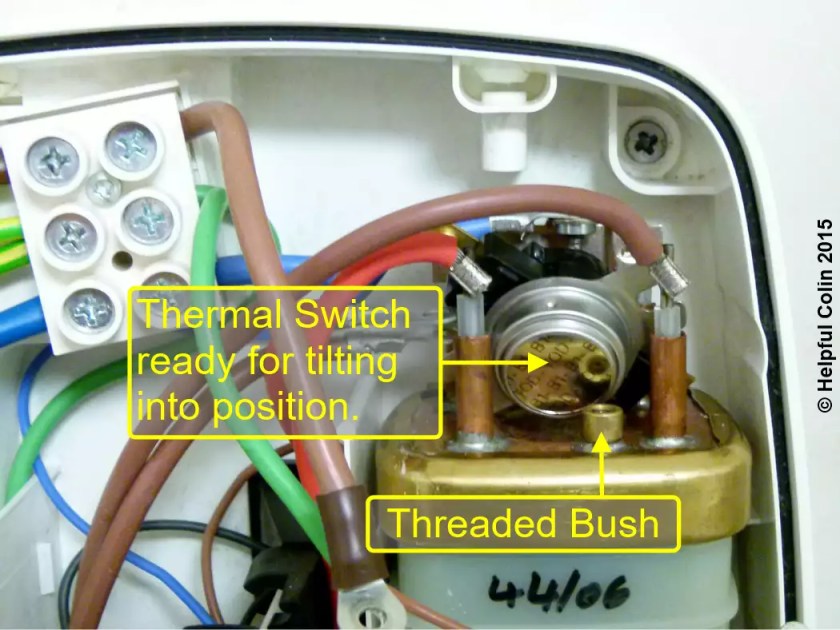
Pic.2. I Moved the Thermal Switch down between the wires to a position where it can be tilted over.

mira shower thermal switch

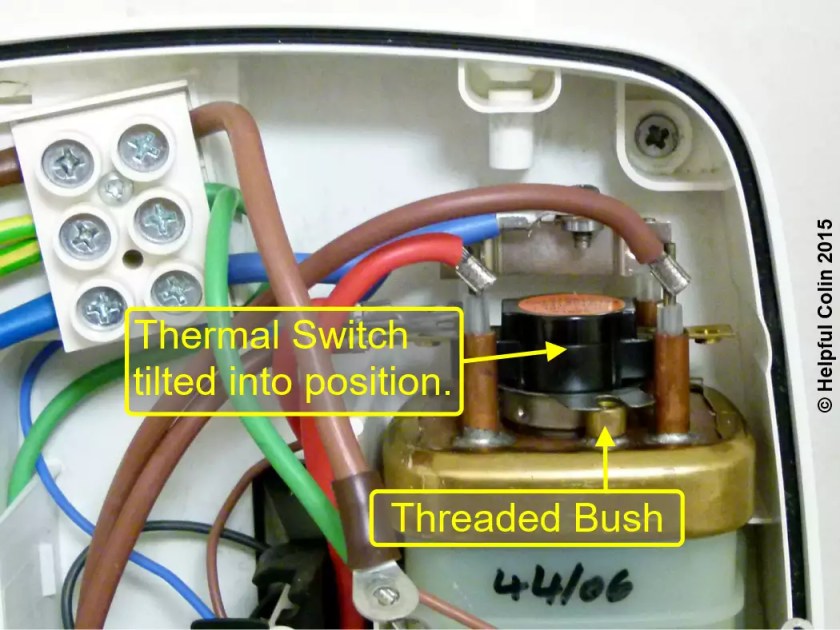
Pic.3. I Tilted the Thermal Switch over and put it under the stud at the back, then rested it on the threaded bush at the front.

mira shower thermal switch

Pic.4. Finally I screwed down the Thermal Switch and Earth wire, then reconnected all the other wires.

Replacing The Front Cover

After I had checked my work inside the shower I replaced the front cover.

Since I had been careful not to move any of the control knobs attached to the Front Cover or turn any of the controls in the shower I was able to align the cover with the case and press it into position.

While holding it and keeping it pressed into place with one hand I inserted the two top screws with my other hand, and then screwed them 90% of the way in. Then I inserted the bottom screw from a crouching position so I could look up and see where to put it and tightened it completely. I then tightened the top two screws completely.

Turning The Power On And Testing The Shower

With the shower rose hanging on the wall and the power and temperature settings normal I proceeded to reconnect the power by resetting the MCB and RCD and turning on the Shower Isolation switch. I observed the neon light illuminate on the isolation switch and behind the shower ON/OFF button.

Keeping away from the water jet I turned the shower on. It behaved normally with low initial output flow until the water warmed up. I tried various temperature settings and the appropriate temperature was maintained. There was no longer a sudden drop in temperature due to the Mira Shower Thermal Switch operating and cutting off the power.

At this point I considered the repair a success.

Further Issues

“In my opinion letting the thermal switch get wet is a design fault.” — HC

Since the initial repair I have had to replace the Mira Shower Thermal Switch several times. The last thermal switch lasted eleven months and now I have had to replace it again. This time it was very corroded. I am concerned about the amount of water that collects under the thermal switch. It rests in a hollow pressed into the copper top of the heater tank so the water cannot drain away. The hollow is probably made to ensure that the copper on which the thermal switch is mounted comes into direct contact with the heater tank water, else it might be in a pocket of air and be isolated from the heat of the water and so not operate correctly. In my opinion letting the thermal switch get wet is a design fault.

Replacing The Shower With A Better One

NOTE: I replaced this shower with a new ‘Mira Sport Max with Airboost’ shower on 17th July 2015 due to continued thermostat problems and a new tendency to continually cycle from hot to cold and back to hot.

Footnotes

  1. Beware of counterfeit and dangerous wiring regulations which cannot be trusted and have proven errors in them. The latest edition is available from the IET.

Comments

38 responses to “Mira Shower Thermal Switch Replacement”

  1. Ken Smith avatar
    Ken Smith

    Reference your instructions for changing thermostatic switch on a mira sport. This is probably the best instruction set I have ever seen. I followed it to the letter with one minor change. I loosened the heater assembly before I could get at the earth screw. I contacted Mira and of course they denied that their product could corrode!!!!Well done and thanks again

    1. Helpful Colin avatar

      Hi Ken,
      I’m glad it went well for you.

      Since I wrote the article I have had the shower off the wall and taken all the guts out to glue cracked parts of the case together. This has been successful. On the left where the metal water inlet filter housing connects to the black plastic control unit there is a white clamping strap held in place with two screws. Before loosening this strap the water supply must be turned off or the water pressure will force this connection apart. They are sealed with an ‘O’ ring. They go together easily. Their flanges are held in place a limited distance apart, by the shape of the case and the clamp, so that the ‘O’ ring forms a watertight seal. In my case both the case and the clamp had cracked. I had noticed this in the past. I removed the clamp and filled the crack with ‘super-glue’, then clamped it in a vice between two pieces of hardboard, to cushion it, for 24 hours. This type of plastic takes ‘super-glue’ very well. Unfortunately I forgot to turn the water off. The back of the case was also cracked but seemed to be holding the parts together, but over about an hour the water pressure made the crack in the case wider until the ‘O’ ring popped out. The ensuing water spray soaked the ceiling and window, and then began to puddle on the bathroom floor. It was pure fortune that this hadn’t begun while I was out. It also hadn’t begun until after the bathroom had been visited only a couple of minutes before I heard a rushing water sound while standing in the kitchen beneath. Luckily I was able to get the water turned off and mop up before any serious damage was done. Anyway the whole shower had to be taken to a bench to work on it and with the innards removed I was able to carry out an effective repair to the case using ‘super-glue’ and a clamp. I reassembled the shower after 24 hours and I was very careful in the way I applied force with my spanners when I reconnected the copper pipe to the inlet filter housing. I reinserted the innards while the case was on the wall and reapplied the clamp when I could see that the parts it held together were in good alignment so as not to crack it again with any undue strain. Note to self: I must remove the cover and inspect it to see if it has held over time. If not I will have to get a new shower.

      My point here is: Please be careful when loosening the heater assembly, but well done.

    2. Glynn avatar
      Glynn

      Hi Colin
      Thanks for the post very helpful. my shower has had its Mira thermal cut-out assembly replaced by the landlord but now it is either piping hot or cold you cant set the temperature at all. has he wired the cut out assembly the wrong way round ? or has it been damaged? I can isolate the power and continuity test it but if its been wired the wrong way would it make a difference to the output of hot water?
      thank you Glynn

      1. Helpful Colin avatar

        Hi Glyn,
        It doesn’t matter which way around the two wires are connected to the terminals of the cutout (thermostat). However this doesn’t mean he has wired it correctly. I think you will find that the water temperature is controlled by mixing cold water with the hot water with the valve controlled by the temperature control knob. It was when this part of my shower went faulty that I decided to scrap it. I replaced it with the Mira Sport Max with air-boost (that’s just a novelty). It’s got digital electronics and I’m about to fit the same in an ensuite shower room. The Mira Sport Max can connect to the same water supply and cable but requires new screw holes in the wall. I was able to carefully position it so that the existing holes didn’t show (wiring and pipe is on the left) but at least one hole is very near to an existing one. Your landlord may be interested in a Mira shower model which is a direct replacement for several older models with regard to screw holes pipe and cable. It’s called the Mira Jump Multi-Fit.
        Good luck with getting it fixed.

        1. glynn avatar
          glynn

          thank you colin you have been most helpful I will get onto it straight away thank you my friend

  2. Peter avatar
    Peter

    When you replaced the Mira Sport with the Mira Sport Max, were ALL the connections in incoming services in the exact same place? If so where did you get the newer Max from?
    Our Mira Sport is now on its second thermal switch, I get the impression that it can expect the life expectancy of each replacement switch in turn to be less and less. Is this your experience, and do you know why? Was the tank leaking at the top?

    1. Helpful Colin avatar

      Hi Peter,
      Q1. When you replaced the Mira Sport with the Mira Sport Max, were ALL the connections in incoming services in the exact same place?
      A1. Not exactly. The new electrical connections are on the left but lower down within the shower so the existing cable was long enough. I actually mounted the new shower higher on the wall than the old one. I wanted it to be higher. I had to drill 3 new fixing holes. I was careful not to drill any new hole closer to an old hole by less than 3/4 of an inch (2cm). I was able to make the new shower (which is bigger) cover all the old holes so that they couldn’t be seen. Because I placed it on the wall as high as I could but sill cover existing holes I had to re-plumb the pipework but I was able to use the original hole. So the pipe now comes through the wall where it always did, and it is still within the confines of the shower, but it comes in right at the bottom of the box and goes much further up inside than before. If you don’t want to change your pipework I think you will manage. The cable will reach but you will have to drill holes which may be too close to existing ones. If so I recommend you plug the old ones well with mortar rammed in to stop new holes breaking into old ones.

      Q2. I get the impression that it can expect the life expectancy of each replacement switch in turn to be less and less. Is this your experience, and do you know why?
      A2. No that’s not my experience. When you change the thermostat you start again but some last longer than others. Don’t ask me why. I got a new shower because I suspected it was manufactured at least a year before I got it (so it was getting quite old) and there seemed to be a new fault such that even with a new thermostat the temperature cycled from hot to cold in a smooth way. This fault I suspect was linked to operation of the solenoid. I had been changing the thermostat for several years. Also the plastic case was deteriorating. I thought the plastic it was made from was chemically unstable.

      Q3. Was the tank leaking at the top?
      A3. Not that you could see, but it might have suffered from dezincification. (It had gone copper coloured.) That is a problem where the zinc in the brass leaches out into the water leaving the metal porous to water molecules which percolate through it from one side to the other.

      Q4. If so where did you get the newer Max from?
      A4. Plumbworld – http://www.plumbworld.co.uk/
      Note: They have various power ratings. Mine is a 9kw. You must not exceed your existing shower’s rating without an electrician’s advice since your cable and fuse may not support a more powerful shower.

      I have just found out from the Mira website:
      “www.mirashowers.co.uk/onlinecatalog/detail.htm?productNumber=Mira Sport Multi-fit 9.0KW&section=Electric showers&resultPageKey=1054540350-0&category=” (Yes this link has spaces in it. So copy and paste it into your browser and see how you get on. Don’t copy the quotes.)
      There is now this shower Mira Sport Multi-fit (9.0kW) . It is like the Mira Sport I replaced mine with but has the outlet on the left. It is designed to fit over the holes of an existing shower.

      1. Peter avatar
        Peter

        Thanks, second thermal cut out switch 416.41 now gone in, mail order, delivery packaging a bit squashed Royal Mail. I wonder if this will shorten the switch life? Not hopeful of getting very long out of it.

        Mira case is deteriorating, mostly on the inside screw positions but it’s ok if it will stay together, but am concerned about the reasons for your water leak from the LHS of the flow control where your case split and the o ring slipped etc

        1. Helpful Colin avatar

          Hi Peter,

          On the left is a white saddle clamp with a peg sticking out from it. The cable cover engages with that peg. In my case that saddle had a vertical crack in it for several years. I felt it should have the crack repaired once I realised it was being forced open by the mains water pressure. I took it off to repair it without turning off the water supply. The metal inlet didn’t burst out from the plastic it plugs into because its flange was still gripped by the plastic case which is shaped to hold it at the back just like the saddle is at the front. However while I took the saddle away to repair it the flanges of the connector and the black plastic of the shower part slowly eased out of the grip of the case until the water pressure was able to force the two parts apart. They came apart enough to spray water like a tap does when you turn it on and put your thumb over it. Fortunately nothing broke and with the water turned off it was easy to put it back together with a bit of Vaseline on it to aid compression of the O-ring. After I repaired the saddle I re-assembled it. The case and saddle held the inlet connector to the black shower plastic OK.

          If your saddle is not damaged and the screws are tight then I’m sure it will be OK.

  3. Paul avatar
    Paul

    I have a mira and replaced the tco 8 months ago. This failed within a week and northwestspares sent me a free replacement. This in turn failed recently and the replacement has failed again within a week. I am beginning to suspect this is a manufacturing or design fault because if you google shower thermal cut out first page references are mainly for Mira.

    1. Helpful Colin avatar

      Hi Paul,
      Sorry you’re having such a bad time of it. I suspect you have a second fault which is making the thermostat work too hard, e.g. the mixing of hot water from the boiler with cold at the output of the boiler. I think that is what normally happens and the thermostat is for safety if the boiler water gets too hot.

      I can’t examine mine to check exactly what happens anymore because I have replaced it with the latest top of the range version – The Mira Sport Max.

      I don’t think it will develop the same fault as the old version. The thermostat doesn’t sit in a depression. Mira have done a good thing and turned the plate at the top of the boiler upside-down so that the thermostat now sits on a hump so it cannot sit in a pool of water. The control is also digital and nothing like traditional showers. They do a version that can sit nicely over the holes in the wall for existing showers.

      1. Tom Ryan avatar
        Tom Ryan

        Oh Colin, what a superb instruction and with such great detail too. We have a Mira Event shower which we have a pressure problem with. We have to turn up the inside dial to maximum to get a decent water pressure. I recently changed the filters as they were clogged up and thought that would help but it hasn’t. I also changed the rail and shower head-not a mira shower rail and head but a cheap one from Wilkinsons. Any ideas on how to get our pressure back without having to turn up to the max. Thanks and keep up your great work. Happy New Year Tom.

        1. Helpful Colin avatar

          Hi Tom,

          I have no experience of this type of shower, but I do have a hot water system that could probably accommodate it since it is gravity fed. I would have to take a cold feed off the header tank to get it to deliver the same pressure as the hot water from the cylinder as per the ‘Correct Installation’ diagram on page 13. I think doing it correctly would involve considerable effort in an already working gravity fed hot water system. A new header tank outlet pipe would have to be fitted at least an inch above the existing one and the existing pipe connected to it while the original outlet would become the cold feed to the shower. Then there is that sloping pipe which would have to replace the usual horizontal one on the cylinder output. It is usually horizontal for simplicity of construction and to allow shelving slats to be put immediately over the cylinder in the airing cupboard.

          I have read some of the installation and user guide for the MIRA EVENT XS and it warns that shock waves sent through the water supply from adjacent taps being turned off (you know that bang in the pipe) can sometimes damage the shower (see page 11). So has this happened in your case? If it was OK for a long time, and then went faulty, have you recently installed a tap in a location near to the shower which might now have damaged it? (I’m not sure what damage is caused.)

          I understand that electricity is only used to drive the pump in the shower and not to heat any water. Is the pump working OK?

          Is it plumbed in so that the requirements of page 11 are all met?

          Is it installed according to the diagrams on page 13?

          I ought to ask if this all happened when you changed the shower head? Your original may have not restricted the water flow whereas the new one would certainly be for a mains pressure shower. Some of these output pipes and heads have devices involved (restrictors) to help people save water. They probably give people a poor quality shower too. If you haven’t thrown the old one away yet you could swap it back temporarily to check if there is an improvement. If there is then buy one from Mira.

          I have asked all these questions not because I want the answers, but so that you might consider the problem further and gain a greater understanding of it and search for a better answer.

          If you seek expert help from a local plumber be careful who you ask. Get a Trusted Trader recommended by your local council. I suspect that many who fit showers will not have experience with this type, but I may be wrong.

          Good luck and Happy New Year to you Tom.

          1. Tom avatar
            Tom

            Good morning Colin, thanks for the quick response and for the useful information. I think that I may have resolved the problem by turning the flow dial to the maximum which appeared to clean what may have been an air lock or maybe some dirt. Shower flow is now back to normal so thanks for all your help and the attached pdf file on the Mira Event was very helpful too. Best wishes Tom.

    2. Adam avatar
      Adam

      I certainly think that water ingress caused from an ageing white plastic Mira shower surround hasn’t help our shower, this is now cured mostly by the addition of extra sealing methods around top and sides of casing. Water ponding in the depression seems to cause the switch to scorch – looking at the last failed switch I removed. Keeping it all dry has been part of the longterm cure.

  4. Stewart avatar
    Stewart

    Could you apply some thermal grease (heat sink compound) on top of the heater tank to prevent moisture getting on to the thermal switch or would that negate the function of the switch?

    1. Helpful Colin avatar

      Hi Stewart,

      Thanks for the suggestion.

      I have attempted something along this line. I have used Servisol Silicon Grease.

      I used this grease both in the hope it would keep the water away and give good thermal conductivity to the bimetal disc in the thermostat. I did it a couple of years ago and if I remember correctly I had thermostat failure immediately. I’m not too sure why. I certainly avoided pressing on the disc with any force that would damage it while applying the grease. Maybe it was not a good one to begin with. I think I tried it again on another occasion with just the thinnest smear on the disc just to stop it corroding, but that didn’t have a happy outcome either.

      What I didn’t try was just having silicon grease on the outside as a water barrier once the thermostat was put in position. However if dezincification of the brass plate at the top of the heater was part of the problem then water would get through and appear on the inside of that barrier anyway. (See my reply to Peter Q3 on 10th December 2015.)

  5. Stephen Spencer avatar
    Stephen Spencer

    Dear Helpful Colin,

    I have “Just” reconditioned the: TCO/319822 (Thermal-Switch) on my MIRA Sprint Shower. I, Cleaned all the Micro-Switches Etc. and after all that was going to buy the MIRA, Go as a “Replacement”, however after reading your “Excellent” advice, decided to “Ultrasonically” Clean the TCO. After: Cleaning all the Lime scale and Crap off, and “Cooking” in my oven for: 1 Hr. (And “Measuring” the TCO “it” Eventually, Clicked! I, then “Sprayed” the TCO with: Isopropyl Alcohol! (Added to the Oven on: 75 Celsius, and left to “Dry-Out” Completely! (Re-installed and now, Thankfully, Operates As “Original” Good job as I need to have a Shower tomorrow for “Work”)

    Your “Advice” is “Excellence” (Thank-You, from my Heart!)

    Please feel free to send me any Contact details to My-Trusted email “Account”

    Kind Regards & Best wishes,

    Stephen Spencer

    1. Helpful Colin avatar

      Stephen you went to tremendous effort. I hope your shower refreshes you for work tomorrow.

  6. Graeme Howie avatar
    Graeme Howie

    Morning Colin, we’ve had our Mira Azora shower for 5 years now and it’s performed faultlessly. However 6 months ago I replaced the thermal switch and it performed perfectly adequately, but have now replaced it twice since, just on Thursday, it has now gone again. I took the chance of ordering two switches last time. The parts have been installed by my nephew who is a fully qualified electrician and has noted that the shower casing is bone dry as it is well sealed and the top of the heater tank is dry and corrosion free. Could it be that I’ve had a bad batch of switches or do you think it could be another factor ? Should I just cut my loses and replace the shower due to the age of the unit? Your comments would be greatly appreciated

    1. Helpful Colin avatar

      Hi Graeme,
      Mine has gone to the tip. I replaced it with a Mira Sport Max with air boost (all digital electronics). The air boost is just a gimmick but so far so good after about one year. I concluded that my faulty shower would normally regulate the temperature by other means which would mix hot and cold water together. The main thermostat is to cut the power when it overheats. Normally it would not ever overheat but it must have been constantly overheating to damage the thermostat. So I presume it had another fault.
      As a consequence of these ideas, I have to advise it would be better to get a new shower.
      My new shower is only 9kW, like the old one, but I get the same water temperature with a lower setting on the dial and during the summer I am using the ECO setting (which only uses one heating element) with a third of the temperature dial left to go.

      1. Danny avatar
        Danny

        Re your initial problem with the thermal cut out corroding. I would add one important step you have missed out on. Once you have replaced the thermal switch, run the shower with the heat setting good and high. Turn it off then open up the shower again and dip your small finger into the thermal cut out slot. Heater tanks often can have a small leak in the top of them that only becomes apparent when the copper expands under heat.

        1. Helpful Colin avatar

          Thanks for this info Danny.

          I appreciate that there could be a leak in a corroded area. I cannot check it out because this shower has gone to be recycled.

  7. Keith Berry avatar
    Keith Berry

    Hi Colin, excellent tutorial, thank you. I have a query regarding my Mira Vista. The shower only runs cold although the Thermal Cut Out and Elements all test OK with a Multimeter. I suspect the TCO so have purchased a new one. My problem is that the original TCO has been fitted so that only approx 20% covers the ‘elevated bump’ on the tank. If I turn the TCO round as if to fit it the other way, it fits the whole raised bump. Do I fit as per the original or does it not matter if it is fitted the opposite way round. The original TCO was heavily corroded which draws me to the conclusion that this is the component that has failed. Thank you. Keith.

    1. Helpful Colin avatar

      Hi Keith,
      Put yourself in the position of the designer. Would the designer make a new product look like a bodged job? I’m sure he would make it all neat and tidy with good thermal contact between the bump on the boiler and the TCO.
      Good luck.
      Regards, HC.

  8. Louise avatar
    Louise

    my husband turned on the shower when the water supply was shut down!!!! Later once the water was on he turned on the shower, the light comes on but no water comes through – is there a reset button or piece that will need replacing or has he killed it totally?

    1. Helpful Colin avatar

      Hi Louise,
      The showers that I have dealt with retain water in the boiler while the water supply is turned off. Then if any power is fed to the heater in the boiler it is kept cool (initially at any rate) by the water until it gets hot. A heater not surrounded by water would get hotter and hotter until it was glowing cherry red and may burn out or melt the plastic, or cause a steam explosion if a small amount of water suddenly came in contact with it.
      So, lets consider the water is turned off and the power is switched on. There wouldn’t be any water pressure to operate the pressure switch in the shower. Operation of the pressure switch turns on the electrical supply to heat the water in the boiler. The pressure switch is a safety feature.

      The problem may be:

      • a faulty pressure switch,
      • no water supply.

      So, why was the water supply shut down? Has some work been done affecting the supply to the shower? Has some dirt moved up the pipe and blocked the flow through the shower. The shower should have a fine filter on the input to catch dirt. Dirt can block the fine mesh of the filter. You may have to disconnect the pipe to check that there is water available at the shower input. Turn off the main stop tap and disconnect the pipe at the shower. Be aware that it is easy to damage plastic parts of the shower when turning the nut on the shower input connector with a spanner. Apply an equal and opposite torque to the input connector with another spanner or mole grips.

      Force a piece of hosepipe onto the copper pipe if you can. Point the hose into a bucket. Turn on the main stop tap a little bit. If water starts to come out turn the stop tap on a bit more until you are satisfied that there is pressure available. If no water comes out you have a problem. If water does come out O.K. you have a faulty shower (or blocked filter).

      Good luck, HC.

  9. Ann-Marie F avatar
    Ann-Marie F

    Hi Colin,

    I came across your posts while trying to find a solution/spare part for our Mira Sport Shower.
    There is water leaking from the bottom of the shower, I think this is due to the PRV popping – but I cannot find any spares online.
    Do you know if the Mira Sport shower has a PRV like most other showers or are they different.
    Any help much appreiciated.
    Thanks,
    AM

    1. Helpful Colin avatar

      Hi Ann-Marie,

      THIS IS VERY DANGEROUS. GET A COMPETENT ELECTRICIAN/PLUMBER TO HAVE A LOOK.

      Well what would I do? I would have to observe the shower with the cover off to see where the water was coming from. Now that would be dangerous. I would plan to keep well away from it at first. I would make sure the hose is aimed down a drain. I wouldn’t stand where I could get wet. Water squirted from a faulty shower could convey electricity to me and give me a shock.

      With the isolation switch OFF I would remove the cover while the controls are in the normal usage position and look at it. I would check if I could see any water coming out when it is OFF?

      I would get someone else to take charge of the isolation switch and get them to turn it ON and OFF when I shouted instructions. I would tell them to switch it OFF if they think I have been harmed by an electric shock. I would use a plastic tube from a ballpoint pen or a long plastic rod as a probe so I didn’t come into contact with any water which might conduct electricity to me. With the isolation switch on I would press the shower ON/OFF button with the probe. That’s the black button which gets pressed by the ON/OFF button which is part of the cover.

      The shower should come on as usual and I should be able to see the leaking water. I would ask: Is it from the outlet hose connection? Is that screwed on tight? Has it got a rubber washer in it? Is it cross threaded?

      If the water was coming from anywhere else then something would be broken. I remember with mine the plastic of the case deteriorated and began breaking. It couldn’t hold the inlet pipe and filter onto the control valve on one occasion when I didn’t screw it together properly and the water pressure blew it apart. If I found the leak I’d have to work out what to do for the best. That would include replacing the whole shower.

      I have found this the valve assembly.

      Good luck. Be safe.

      Regards, HC.

  10. Frank Gorny avatar
    Frank Gorny

    Hi Colin, Just replaced the thermal cutout switch on my Mira Sport shower. It was all very straightforward, thanks to your really excellent and comprehensive instructions. Saved me a fortune as I would have junked the broken one. The shower is now back in working order. Just a point – Mira recommend replacing the heater tank at the same time as the thermal cutout switch, since they say it will probably have scaled up with use. Given our very hard water, that may be a valid (if expensive!) suggestion. I’ll see how the shower runs, before I decide whether to do that or to replace the whole shower, given that it’s quite old and well used. Cheers Frank

    1. Helpful Colin avatar

      Hi Frank,

      It can be very satisfying to fix something. Well done.

      In my case I had a problem with the thermostat nearly every year. The heater tank lasted throughout the life of the shower. I had to change the shower in the end because the plastic case deteriorated and became week. Something also went faulty with the main temperature control. By then I just wanted a general improvement all round. I’ve not had to repair my current model for any reason but twice I’ve had a flashing green light behind the button which was fixed by a power off reset.

      Regards, Colin.

  11. Peter Armstrong avatar
    Peter Armstrong

    Helpful Colin – very well named! Thankyou!

    1. Helpful Colin avatar

      Hi Peter,
      Thanks for the positive comment.
      I’ve run through this post and done one or two minor edits and spelling corrections as a consequence.
      Regards, Colin.

  12. Paul Morrison avatar
    Paul Morrison

    Fantastic Tutorial……Thanks so much, you saved me so much time.

  13. Adam avatar
    Adam

    Hi Colin, my Mira Advance has recently started cutting out completely after a few minutes and all the LEDs go out. I have to pull the isolation cord twice (off/on) then the blue LEDs come back on. It might then run again for a few seconds before cutting out again. Any idea where to start on this one? The RCD doesn’t trip at all. Confident I can fix it myself once the diagnosis is right. Cheers

  14. Chris avatar
    Chris

    I have had to replace the thermal switch three times in my Mira shower. This time the earth post has broken off from its base. I have screwed the earth lead on to the post but it is now just free and is not fixed to the shower. The shower is working again, but is it OK to use.
    I have of course screwed the earth lead on to the switch just as if all was normal.

    1. Helpful Colin avatar

      Hi Chris,
      Are you referring to the Threaded Bush I have labelled in Pics 1, 2 & 3. If you are:

      1. I can’t see what is holding the thermostat in place,
      2. I can’t see how the copper plate on top of the boiler is earthed.

      The copper plate on top of the boiler must be earthed. It is soldered to the outer casing of the heating elements and ensures that the water is kept at earth potential especially under fault conditions.
      If that’s the case my advice is, “DON’T USE THE SHOWER.” Any user might get electrocuted. It could have fatal consequences for the user and very serious consequences for you if you put it into service in a dangerous condition.
      It’s probably time to replace your shower.
      Regards, Colin.
      P.S. If I have misunderstood what part is broken then please include a picture in another reply.

      1. Chris avatar
        Chris

        Thank you for reply. Looks like a new shower.
        Chris.

Leave a Reply

Your email address will not be published. Required fields are marked *

This site uses Akismet to reduce spam. Learn how your comment data is processed.