Introduction
This post describes how to make a condensation-free bathroom mirror using an automatic mirror heater. See the one I made in 2007 here. Look carefully and you will notice the condensation around the edge but not in the central heated area.
Without a heater it would be impossible to use the mirror without first wiping it with a cloth. Added to that cold mirrors in a humid atmosphere usually mist over again after being wiped.
With an active mirror heater, it’s possible to get straight out of a bath or shower and use the mirror immediately.
Apologies
When I first created this post in 2017, I couldn’t correctly identify the brand of the PIR movement sensor and in-line relay I used. I failed to recognise the brand name on the front of the in-line relay. The sensor is easily visible in the bathroom but hasn’t got the brand name on it – inside or out. But I’ve just found the instruction sheet for the sensor and that is branded Home Easy.
In 2017 I searched for the items on the internet and found they, or similar items, were available from Lightwave. So, I labelled them as such in this post.
My original source for these items was B&Q where a big display was set up to promote them. That didn’t last long and although Home Easy products are available the items I purchased aren’t being marketed by them currently.
I have now re-labelled the devices as Home Easy in this post but anyone wanting to buy them should search under:
- Home Easy,
- Lightwave,
- Smartwares,
- Byron Home Automation.
. . . to name but a few.
Why I Chose A DIY Condensation-free Bathroom Mirror
I rebuilt my bathroom in 2007 with a determination to have a condensation-free bathroom mirror by heating it above the dew point of the room with an electric heater.
Readily available heated mirrors on the market generally stood proud of the wall by at least 2cm and would therefore collect dust along the top edge. I was also not too happy with any of the lighting arrangements around the periphery of the mirror. Perhaps such mirrors are intended to be let into the wall but all the pictures I have seen suggest they are normally surface mounted.
On investigation I found it was possible to buy self-adhesive mains powered heaters to stick on the back of mirror glass. So I decided to do it myself.
How I Built A Condensation-free Bathroom Mirror
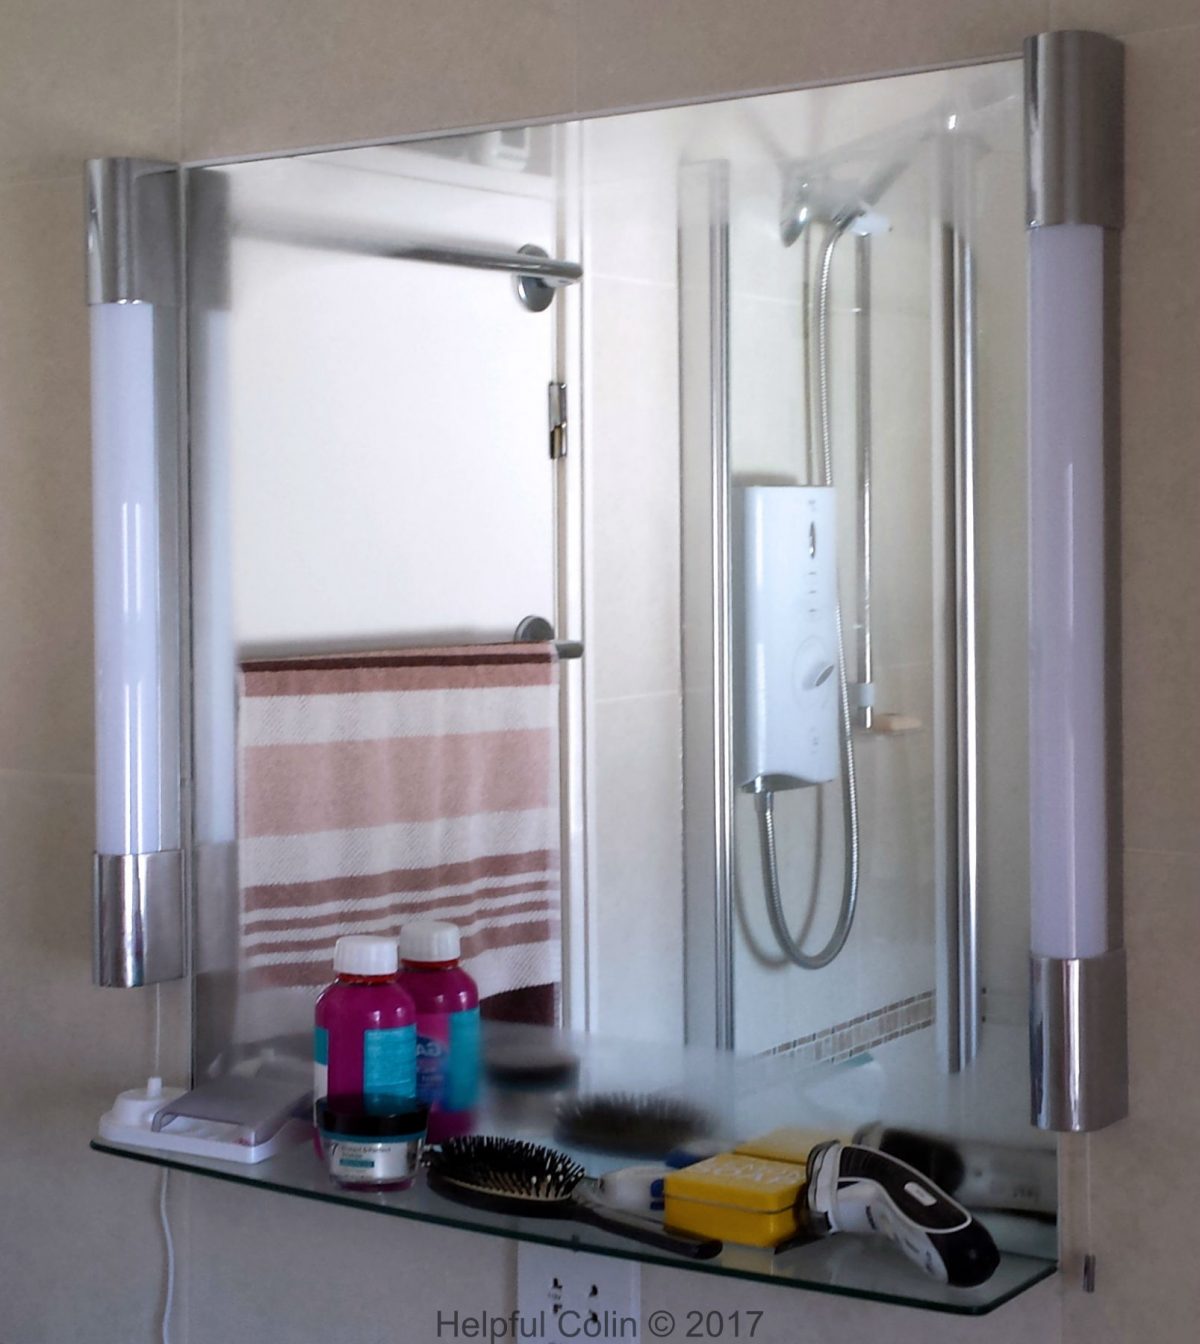
I bought plain 4mm mirror glass to mount on the wall like a tile (630mm x 700mm). Well it looks like it is just another tile – a big tile – equivalent to just over three 45cm x 31.5cm tiles in area.
The area behind the mirror is cut back to the block-work of the wall, where necessary, to leave a space the depth of the plaster (1cm), tiles (9mm) and tile adhesive (1-2mm). I found I could have a gap >= 2cm behind the mirror to accommodate the wiring. My mirror is sealed into the wall flush with the tiles. Fingers cannot get around the edge of the mirror. There is no path for water to conduct electricity from behind the mirror to the front. So it is a very safe way to do it in a bathroom.
It is flush with all the other tiles mounted on the wall but the grout around the edge of it is silicon bath sealant. The sealant is not just a grout, it holds the mirror in place along the top and side edges. The bottom edge rests on a glass shelf which is cantilevered out from the wall.
NOTE: The mirror can be removed from the wall by cutting through the sealant with a knife.
Applying The Heating Pad

To make my condensation-free bathroom mirror I had to obtain a heating pad to stick on the mirror glass. Self-adhesive heaters are made for this purpose and come in various sizes. I didn’t find a large selection to choose from and couldn’t get one as large as I wanted. I did get one that left an unheated border around the central heated area. The border is about 5cm at each side and 10cm at the top and bottom.
The instructions with mirror heaters advise that at least a 5cm border must be left between the pad and the edge of the glass. This is in case the mirror back will be accessible when a mirror is mounted on top of a wall. It’s for electrical safety to ensure fingers cannot get near to any electrical connections – especially in a wet bathroom. Also the heating effect will extend beyond the heating pad towards the mirror edge anyway – maybe.
Heated pads are made of resistive strips laminated between flexible plastic sheets. They have a thin flexible connecting cable with two wires. Mine consumes about 30 watts of power and runs off a 230/240V AC supply.
To fix the heater to the back of the mirror I worked out how to centralise it. Then I marked the back of the mirror to align it and peeled the backing paper off as I smoothed it down.
One source of heating pads is TLC Direct. This example of a heating pad has these Technical Instructions in a PDF file.
Removing The Mirror For Maintenance

If the condensation-free bathroom mirror had to be removed two Double Cup Suction Lifters would have to be attached to hold it while a sharp knife is used to cut the sealant holding it in place. After disconnecting the wiring at the back of the wall the Double Cup Suction Lifters would then be pulled to remove it and the wires would come out of the wall too.
Controlling The Heater
In my case the wires from the heater go through the wall and appear on the other side so outside the bathroom area. The heater runs directly from the mains and consumes about 30 watts. It could be controlled with a simple switch and its low power allows it to be fed from a lighting circuit or more ideally from a fused spur off a ring main. I wanted something more automatic just to make it come on at a time when condensation would be made in the bathroom. Those times are only when someone takes a bath or a shower. Other use of the bathroom doesn’t generate water vapour.
Because a straight forward switch would either get left on accidentally, or users would forget to switch it on before getting in the shower, I looked for an automatic method of controlling the heater.
I found a whole range of Home Easy parts at B&Q and selected a Home Easy RF Passive Infra-Red (PIR) Movement Sensor (no longer available) and matching Wireless Receiver In-line Relay.
NOTE: Since I built this condensation-free bathroom mirror in 2007 the versions of Home Easy components I used are no longer available. However, Home Easy do produce later versions which I am sure will perform similarly. – HC
Using A Wireless PIR Movement Sensor
NOTE: These PIR Movement Sensors come with installation and user instructions.

I mounted the battery-powered (2 x AAA) HE-303 PIR movement sensor on the ceiling above the bath. It has a wireless transmitter which signals to a remote relay. It has no mains connection, so it meets the safety regulations for bathrooms. The receiving relay is mounted outside the bathroom where the condensation-free bathroom mirror wiring emerges from the wall.

The PIR movement sensor transmitter has four timer settings built in. They Are:
- 5s (seconds).
- 1m (minute).
- 5m (minutes).
- 10m (minutes).
So once activated the PIR movement sensor will remain on for a fixed period. In my case I set it to 5 minutes. It will stay on as long as they keep moving around (while showering) and it will stay on for 5 minutes after they leave the detection zone. After that time has elapsed the residual heat will keep the mirror condensation-free while they finish in the bathroom. I find this keeps electrical power consumption to a minimum.
Occasional failures have occurred where the mirror has been found hot to the touch because it was on when it should be off. The heat can be felt on your face when looking in the condensation-free bathroom mirror.
There are three background light level settings:
- L (low).
- M (medium).
- H (high).
High is a good setting in a well-lit bathroom.
Three range settings not found on later models are:
- 1M.
- 3M.
- 6M.
The Learn switch positions used when linking the sensor to the relay:
- DEL (delete).
- SET.
Mounting The PIR Movement Sensor
The PIR movement sensor is designed for wall mounting to detect people and switch on a light. It uses infra-red lenses that let it see light approaching at an angle. I mounted it on the ceiling over the bath to take advantage of this detection angle. It only receives an infra-red signal from an area near the wall behind the bath. So someone has to stand in the bath to be detected. It also came with plastic shades which I attached so it would not detect anyone using the wash basin. The wash basin overhangs the bath, by a small amount, at the opposite end to the shower. Mounted this way it only detects people standing in the bath between the PIR detector and the shower unit. See the rough diagrams below.


Using A Wireless Relay To Switch On The Bathroom Mirror Heater
NOTE: These Wireless Relays come with installation and user instructions.

The picture above shows a Home Easy wireless in-line relay programmed to respond to a wireless signal sent by a Home Easy PIR Movement Sensor. The relay has a 230/240V mains supply connected to one pair of connections (the outer pair) and the other pair of connections have the mirror heater connected to them.
NOTE: With this model of in-line relay the connections are exposed and can be touched with a pointed object. The later model looks safer. If there is any doubt about their electrical safety mount them in a plastic box with a lid and attach a warning label.
When the relay is triggered by the PIR movement sensor it operates and connects the mains supply to the mirror heater. The relay remains operated until the movement sensor time period has elapsed. Then the mirror heater is disconnected. While movement is sensed during that time period the period is perpetually reset to start over again.
Below is a schematic wiring diagram for the condensation-free mirror heater:

The diagram shows a light switch in series with the relay contact and the mirror heater. That’s used to isolate the mirror heater circuit under fault conditions or just to switch it off.
The Glass Shelf Under the Condensation Free Bathroom Mirror
I used a bespoke aluminium channel, screwed to the blockwork, to grip the toughened glass shelf with special screws to keep it tight against the wall.
The shelf projects out over the tiles which give it some support. The tiles are carefully cut to fit and adhered so they project up and over the bottom of the gripping channel. I carefully levelled the shelf on a bed of tile grout to prevent a ball bearing rolling off it. (No one wants their lipsticks to roll onto the floor do they.)
I mounted the shelf above a curved bathroom towel radiator. So cutting the front edge to match the curvature of the radiator improved its looks. I got it shaped by making a cardboard template curved like the radiator and had my local glass company (Abbey & Burton Glass) cut it to the template.
How I Made A Template For The Shelf
To make the template I took a long piece of card from an opened up cereal packet and drew the basic rectangular shelf on it. I continued by standing the uninstalled radiator upside down on the cardboard to align it with one long edge on my drawing. I then followed the top tube of the radiator with a pencil to copy the curve smoothing any bumps on the line later. A coin made a good former to create round corners.
I realised that I could end up with an asymmetrical shelf if I got the curve misaligned. So I took the following course of action to ensure the shelf would look symmetrical.
I cut the curve for half of the shelf from one rounded off corner to the middle of the shelf. Folding the card across the middle so that the right end lay exactly over the left enabled me to cut the second half by following the cut of the first half. That way I got a symmetrical curve.
Leave a Reply