Introduction
A friend of mine has a fence at the bottom of his garden made from six interwoven fence panels each 6ft × 6ft (1.8m × 1.8m). They are erected on a three feet high bank of soil.
His neighbour on the next street has a garden backing onto his but beyond the bank of soil. So work done on the bank to support the fence isn’t on his land.
The panels are fixed to 3in (75mm) posts dug into the bank of soil. Over a two year period the posts snapped one by one, at or just below ground level, due to wind pressure and rot. This has left the fence with broken timber fence posts throughout.
Because the posts snapped one at a time the unbroken posts held the fence up when the problem began. However the panels attached to the broken timber fence posts were floppy and moved about in the wind begging to be repaired. So I offered to help him repair them.
Over time I repaired each one, only to find another snapped a few weeks later. Eventually they all snapped and had to be repaired by the same or similar method.
How I Fixed The Broken Timber Fence Posts
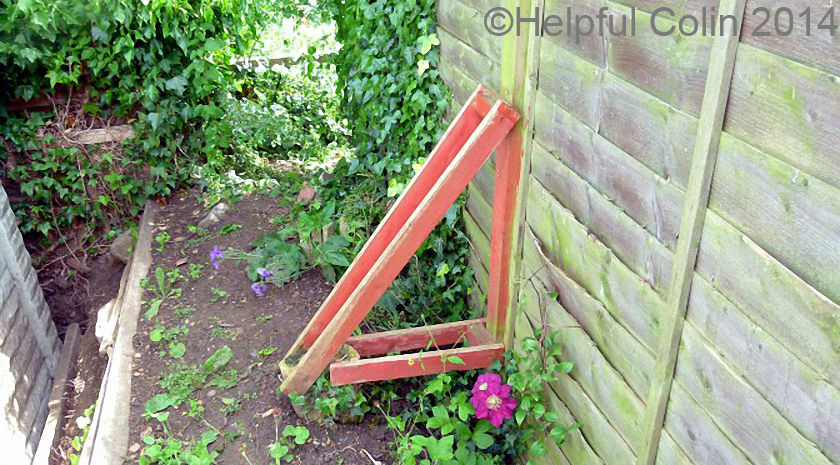
Ideally the posts would be replaced but I offered to do a quick fix as each one broke. I attached two diagonal stays from halfway up each post and two horizontal stays near the bottom. These stays cannot be seen from my friend’s garden because they are behind his fence. They have lasted for a year on all the posts except for one.
One end post has been fixed by a different method. It has a simple horizontal stay going from midway up the post to a tree about two feet behind and to one side of it.
NOTE: The pictures here were taken one year after the original stays were provided. Select (click on) them to enlarge them in another window or browser tab.
I Fixed Stays To Old Tree Stumps

The bank of soil previously had some leylandii trees growing on it. These had already been cut down but their stumps were firm and well positioned for use as anchors for the fence post supports I provided on all but two posts.
The Posts Were Still Resting On Their Snapped Off Stumps

Although the posts were broken when I supported them the upper sections were still resting on top of the lower sections. They weren’t snapped with a clean break across the timber. The breaks were very jagged and so the upper sections and lower sections were interlocked by the “wooden teeth” these jagged breaks provided. This type of break stops the posts moving about at ground level.
I Used Timber From A Divan Bed To Make The Stays

To support the posts I made stays out of scrap wood I already had to hand. Some of it wasn’t long enough so I screwed two pieces together side by side to make longer lengths.
At the fence post end of the stays I attached blocks of wood to the fence post and at the other end I attached the stays to the tree stumps.
One fence post did not align with a tree stump and was midway between two. So I bridged the tops of the tree stumps and attached the stays to a wooden block mounted midway. This is the only support that has failed to date. When I took the photos for this post I found one of the tree stumps which the bridge was attached to had rotted away in the ground. This means the stays for that post are ineffective. It will now require a stake in the ground to fix the stays to.
NOTE: A source of good timber is an old divan bed frame. It’s usually well seasoned (because it’s been in someone’s bed for many years), straight and doesn’t have many knots in it. — HC
I Used Wood Screws – Not nails

Supporting broken timber fence posts isn’t a precise art, so positioning, sizes of screws, and timber are set to suit the job in hand.
The supports are held in place with wood screws instead of nails because they can be undone to make alterations if necessary. The stays are drilled to the diameter of the screw shanks and countersunk for the screw heads.
If nails are used I would still recommend drilling the stays just to stop the timber splitting.
TIP: The other way to stop timber splitting is to use blunt nails which punch a hole through the timber. A nail with a point squeezes between the grain pushing the grain apart and splitting the timber. — HC
Tools List:
- Tenon saw or cross-cut saw;
- Posidriv® or flat blade screwdriver (depending on screws used);
- Adjustable spanner if using coach bolts;
- 1lb or 2lb hammer if using nails;
- Lump or sledge hammer if driving posts or Metposts into the ground.
Using Tree Stumps To Support Broken Timber Fence Posts
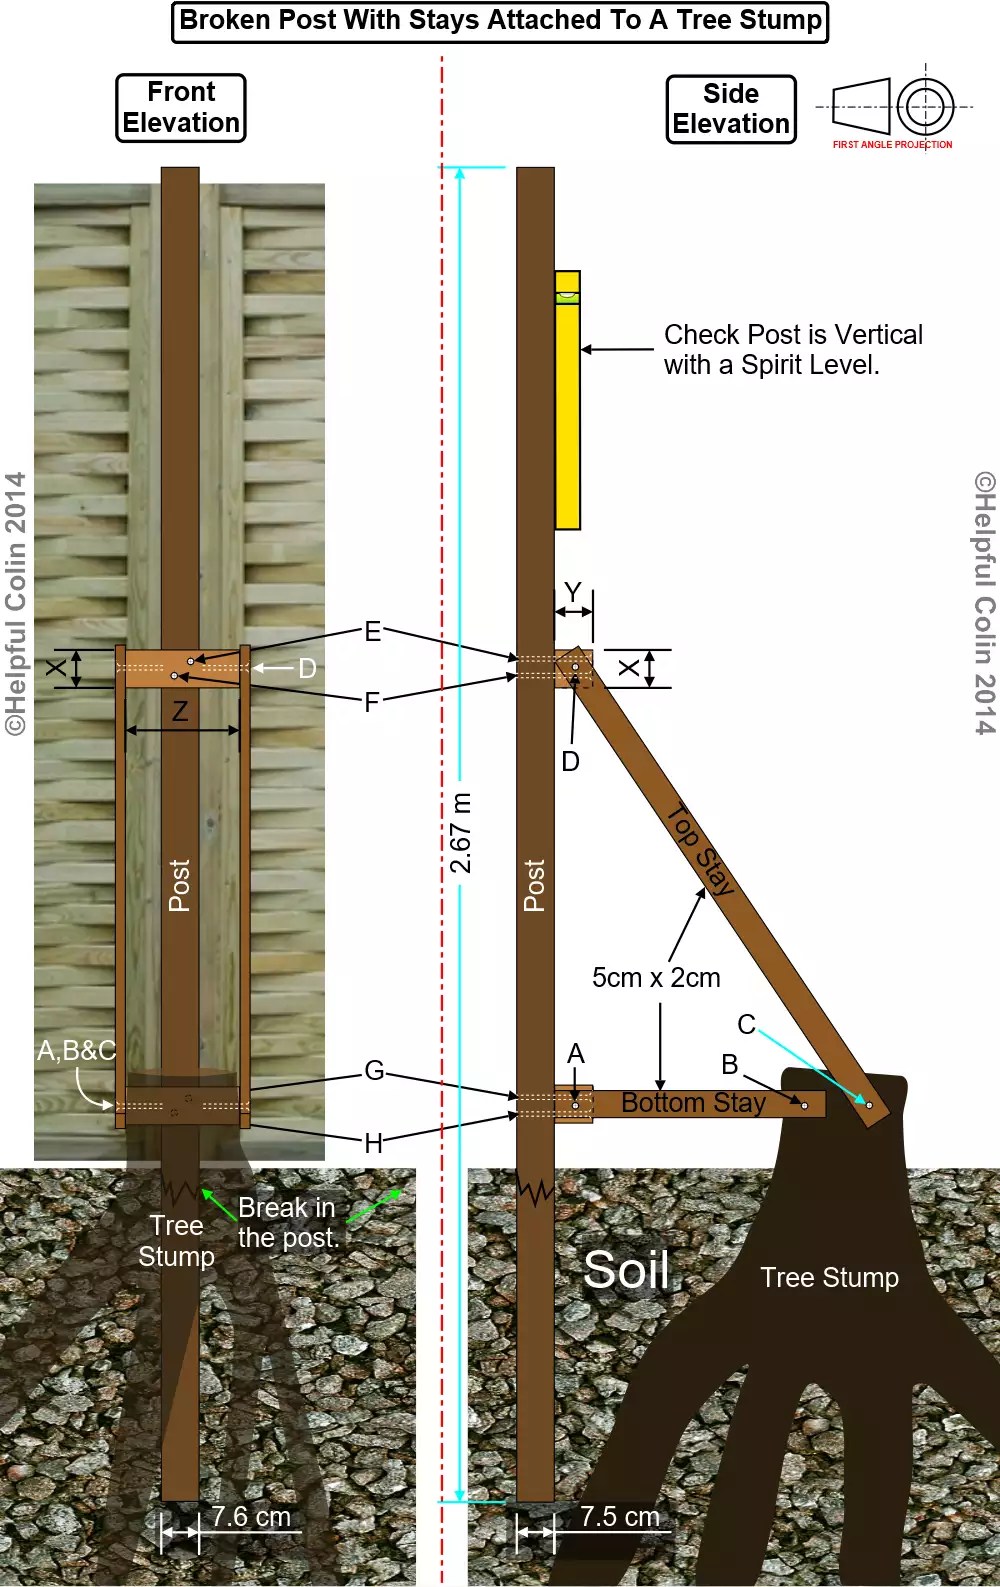
This is a diagram using First Angle Projection showing, in the Front Elevation, what it would look like when standing behind the fence looking straight at the post. In the Front Elevation the tree root is translucent so that it doesn’t completely obscure the detail of the fence post. The Side Elevation shows what it would look like to see a post and supports, with the fence on the left, without a panel attached to the viewers side of the post.
Parts List:
- 2 × Top Stays (length to suit);
- 2 × Bottom Stays (length to suit);
- 2 × blocks for use at A and D whose dimensions are:
- X = 50mm;
- Y = 50mm;
- Z = width of tree stump, as seen in the Front Elevation, with grain running along the length of Z;
- 4 × long No.12 screws, round nails 5″ or 6″ (120mm or 150mm) or Coach Bolts (M8 x 180mm);
- 8 × medium No.12 screws or round nails 3″ or4″ (75mm or 100mm).
Instructions When Using An Existing Support, e.g. A Tree Stump
Treat all timber with preservative before and after construction to make a lasting job.
Refer to the diagram: Broken Post With Stays Attached To A Tree Stump
- Ensure the broken timber fence posts are still resting neatly on their stumps in the ground.
- Fix 2 × blocks of timber to the post at A and D. Either screw, bolt or nail the blocks to the post. If using nails don’t fix the blocks to the post now – wait until you get to 4 below and nail the stays to the blocks first. If using bolts place the head on the front of the fence post. If using countersunk woodscrews or nails drive them in from the back. Drill two holes the same diameter as the fixings in each block and countersink them if using countersunk woodscrews. Position the holes one above the other and one to the left with the other to the right so their centres are on a diagonal line at 45º to the horizontal. See the screw positions E, F, G & H. If using bolts drill holes to match in the post.
- Fix 2 × Top Stays between C and D. Drill two holes the same diameter as the fixings in each Top Stay. Countersink them if necessary when using screws. Put them in the centre between the edges and a similar distance from the end at D. Trim the end at D with a saw so it will fit up against the fence. Drill the hole at C as required to fit to the tree stump.
- Either screw or nail the Top Stays to the block at D and to the tree stump. Get a helper to hold the broken timber fence post vertical and check it with a spirit level while the stays are finally attached to the tree stump. Watch out for the block at D splitting. If the screws or nails are likely to meet in the middle of the block put them in at a slight angle so they overlap each other. If the block splits make another one and pilot drill it for the screws or nails to relieve the stress. Nailing into the end-grain of the block can be more easily done before the block is fixed to the fence post by doing it on a bench or a concrete surface on the ground.
- Similarly attach the Bottom Stays to the block at A and to the tree stump at B. Before finally attaching the Bottom Stays make sure the broken timber fence posts are still vertical and resting neatly on there stumps. They may have got dislodged while the other work was done.
Providing Posts To Support Broken Timber Fence Post Stays
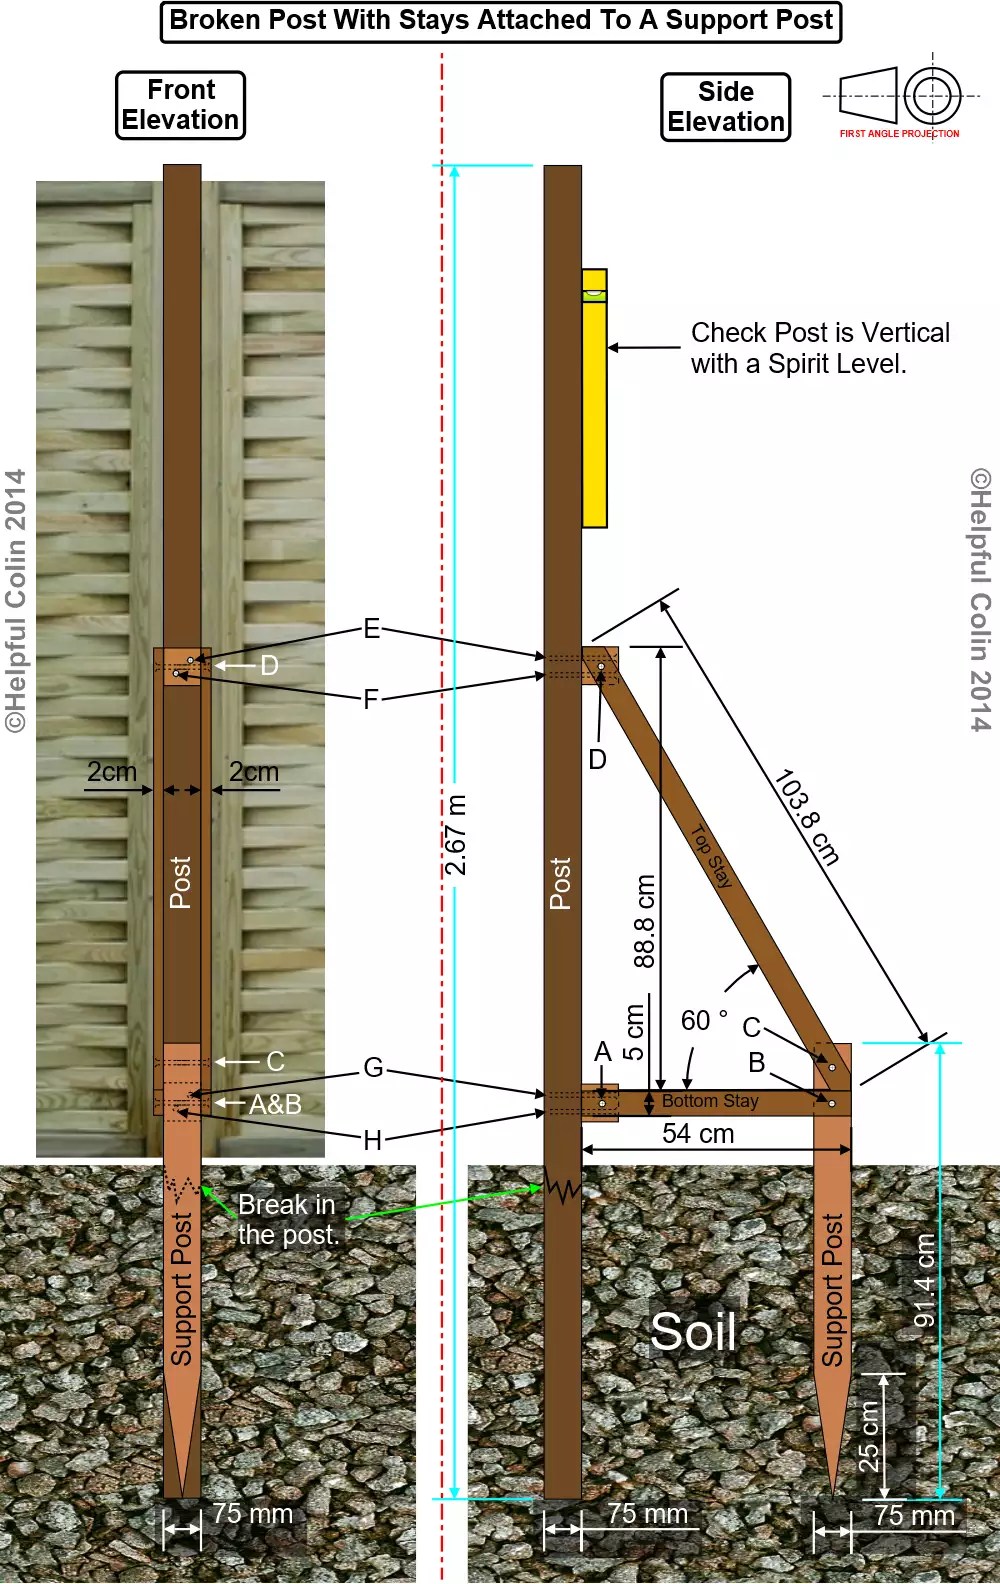
This is a diagram using First Angle Projection showing, in the Front Elevation, what it would look like when standing behind the fence looking straight at the post. The Side Elevation shows what it would look like to see a post and supports, with the fence on the left, without a panel attached to the viewers side of the post.
Parts List
- 2 × Top Stays;
- 2 × Bottom Stays;
- 1 × Support Post;
- 2 × blocks for use at A and D made from Support Post off-cuts whose dimensions are:
- X = 50mm;
- Y = 50mm;
- Z = width of Support Post, with grain running along the length of Z;
- 4 × long No.12 screws, round nails 5″ or 6″ (120mm or 150mm) or Coach Bolts (M8 x 180mm);
- 8 × medium No.12 screws or round nails 3″ or4″ (75mm or 100mm).
Instructions When Providing A Support Post
Before putting a support post in the ground treat it with preservative.
Treat all timber with preservative before and after construction to make a lasting job.
Refer to the diagram above: Broken Post With Stays Attached To A Support Post
- Either: Dig a post hole for the Support Post and fix it firmly in the ground (maybe using Post Fix concrete), or sharpen one end (as shown in the diagram) and knock it into the ground (perhaps with a small hole to get it started). Use a block of wood on top of it (so as not to damage it) and hit it with a lump hammer or sledge hammer. If a heavy hammer is not available choose to dig a post hole. Alternatively use a Metpost with a short wooden post mounted in it.
- Whichever method is used ensure the Support Post is in good alignment with the fence post so that the stays will sit flat against its sides.
- Ensure the broken timber fence posts are still resting neatly on their stumps in the ground.
- Fix 2 × blocks of timber to the post at A and D. Either screw, bolt or nail the blocks to the post. If using nails don’t fix the blocks to the post now – wait until you get to 6 below and nail the stays to the blocks first. If using bolts place the head on the front of the fence post. If using countersunk woodscrews or nails drive them in from the back. Drill two holes the same diameter as the fixings in each block and countersink them if using countersunk woodscrews. Position the holes one above the other and one to the left with the other to the right so their centres are on a diagonal line at 45º to the horizontal. See the screw positions E, F, G & H. If using bolts drill holes to match in the post.
- Fix 2 × Top Stays between C and D. Drill two holes the same diameter as the fixings in each Top Stay. Countersink them if necessary when using screws. Put the holes in the centre between the edges and a similar distance from the end at D. Trim the end at D with a saw so it will fit up against the fence. Drill the hole at C to align with the centre of the Support Post and trim the end of the stay with a saw to fit against the Bottom Stay when it is put in place.
- Either screw or nail the Top Stays to the block at D and to the Support Post. Get a helper to hold the broken timber fence post vertical and check it with a spirit level while the stays are finally attached to the Support Post. Watch out for the block at D splitting. If the screws or nails are likely to meet in the middle of the block put them in at a slight angle so they overlap each other. If the block splits make another one and pilot drill it for the screws or nails to relieve the stress. Nailing into the end-grain of the block can be more easily done before the block is fixed to the fence post by doing it on a bench or a concrete surface on the ground.
- Similarly attach the Bottom Stays to the block at A and to the Support Post at B. Before finally attaching the Bottom Stays make sure the broken timber fence posts are still vertical and resting neatly on there stumps. They may have got dislodged while the other work was done.
Coach Bolts Could Be Used Instead Of Wood Screws
Alternatively Coach Bolts (not Coach Screws) could be used in place of some wood screws. There use avoids splitting wood because the timber has to be drilled, but they’re more expensive than wood screws.
There’s nothing wrong with Coach Screws except they are a bit too fat and expensive for this type of work. They usually have a larger diameter than the wood screws suggested and require appropriate pilot holes to prevent them splitting the size of timber I have suggested using.
The two images below are to remind readers what Coach Bolts and Coach Screws look like.


Another Method of Repairing Broken Timber Fence Posts
Added on 9th August 2017
I’ve just found out about a method of repairing broken fence posts which I haven’t seen before.
The method is intended for use when the post was originally held in place by concrete or similar post fixing compounds.
It requires strips of steel to be forced into the ground close by the sides of broken posts. They wedge between the post stump and the concrete holding it. The necessary fixings are available from Post Buddy.
Here is a photo of the steel strips being applied to a post and a self explanatory diagram showing the Post Buddy system:

Footnotes
- The photos used in this post were taken at least 1 year after the supports were provided.
- The supports for the broken timber fence posts were not all provided at the same time.
Leave a Reply