Introduction
Here I will describe how I created a Fireplace Alcove Coloured Lighting Scheme using multi-coloured LED lighting.
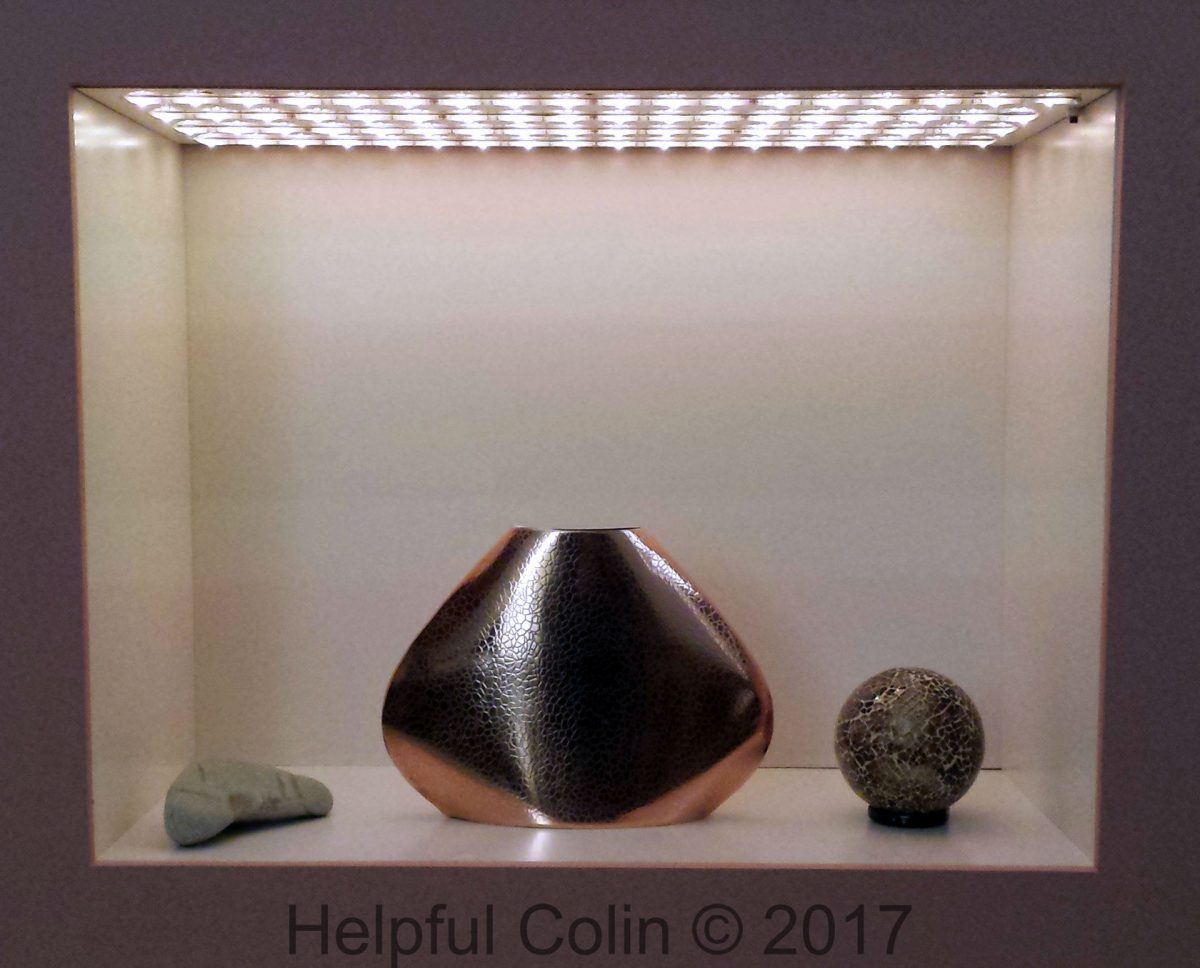
This article isn’t about lighting a small niche in the wall of a large Ingle Nook fireplace or anything like that. It’s about converting a modern domestic fireplace into an alcove where ornaments or a plant could be placed.
In the daytime daylight is sufficient to illuminate these items but at night a little artificial light, white or coloured, is required.
In The Beginning There Was No Alcove
Originally the house was built in the 1960’s with a solid fuel fire and back boiler which fitted inside a portrait shaped opening.

In the early 1980’s that was replaced with a Glowworm Majorca gas fueled back boiler and gas fire combination. In order to fit the back boiler the fireplace opening had to be widened on both sides to install the pump and a valve. That widening gave the opening a landscape shape. The extra width didn’t matter because the gas fire was a ‘Glowworm Majorca 346’, an extra wide gas fire with illuminated niches at each side.
In 2005 the gas fire and back boiler were removed and a new wall mounted boiler was installed in a different location.
At the fireplace a new gas fire could have been installed. However the previous gas fire had only been used on rare occasions and appeared unnecessary because the central heating did its job well. So a daring decision was made to rely totally on gas powered central heating backed up by electric fan heaters. Fan heaters have only been required on a couple of occasions, as I recall, so the decision was sound.
This action meant either:
- the chimney breast could be demolished,
- an actual fireplace could be built for show,
- or an alcove could be created.
An alcove was chosen as the most cost effective and desirable option.
Turning The Fireplace Into An Alcove

This alcove was first constructed in 2005 when the main decisions mentioned previously were taken.
Having chosen an alcove instead of a fireplace I also chose to raise the bottom of the opening 13cm above skirting board level instead of leaving it at floor level. This improves the landscape shape and lifts ornaments further above floor level so they look their best. I raised it by adding a course of bricks to those already spanning the opening at floor level. These bricks provide support at the front for the base lining board.
The chimney breast above the opening is supported by two inch angle-iron. This support was created when the fireplace was originally widened to accommodate the gas boiler.
Lining and Framing The Alcove
The Alcove is lined with 5 × 12mm painted MDF boards consisting of:
- a base,
- left side,
- right side,
- a back,
- a top board supporting the lighting.
The opening has a frame around it made from 12mm MDF board which sits well with the 12mm plaster on the wall. Fitting the frame wasn’t particularly difficult. It’s screwed to the brickwork. The screws are well covered with filler and smoothed off so they don’t show through the wallpaper.
The frame is 750mm × 600mm which has a 630mm × 480mm rectangular hole in it. It is therefore a 60mm frame set in the wall as flush as possible with the surrounding plaster which is married up to it. I made it to give a very neat edge to the alcove and cover the edges of the lining boards. So the sides bottom and top sit behind this frame and are flush with the open edge. See below:
Having the base of the alcove 13cm above the skirting allows this MDF frame to be well defined in its own right as a recessed rectangle seen through the wallpaper.
The frame was intended to be invisible but is seen because gypsum plaster expands due to the chemical reaction that occurs when it hardens. Fortunately the shape seen is a nice regular rectangle.
Wallpapering The Chimney Breast
The plan was always to cover the frame and the rest of the chimney breast with wallpaper. The idea being to make it look as if the wall is wallpapered and the rectangular hole cut cleanly in it without any frame around it. So the MDF frame is a neat and substantial support for the wallpaper which is stuck directly to it.
I felt that if such a frame were made of four separate straight pieces of wood joined or just fitted close at the corners, then those corner joints would show through the wallpaper pasted over it.
The MDF frame can be detected below the wallpaper due to the difficulty of getting the plaster to lie invisibly next to it. Unfortunately because gypsum plaster expands as it sets it can be made flush with the MDF when applied but later it appears in relief. However I think the frame being a bold 60mm wide looks the better for being jointless at the corners.
The paper on the chimney breast wall comes over the MDF frame right up to the opening. After the adhesive had dried I trimmed it off with fine abrasive paper using only an inward action so as not to rip it away from the MDF. To finish it the wall and MDF Frame were then both painted with emulsion. The paint creates a further bond to the paper at its edge so it doesn’t get damaged at the opening. See below:

The Original Alcove Lighting

From the outset in 2005 I lit the alcove with a 13 Watt fluorescent tube mounted in an MDF box fitted above a rectangular hole in the board through which the light shone. Initially it was too bright so I attenuated the brightness and filtered the colour towards the red end of the spectrum.
To attenuate the light I made a filter of laminated white A3 paper. To provide a coloured filter I bought a set of flexible translucent coloured cutting sheets. They were the type used for preparing food on. The filters were cut to size and placed over the output port of the fluorescent light fitting.
Due to the construction of the fireplace the original fluorescent light could only be mounted at the back of the fireplace in the mouth of the chimney. This caused all the light to project down and forward from the back so there was a tendency to silhouette items placed in the alcove. That was O.K. but not as desired. This was how it looked:


I needed to illuminate items from further forward too. I also wanted to avoid lighting green plants with red tinted light. Without any green light they just look dark.
The Fireplace Alcove Coloured Lighting
I recently decorated the room and introduced LED lighting to the house. While looking for LED lights I came across multi-coloured LED low voltage strip-lights at B&Q and realised how I could use them to provide fireplace alcove coloured lighting.
So I decide to replace the old fluorescent light with a ‘Masterlite Izo 60cm LED Flexi Strip Kit Colour Change’. I have since found this lighting kit is cheaper from Screwfix. See it here.
Fireplace Alcove Coloured Lighting Equipment

This new Fireplace Alcove Coloured Lighting Scheme consists of four self adhesive LED strips adhering to a new MDF top board in the same location. The MDF is painted with white undercoat and gloss to give good reflectivity and a smooth clean surface for the lighting strips to adhere to.
By chance the lighting strips are exactly the length required when mounted from left to right. I mounted them with equal spacing between strips and cut rectangular holes in the MDF to allow the interconnecting wires to be attached on the upper side of the MDF top board. My particular circumstances required this.
One problem I have found is that the interconnecting cables, used to connect one strip to another, have plugs which easily become disconnected when I am putting the top board in place. This is because their pins have little or no friction. Below you can see the top side pf the top board.
Fireplace Alcove Coloured Lighting Power Supply
Apart from the lighting strips there is a white plastic box containing the power supply. This has a short mains lead coming out of one end terminating in a 13 Amp mains plug and a 2 wire low voltage supply wire coming out of the other end. This wire terminates in a coaxial power plug which connects to the control unit. See below:

Here the Power Supply unit is fixed to one of the supporting batons for the lining boards. The 13 Amp power point is also fixed to an adjacent pattress.
Conveniently I am able to make use of the mains power previously delivered to the back boiler. This is fed from a switched spur unit mounted to the right of the chimney breast. See below:

Controlling Fireplace Alcove Coloured Lighting

The control unit is another white plastic box with a short 4 wire lead to connect to the first flexi strip. (See the picture above.) All the other flexi strips connect in series with it using short interconnecting cables. I fixed the control unit to the top side of the top board with two small wood screws.
Another short lead comes out of the control unit with an infra red detector connected to it. The infra red detector has to receive light signals from the hand held controller.
The detector protrudes through a notch I made in the right hand edge of the top board. This lets it pick up the signal from the hand held controller.
The controller’s infrared beam is easily aimed at the detector in the alcove while sitting on the settee opposite.
The Controller’s Functions
Below you can see the fireplace alcove coloured lighting Controller. It’s dimensions are 50mm × 85mm × 7mm. It gets power from a replaceable 3 volt lithium cell CR2025 accessible from the bottom edge at the back.

The Coloured Lighting Controller has:
- Power ON/OFF buttons at the top right,
- Magnitude buttons at the top left,
- 16 × Colour buttons which will set fixed lighting colours,
- 4 × Effect buttons to the right.
NOTE: The two Purple colour buttons don’t have colours which give a good representation of the light seen. All the others do give a fare representation.
Power Buttons

The ON button turns the lights ON. They carry on with the same settings they had when they were turned OFF.

The OFF button turns the lights OFF. The controller remembers the settings before it goes OFF.
Magnitude Buttons

With a steady light this button turns up the brightness.

With a Steady light this button turns down the brightness.
Colour Buttons

This button switches to RED light by turning ON all the red LEDs.

This button switches to GREEN light by turning ON all the green LEDs.

This button switches to BLUE light by turning ON all the blue LEDs.

This button switches to WHITE light by turning ON ALL the red, green and blue LEDs.
The other twelve colour buttons select intermediate colours of the spectrum. The Magnitude buttons control the brightness.
Effect Buttons

This button steps to another colour in the following order each time it is pressed: Red, Green, Blue, Yellow, Magenta, Cyan and White. The Magnitude buttons control the brightness.

This button uses white light only which fades up and down between maximum and minimum brightness. The Magnitude buttons control the cyclic period of the fading. When the period is short the light appears like a strobe light.

This button is similar to the Strobe button except it is for the three primary colours. It steps through the three primary colours Red, Green and Blue. Each one fades up and down between maximum and minimum brightness. The Magnitude buttons control the cyclic period of the fading.

This button moves through the colour spectrum at full brightness. The Magnitude button controls the speed at which the colours change. See the video demonstration below:
Problems With Fireplace Alcove Coloured Lighting
So far there is one unfortunate problem. When the lights are set to their brightest white light state, the system locks up and has to be switched off and on to regain control. Under these circumstances I cannot switch the lights off using the Controller. The only way to switch them off is to use the switch provided on the switched spur unit to turn off the mains power.
I need to investigate this further since it didn’t happen when I tested the lights initially by linking them loosely on the floor. I suspect the bright white light may be overloading the sensor to the extent it prevents it from reading the control signal. So if I want to fix this problem I will have to shield the sensor from the LED lights it controls.
Leave a Reply