How Many Parts?
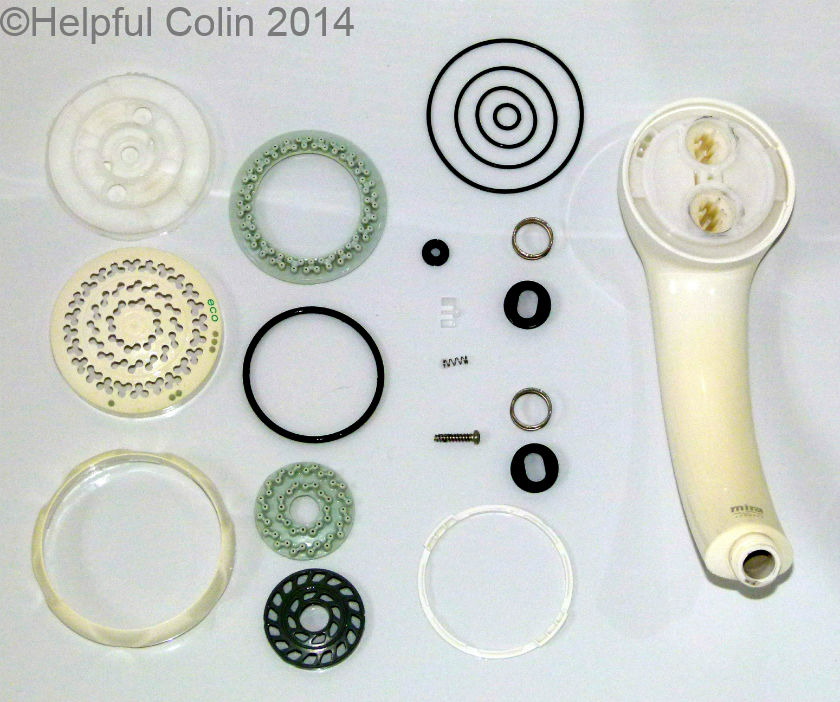
You may be surprised to learn that the shower head that came with my Mira Sport Thermostatic Shower is made from 22 separate parts. If you count them in the featured image above you will see 21 but take note that the main body of the shower head, on the right, is made from two inseparable parts of plastic.
I can also tell you that the main body of the shower head retains water after use. Some drops can be removed by shaking it in various ways but some always remains inside. If the shower isn’t used regularly this water will become stagnant and may hold dangerous bacteria. I would recommend turning the shower on at least once per week to refresh the water in the shower head.
This all came to light when I wanted to do a good job of cleaning mould and calcium off the shower head. I felt the best job would be done by dismantling it and cleaning all the parts individually since some mould looked as if it had penetrated inside.
Disconnecting The Shower Head From The Hose
It’s easiest to work on the shower head after disconnecting it from the hose. All the shower heads I have worked on have had the same universal screw connection to the hose. This allows for easy replacement of either the shower head or the hose. This shower head was no different.
An externally threaded spigot projects from the bottom of the shower head, and the end of the hose has an internally threaded collar which screws onto the shower head’s spigot and pulls a flange up tight against the spigot. The collar is free to rotate on the end of the hose until it is up tight. See pictures below:


To seal the connection a soft synthetic rubber washer/gasket is placed in the collar to sit up against the flange before the shower head is screwed into it. See pictures above. The washer/gasket often sticks to the flange in time. The two should be screwed together by hand. Tools, like mole-grips, will only damage the surface of the collar.
Dismantling The Shower Head
Dismantling was initially difficult. There are no visible screws and the shower rose that rotates into three positions appears to be fixed onto the main body in a way that makes them inseparable.
I resorted to the Internet for help and found an assembly diagram that suggested to me that the outer ring, which one grips to turn the shower head to its three positions, is the last part to be assembled and just clicks into position. See Mira Sport Electric Shower Manual. I managed to force it off using a pen-knife blade slotted in around the back without damage, but I was lucky. Once removed the disc containing the rubber holes can be unscrewed (anticlockwise ![]() ) to reveal two ‘O’ rings and the one and only screw that holds the rest of the parts together.
) to reveal two ‘O’ rings and the one and only screw that holds the rest of the parts together.
Observe very carefully how it comes apart so that you can reassemble it. Make notes and take photos. There is one small coil spring like the one in a ballpoint pen. The spring puts the force behind the pawl that clicks into place when the shower head is rotated through its three positions. There are two larger coil springs that sit behind the two black rubber tubes with oval holes through which water passes.
Cleaning The Shower Head
Parts can be cleaned with a toothbrush and strong bleach, such as HG Mould Spray, then rinsed under a tap. Remove limescale, after bleach is rinsed off, with limescale Descaler.
The outer rubber jets can be poked out from the front for further cleaning. The inner ring of jets has its own plastic retainer, pressed in from the back, with keyways that engage keys in the plastic cover as shown below:

The keys and keyways syncronise the holes in the retainer with the rubber jets or the retainer might turn in operation and block the jets.
Reassembling The Shower Head
Reassembly is the reverse of dismantling. Below are some pictures depicting five stages of assembly:
STAGE 1
Apply the rubber seals shown above and the central rubber washer in the selector disc.

STAGE 2
Attach the selector disc with a central screw. This determines which ring of holes the water comes out of.

STAGE 3
Put the ‘O’ rings in place.

STAGE 4
Put on the cover (Spray Plate) with the outlet holes in it. With some models this screws on.

STAGE 5
Finally clip on the Outer Ring. . . .

. . . Be careful to align the Outer Ring with the teeth on the grey ring as shown below:

Leave a Reply