Introduction
This article describes the Dyson Slim DC18 Filter Cleaning process for the Pre-filter and the HEPA (Highly Efficient Particle Arrester) Post-filter.
Many devices in this world which pump air have air filters. They’re installed to stop dirt harming mechanisms, bearings, etc.. Without filters that dirt would ultimately make them perform badly or fail. The air filters clog up instead and have to be replaced or cleaned at regular intervals. The Dyson Slim DC18 is no different. It has two air filters, one to protect the motor and the other (the HEPA filter) to protect the local environment and the people in it.
The DC18’s Filters
Here follows a more detailed description of the DC18’s two filters:
- A Pre Filter (before the motor) which requires periodic cleaning by the user every 3 to 6 months under normal usage. This sits on top of the Cyclone within the Cyclone Assembly and is placed between the Cyclone and the motor. It prevents dirt entering the motor bearings or clogging up the space around the rotor. Clogging in this area can affect heat dissipation letting the motor overheat.
- A HEPA Post Filter (after the motor) which doesn’t require user attention. This sits on top of the motor and filters the air leaving the DC18. It captures allergenic particles which have been drawn into the cleaner and prevents them being reintroduced to the local atmosphere. These particles (if not captured) can seriously affect people’s breathing.
The method of cleaning the Pre Filter, on all the Dyson machines that I have seen, requires the air filter to be washed with water under a running tap. This is an easy way to clean a filter which has built-in flexibility so that it can be squeezed to remove the water it absorbs in the washing process. The dirt is washed away and doesn’t get into the air which would cause a breathing hazard for the user.
Diagrammatic Breakdown of a Dyson Slim DC18
Here is a very clear diagrammatic breakdown of: The parts of a DC18. I have named parts in my description to conform with it.
This site, Parts Warehouse, may also be a place where readers in the USA find it convenient to buy replacement parts.
Clarification of Dyson/Parts Warehouse Parts Names
In the parts of a DC18 there are items listed whose names are, in my opinion, not correct. So I have listed below what those part names really refer to:
- Pre Filter – refers to – Pre Motor Filter,
- Pre Filter Assy (Assembly) – refers to – Pre Motor Filter Assy (Assembly).
- Post Filter – refers to – Post Motor Filter,
- Post Filter Assy (Assembly) – refers to – Post Motor Filter Assy (Assembly),
- HEPA Post Filter Assy (Assembly) – refers to – HEPA Post Motor Filter Assy (Assembly),
- Post Filter Cage Assy (Assembly) – refers to – Post Motor Filter Cage Assy (Assembly),
- Post Filter Cover – refers to – Post Motor Filter Cover.
I will continue to refer to the items above by the Dyson/Parts Warehouse names to avoid confusion.
Air Flow Through A Dyson Slim DC18
Pic. 1. Block diagram of the air flow through a Dyson Slim DC18

Fig. 1, in Pic. 1, above shows a block diagram of the air flow through a Dyson Slim DC18. This shows where, in the scheme, the filters are located.
Gaining Access To The Pre Motor Filter
Below, in Pic. 2 (Fig’s. 2.1 to 2.3), are three images showing how the Motor Pre Filter fits into a chamber on top of the Cyclone Assembly. Following the order of air flow through the DC18 this filter is situated between the Cyclone and the motor which pumps the air through. It catches particles escaping from the bin via the Cyclone and prevents them entering the motor.
Pic. 2. Bin & Cyclone Assembly

Descriptions of the three images in Pic. 2 above:
- Fig. 2.1: Bin & Cyclone Assembly with the Cyclone Cap closed.
- Fig. 2.2: Bin & Cyclone Assembly with the Cyclone Cap open and the Pre-filter inserted.
- Fig. 2.3: Bin & Cyclone Assembly with the Cyclone Cap open and the Pre-filter removed.
Pic. 3. Dyson Slim DC18 Pre Motor Filter

Fig. 3, in Pic. 3, shows the Motor Pre Filter with its dimensions (seen upside down). It comes in two parts. The Filter proper, which is made of various water resistant layers of material moulded into a flexible ring of rubbery gel, and a plastic cylindrical container which fits over it.
The container has instructions printed on it, explaining in diagrammatic form how to clean and dry the filter, but it’s mainly a device with a handle enabling the user to extract the filter from the machine.
Pic. 4. Pre Motor Filter & Pre Motor Filter Container

Fig. 4, in Pic. 4, shows the two parts separated. The circle of plastic in the centre of the cross is shaped like a thin section through the surface layer of an inverted cone so it can be gripped to pluck it from the machine. The seemingly sticky rubbery edge of the filter grips the inside of the container enough for the two to be lifted out together. Then they can be separated by pressing the filter pad to push out the filter while holding the container.
To remove the Pre Filter for washing:
- Remove the Bin & Cyclone Assemblies from the DC18 as if to empty the bin.
- Ease the Cyclone Cap Catch forward with a finger or thumb to disengage the Catch from the Cyclone.
- Lift the front of the Cyclone Cap (it hinges at the back).
- Lift the Pre Filter out of the Cyclone Chamber by gripping the blue cylindrical container’s handle (described earlier).
- Hold the Pre Filter container at the edges with fingertips and press the Filter proper out by pushing it with the thumbs on the white upper layer of material.
Dyson Slim DC18 Filter Cleaning Process For The Pre Motor Filter
To clean the Pre Filter proper:
- Pluck visible dirt such as fluff off the filter with the fingers and dispose of it in a bin.
- If available use another vacuum cleaner (e.g. a Dyson Animal) to remove surface dirt.
- Thoroughly wet the filter under a running tap and squeeze out the water which should look dirty. The filter is very flexible. Squeeze it all ways and release it so that it absorbs more water.
- Repeat the squeezing and releasing action many times under running water until the water comes out clean.
- Finally squeeze out as much water as possible and leave the filter in a warm place (NOT on top of a radiator) to dry. This could take a whole day.
To reinstall the Pre Filter:
- When the filter is completely dry reinsert it in the blue container (white side first).
- Place the Pre Filter module in the Cyclone Chamber white side up, blue side down.
- Close the Cyclone Cap. The Catch will click into the closed position.
- Reattach the Bin & Cyclone Assemblies to the DC18.
The HEPA Post Motor Filter
The HEPA Filter is a Post Motor Filter because it filters the air passing through the DC18 after it has passed through all parts including the motor. Its purpose is to filter out fine particles including particles from the brushes, particularly those causing allergies, and prevent them entering the atmosphere. For example a vacuum cleaner without a HEPA Filter would suck allergenic particles out of a carpet which would then pass all the way through the machine and its basic dirt filter and then be blown into the atmosphere of a room to then irritate its occupants who may be allergic to them. A HEPA filter fitted to filter the exhaust air of a vacuum cleaner keeps people with allergies safe.
The DC18’s HEPA Filter is intended to last for the lifetime of the cleaner and the user is not expected to perform any maintenance on it. However it can be removed and cleaned on the surface or replaced if a new one can be obtained.
Where Is The HEPA Post Filter Located?
Pic. 5. HEPA Post Filter

Fig. 5, in Pic. 5, shows how the HEPA Post Filter is situated immediately above the Motor Housing and covered by a transparent plastic container with rectangular holes all around the top edge to let out the exhaust air from the DC18. The Collection Bin and Cyclone assemblies fit directly on top of it.
The transparent container is held down to the Motor Housing by four bayonet catches which are locked in place by an anti-clockwise twist (viewed from above). The image shows the two front catches. There are two more at the back (all are evenly spaced at 90º intervals).
Removing The HEPA Post Filter From The DC18
The DC18 is constructed so that the transparent HEPA Filter container cannot be easily removed with a clockwise twist to unlock the bayonet catches. There is a tab at the back which engages with a hole in the back of the Lower Cable Winder. See the images below:
Pic. 6. The Lower Cable Winder on the back of the DC18

Descriptions of the four images in Pic. 6 above:
- Fig. 6.1: Back with lower cable winder in situ.
- Fig. 6.2: Back with lower cable winder removed & HEPA Filter Container in the locked position.
- Fig. 6.3: Back of lower cable winder with lock hole circled.
- Fig. 6.4: Back with lower cable winder removed & HEPA Filter Container in the unlocked position.
The Lower Cable Winder can be removed by unscrewing its 2 x T15 fixing screws which require a screwdriver with a TX-STAR security bit T15 to remove them.
After removing the Lower Cable Winder the HEPA Filter Container tab is released (see Fig. 6.2 in Pic. 6). It fits in a rectangular hole on the back of the Lower Cable Winder which locks it in place and prevents it being rotated and removed (see Fig. 6.3 in Pic. 6). After the tab is released the container can be rotated (see Fig. 5 in Pic. 5). Then when the bayonet catches have reached the limit of their clockwise travel the container can be lifted up. The HEPA Filter will remain inside it as it is lifted off the DC18.
To remove the HEPA Filter from the container turn it upside down and observe that two of the bayonet catches are on springy stalks because the container has slots cut in it on both sides of each catch. When the stalks are pushed outward the filter can pass by the catches. To perform the act of removal turn the container upside down and with the forefinger of each hand pull out the stalks until the filter drops out under the force of gravity. It can then be examined, replaced or vacuumed to get any visible dirt off it. In my case there was some small piles of dust on top of the motor and on the bottom of the filter. See Fig. 7, (in Pic. 7), below, the HEPA Filter separated from its container:
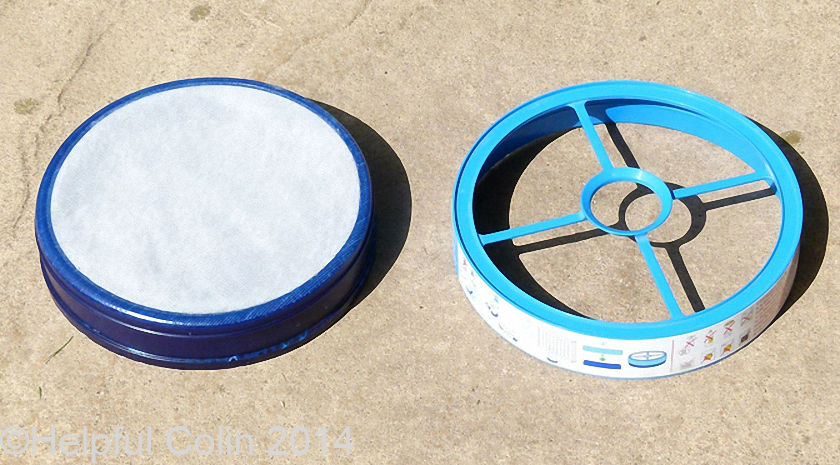
Pic. 7. HEPA Post Filter & HEPA Post Filter Container

Reinstalling the HEPA Post Filter
Reassembly is the reverse of disassembly:
- Insert the HEPA Filter into the Filter Container.
- Mount the Filter Container on top of the Motor.
- Turn the Filter Container anticlockwise to lock it in place.
- Reattach the Lower Cable Winder with 2 x T15 screws.
Leave a Reply