Introduction
This article advises how to perform Dyson Slim DC18 Cleaner Head Maintenance. This can involve removing the Brushbars to remove items that have got wrapped around them and removing the Soleplate for access so dirt can be cleaned out. In extreme cases the Motor Housing can be opened so that dirt can be sucked out of it too.
Diagrammatic Breakdown of a Dyson Slim DC18
Here is a very clear diagrammatic breakdown of: The parts of a DC18. I have named parts in my description to conform with it.
This site, Parts Warehouse, may also be a place where readers in the USA find it convenient to buy replacement parts.
Clarification of Dyson/Parts Warehouse Parts Names
In The parts of a DC18 there are items listed whose names are, in my opinion, not correct. So I have listed below what those part names really refer to:
- Pre Filter – refers to – Pre Motor Filter,
- Pre Filter Assy (Assembly) – refers to – Pre Motor Filter Assy (Assembly).
- Post Filter – refers to – Post Motor Filter,
- Post Filter Assy (Assembly) – refers to – Post Motor Filter Assy (Assembly),
- HEPA Post Filter Assy (Assembly) – refers to – HEPA Post Motor Filter Assy (Assembly),
- Post Filter Cage Assy (Assembly) – refers to – Post Motor Filter Cage Assy (Assembly),
- Post Filter Cover – refers to – Post Motor Filter Cover.
I will continue to refer to the items above by the Dyson/Parts Warehouse names to avoid confusion.
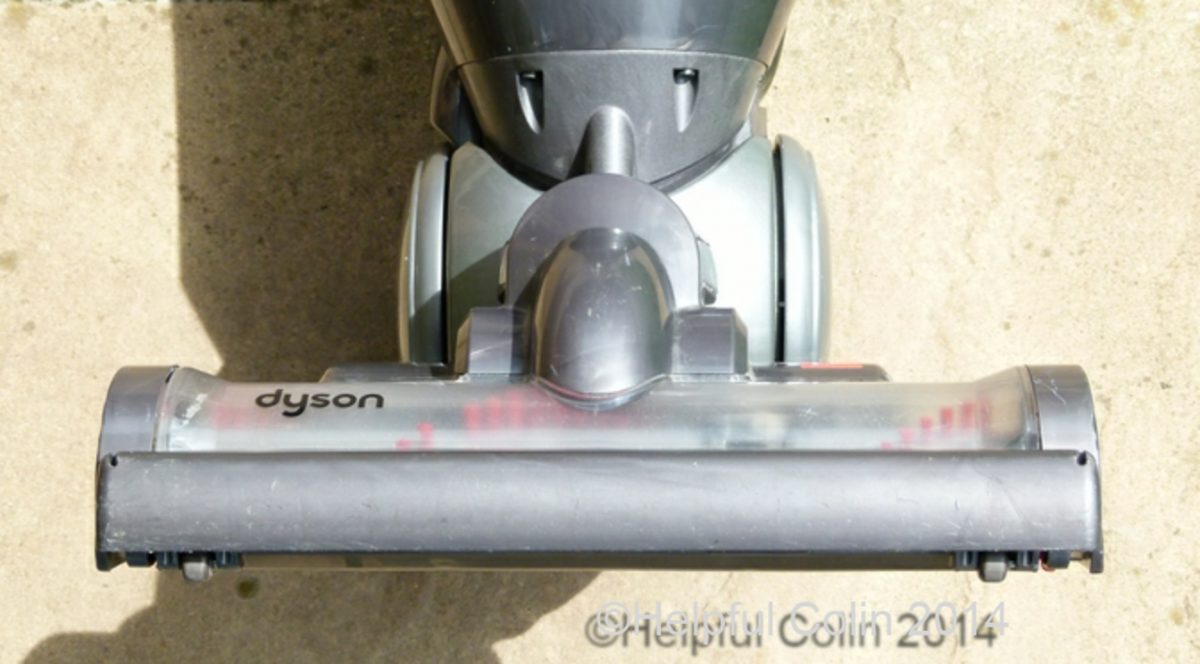
The Cleaner Head Assembly
The Cleaner Head Assembly is the first diagram in the Breakdown of Parts. It has 27 separate parts, many of which can be seen in the pictures shown here.
Cleaner Head Issues
The Cleaner Head, with its rotating Brushbar, is a very hard working part of the DC18. All the dirt picked up from carpets and floors has to pass through it and some items can get entangled with the rotating Brushbar.
Pic. 1. Cleaner Head Motor Safety Cut-out Reset Button

If anything is picked up that jams the Brushbar there will be an excessive load on the motor which will operate the safety cut-out. After the jammed Brushbar has been fixed the Safety Cut-out Reset Button should be pressed to reset the cut-out. The Safety Cut-out Reset button is on the top of the motor housing with a RESET label pointing to it.
Some items that get picked up can damage the Cleaner Head. Examples of problematic items are:
- long hairs;
- sewing cotton;
- string;
- shoelaces;
- ribbons;
- jewellery chains.
Pic. 2. A Damaged Brushbar (Soleplate Removed)

“I recently found part of a shoelace wrapped around the end of the Brushbar a few days after my wife had found one of her trainers with a shortened lace. Before I found it she had complained to me that the DC18 was not working as it should.
The hardened end of the lace had jammed in the Cleaner Head and stopped rotating with the Brushbar. The lace was still wrapped around it and the friction caused had melted the Brushbar tube and put a very nice 4mm groove in it. This nearly severed the tube into two parts.” ― HC
Fortunately the Drive Belt (presumed to be toothed) connecting the motor to the layshaft is well protected by a black plastic cover. This also encases the Layshaft. The cover is firmly bolted to the Motor forming part of the Brushbar Motor Assembly. Cleaners that have exposed un-toothed drive belts often go faulty when ingested dirt wedges between the drive belt and the brushbar at the point where the belt wraps around the brushbar. If those brushbars jam the motor continues to rotate melting the drive belt with the pulley’s friction.
Diagrammatic Breakdown of a Dyson Slim DC18
Here is a very clear diagrammatic breakdown of the parts of a DC18. I have named parts in my description to conform with it.
Removing and Re-attaching A Dyson Slim DC18 Cleaner Head
1. How The Dyson Slim DC18 Cleaner Head Is Attached To The DC18 Body
The Cleaner Head plugs into a socket on the Swivel of the Yoke Assembly. The socket has two parts:
- for the airway in the centre of the Swivel;
- for the electrical connection to the Brushbar Motor Assembly.
The Cleaner Head Sockets can be seen in the picture below:
Pic. 3. Yoke Showing Cleaner Head Sockets

The sockets are mounted on a Swivel. The Swivel allows the body of the DC18 to lean sideways while the Cleaner Head remains flat on the floor.
NOTE: It isn’t necessary to remove the Cleaner Head in order to remove the Brushbar and clean it, but it makes the job easier because the Cleaner Head is more manageable on its own.
Below is a picture of the rear of the Cleaner Head after it has been detached from the Yoke showing the electrical plug wired to the motor and the motor cut-out reset button:
Pic. 4. Cleaner Head Rear View

2. Removing The Dyson Slim DC18 Cleaner Head From The Yoke Swivel
The Cleaner Head is locked onto the Swivel by two Swivel Catches. The Cleaner Head is removed from the Swivel on the Yoke by gripping the Brushbar Motor Cover Assembly upper part (socket shroud) and pulling it away from the Yoke while simultaneously squeezing the two Swivel Catches at the side by their indentations. If done in the upright position the DC18 body must be supported with the other hand or by another person to stop it falling over. Not the easiest of tasks for anyone with small or weak hands.
NOTE: For the DC18 to remain freestanding the Cleaner Head must be attached. So after the Cleaner Head is removed it can be leant into a corner with the wheels chocked or laid down on the floor.
Pic. 5. The Swivel Catches holding the Cleaner Head in place

Pic. 6. Pulling off the Cleaner Head

Laying the cleaner on the floor with the wheels down and the Cleaner Head uppermost is the best way for one person to remove the Cleaner Head. The picture below shows it in this position and highlights one of the two Swivel Catches in the engaged (locked) position, i.e. engaged with the Swivel’s flange.
Pic. 7. DC18 lying down for ease of Cleaner Head removal

The next picture shows just how much the Swivel Catches can be withdrawn from the Cleaner Head’s shroud when the indented ends are depressed. They pivot in the middle and come out by a ¼ inch to disengage the Swivel’s flange and unlock the Cleaner Head from the Swivel. They are normally held in the engaged (locked) position by unseen springs.
Pic. 8. How A Swivel Catch is pressed in against its spring

If the Swivel Catches won’t move when pressing the indentations try pushing the Cleaner Head further onto the Swivel. That action should relieve the pressure where the catches engage the flange and consequently reduce the friction between them allowing them to move easily.
In the next picture the electric socket is shown together with the retaining flange, built onto the Swivel, behind which the Swivel Catch tips rest. It is this engagement which prevents the Cleaner Head from coming off the Swivel.
Pic. 9. The Swivel with the Cleaner Head removed

Without the locking effect of the Swivel Catches the Cleaner Head would only be held onto the swivel by the friction of the plastic parts and the pins of the electric plug used to connect power to the rotating brush motor. Once unlocked the Cleaner Head can be pulled upwards and off the Swivel.
3. Using The Flexible Wand With The Cleaner Head Removed
With the DC18 leaning into a corner, and with the wheels chocked, it can be used with the Flexible Wand, and attachable tools, while the Cleaner Head is disconnected. The undercarriage must be set in the position it would be in if the DC18 was in a freestanding upright position. This is to set the air valve so that air will be drawn through the Flexible Wand.
“Preparing the DC18 in this way enables the Flexible Wand to be used to vacuum the dirt from the Cleaner Head parts as they are dismantled.“ ― HC
CAUTION: The exhaust airway from the HEPA Filter must not be obstructed. The exhaust can be hot from the heat generated in the main electric motor so take care of what it blows onto.
4. Lubrication Of Plastic Parts
Generally plastic parts don’t need lubrication because they are considered to be self lubricating. That means:
- initially they are smooth and without much friction;
- after some wear small amounts of plastic dust act like minute ball bearings and roll between the parts.
However small particles of grit can get embedded in a plastic surface and have a very abrasive nature. They wear the parts more and add friction which prevents easy movement. It may therefore be appropriate in some cases to add an inert lubricant in the form of petroleum jelly, silicon grease or wax polish. Mineral oils can soften plastics so they are not advised. Very little is required and after application any surplus should be wiped off. Unfortunately grease can help to prevent binding initially, but can collect more dirt over time. So once greased those parts need cleaning and re-greasing as time passes.
I am suggesting, here, that a little lubricant might help the Swivel Catches to be pressed in if it is applied to the back of the flange. Avoid getting grease on electrical plug and socket pins. It can be an insulator.
5. Re-attaching The Dyson Slim DC18 Cleaner Head
Re-attaching the Dyson Slim DC18 Cleaner Head involves aligning the Brushbar Airway Connector on the Cleaner Head with the Brushbar Airway Socket on the Yoke and just pushing it onto the Swivel. The Swivel Catches don’t have to be touched. They will move into the disengaged position without assistance and then click home into the engaged (locked) position when the Cleaner Head is pushed on far enough.
NOTE: When re-attaching the Cleaner Head it is important to ensure correct engagement of the spring loaded Gimbal Lock Pin with a notch in the Cleaner Head shroud covering the Swivel. (see the diagram above). This catch is used to keep the DC18 in the upright position when freestanding. Without it the DC18 can flop over sideways. In use it moves out of the way when the DC18 is tilted over sideways.
Disassembling A Dyson Slim DC18 Cleaner Head
Whether the Dyson Slim DC18 Cleaner Head is removed or not it can be taken apart in four stages by:
- Detaching both End Cap Assemblies to access the Brushbars by the user;
- Disengaging both Brushbars from the Motor Assembly Layshaft by the user;
- Removing the Soleplate Assembly for better access by a technician;
- Removing the Motor Housing Cover and cleaning inside the housing by a qualified electrician.
Below are the four stages in detail:
1. Detaching Both End Cap Assemblies To Access The Brushbars.
NOTE: This process is designed to be done by the user of the DC18.
Pic. 10. Locking and Unlocking The Turnbuckles

The End Cap Assemblies provide the outer bearings for the Brushbars. Each has a Turnbuckle locking it in place which takes the form of a large slotted screw head designed for turning with a large coin. In the UK a 50 pence coin is most suitable. See images left & right.
NOTE: Most screwdrivers would damage the plastic and mangle the slot because they are not likely to be as large and as good a fit as a coin.
The Turnbuckles have a shaft with a T-bar on the end. The screw head must be turned anticlockwise ![]() through 90º so that the T-bar can align with a slot in the transparent plastic of the Brush Housing. When so aligned the turnbuckle end of the End-caps can be rotated up and forward between 45º and 90º until the End-caps are disengaged from the Cleaner Head’s retaining flanges. The End Cap Assemblies can then be pulled off along the axis of the Brushbar. See images below.
through 90º so that the T-bar can align with a slot in the transparent plastic of the Brush Housing. When so aligned the turnbuckle end of the End-caps can be rotated up and forward between 45º and 90º until the End-caps are disengaged from the Cleaner Head’s retaining flanges. The End Cap Assemblies can then be pulled off along the axis of the Brushbar. See images below.
Pic. 11. Rotating an End Cap Assembly and pulling it off

2. Disengaging Both Brushbars From The Motor Assembly Layshaft.
NOTE: This process is designed to be done by the user of the DC18.
The motor drives the Brushbars via a drive belt which transfers power from the motor to a Layshaft contained in a black plastic housing mounted off-centre inside the transparent Brush Housing. The Layshaft has flats ground on it to engage the inner ends of the Brushbars and so communicate the torque. The inner ends of the Brushbars also get their bearing from the Layshaft. The bearings for the outer ends are built onto the End-caps. With the End-caps removed take hold of the outer ends of the brush bars and pull them out or tilt the Cleaner Head to tip them out.
Below is the Cleaner Head with the Soleplate removed and the Brushbars and Layshaft Housing fully exposed.
Pic. 12. The Cleaner Head Underside (Soleplate Removed)

See the Layshaft and Brushbars separated below.
Pic. 13. The Layshaft Which Engages With The Brushbars

Pic. 14. Long and Short Brushbars showing each type of end

Once out the Brushbars can be cleaned with a flexible wand tool to remove any dust. Anything wrapped around the Brushbar should either be unwound, or in the case of hairs, cut off with scissors or a knife.
SAFETY NOTE: If threading a knife under the hairs cut them by pushing the knife away from your body NOT up towards your face.
3. Removing The Soleplate Assembly To Access The Brush Housing.
NOTE: This process is designed to be done by a technician.
NOTE: There is potential for damaging the Clip on the Soleplate with this process.
Althought the Brushbars can be removed without first removing the Soleplate, removing the latter first gives better access to the Brushbars and the Motor Assembly Layshaft.
The Soleplate is fixed to the bottom of the Cleaner Head with 5 x [Philips No.2 x 15mm] self tapping screws and a moulded plastic clip. Remove all the screws first then attend to the clip. It is this clip which has the potential to break (but mine appears to be very tough).
The positions of the screws and the clip are shown in the image below.
Pic. 15. The Soleplate Removed From The Cleaner Head

The picture below shows how the clip can be released:
- First remove the Long Brushbar as described in sections 1 and 2 above. This gives access to the clip.
- Pull the Clip forward using either a very strong fingernail or prise it using a long screwdriver with a thin blade, as shown below, so that it will move past the protrusion over which it sits.
Pic. 16. Releasing the clip with a Flat Blade Screwdriver

PHOTOGRAPHER’S NOTE: The screwdriver was held in place by an elastic band while photographing.
4. Removing the Motor Housing Cover and Cleaning Inside The Housing.
NOTE: This process is designed to be done by an electrician else damage to electrical components may go unnoticed.
NOTE: There is potential for damaging the Clip on the Motor Housing Cover.
After a few years of use dust can accumulate in the Motor Housing. Dust in there can reduce the flow of the air cooling the motor and is best sucked out after the cover is removed.
The Motor Housing Cover is held in place by 2 x [T15 x 15mm] screws and a clip similar to the one holding the Soleplate. It is this clip which has the potential to break (but mine appears to be very tough). Unfortunately the clip cannot be accessed from within and prised apart with a screwdiver like the Soleplate Clip, but if the edge held down by the screws is lifted it angles the clip until it releases. Once open you can see that the clip engages in the same location as the Soleplate Clip.
Pic. 17. Motor Housing Cover

Pic. 18. Open Motor Housing

Re-assembling A Dyson Slim DC18 Cleaner Head
Re-assembling a Dyson Slim DC18 Cleaner Head is basically the reverse of the dismantling process.
1. Replacing The Motor Housing Cover.
NOTE: This process is designed to be done by an electrician else damage to electrical components may go unnoticed.
If the Motor Housing Cover has been removed you will find a Soleplate Seal attached to it. When the cover is replaced be careful to locate the ends of the seal in the groove it came out of on the edge of the Brush Housing.
2. Inserting the Brushbars.
NOTE: This process is designed to be done by the user of the DC18.
If the Soleplate has been removed then it is easier to replace the Brushbars and End Cap Assemblies. The Layshaft flat sides can easily be aligned with the shape of the hole in the end of each Brushbar.
If the Soleplate is in place each Brushbar must be dropped into the Cleaner Head from the end and rotated until it engages with the Layshaft. Fortunately the large openings in the Soleplate allow the Layshaft to be viewd while the brushbars are coupled to it.
A little light oil can be applied to the sintered bronze bearings mounted in the End Cap Assemblies. The bearings, being sintered, should soak it up. The bearings then have to be aligned with and pushed onto the Brushbar Axles.
NOTE:
- Some plastics can be harmed (softened) by mineral oils.
- Oxidation can change the quality of natural oils over time.
- Do not apply any oil to the Layshaft.
3. Re-attaching The End Cap Assemblies.
NOTE: This process is designed to be done by the user of the DC18 while the Soleplate is attached. If not attached it should be done by the technician who will re-attach the soleplate.
Below is an image of the the Cleaner Head upside down with an End Cap Assembly and Soleplate removed. Refer to this while engaging the End Cap Assembly.
NOTE: The End Cap Assemblies can be engaged while the Soleplate is attached.
Note the flanges [A] and [D] moulded onto the transparent top of the Cleaner Head and see how they engage the protrusions at [C] and [F] on the End-cap to stop it being pulled off.
Now engage the End-cap with the transparent plastic of the Cleaner Head so that [A] is placed adjacent to the open space [B] and [D] is placed adjacent to [E]. Rotate the End-cap so that [A] slides around from [B] to [C] and [D] slides around from [E] to [F]. Make sure the T-bar of the turnbuckle passes through the slot in the transparent cover and turn the turnbuckle clockwise with a suitable coin.
Pic. 19. The End Cap Assembly ready to be re-attached

4. Attaching The Soleplate.
NOTE: This process is designed to be done by a technician.
Ensure that all the grooves around the edge of the Soleplate and the area it fits to on the underside of the Cleaner Head are free from dirt or it won’t fit together. Check that the rubber seals along the two long edges of the Soleplate are fitted in position for the Soleplate to bed onto.
With the Cleaning Head upside down lay the Soleplate in place, align the catch and click it into position. Then replace the 5 x [Philips No.2 x 15mm] self tapping screws.
Leave a Reply