Introduction
This post describes a method for DIY readers to make and mount bespoke wooden Bed Headboard Wall Fixings, to my design, so that no bolts are visible and so the headboard can be removed by just lifting it vertically to allow for cleaning or horizontal adjustment. It gives a specific example. Other headboards will be different, but I hope anyone wanting to use this fixing method can work out how to do it with their headboard. I’m open to questions – just use the comment process.
Headboard Mounting issues
Headboards are usually mounted on beds using parts supplied by the manufacturer but sometimes it’s best to mount them on the wall instead. The manufacturer’s wooden stalks (batons) and fixing bolts often take up space between the head end of the bed and the wall. When the bed is pushed against the wall, they can scratch the wallpaper, plaster and skirting board. They take up space and keep the bed away from the wall so that in a small room the space between the foot of the bed and the next object (furniture or wall) is insufficient. Without a headboard attached a bed can often be pushed up to the wall by another 20mm to 50mm and many headboards can then be mounted on the wall above the mattress level. Be aware that with a headboard mounted on the wall and the bed pushed up to the wall underneath it the length of bed available for sleeping may be reduced by 20mm to 50mm.
Pros & Cons of My Bed Headboard Wall Fixings
Pros:
- Easily Removed and mounted when cleaning because there are no screws, or other fixings, involved that require the use of a tool to undo them.
- ± 25mm (1 inch) Left or Right alignment adjustment. With a slight design alteration this could be ± 50mm (2 inches).
- When in place the headboard is very firm and is not easily pushed towards or pulled away from the wall at the top.
- Depending on the headboard the fixings can be mounted to it using manufacturer’s embedded threaded bushes.
Cons:
- Good joinery skills are required to make and mount the fixings accurately.
- When using manufacturer’s embedded threaded bushes longer bolts have to be provided.
Mounting These Bed Headboard Wall Fixings
The Bed Headboard Wall Fixings I have designed are mounted on the manufacturer’s mounting points at the bottom of the headboard. using these fixings allows two people (one at either side of the bed) to lift the headboard by just 20mm to remove it. There are no fastenings to undo before lifting it.
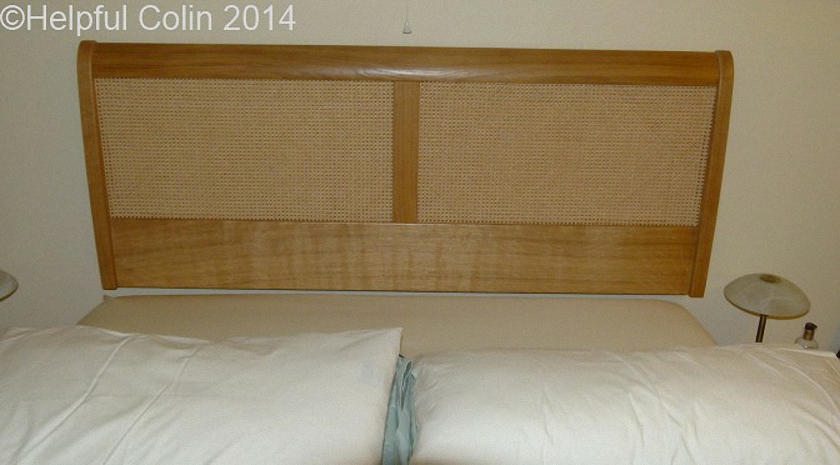
When the headboard is attached to the wall using my method it is rigid to the point that the top of the headboard cannot be pushed towards the wall any more easily that it could if mounted directly on a bed. In fact some beds have more wobbly headboard fixings than these. In this example the headboard doesn’t touch the wall at the top even though it is curved towards it. The gap at the top is 8mm minimum.
In the example I give here there are two pairs of fixings. Below – you can see them mounted on the back of a headboard laid across the bed:

Each pair of fixings has a piece that fixes to the headboard using the threaded M6 nuts embedded in the headboard for the original manufacturer’s fixings. The other pieces are fixed to a brick wall using 75mm to 100mm long No.10 or No.12 screws. (Hollow walls can be used with suitable fixings.)
Below is a picture of one pair showing both pieces fixed in place with the headboard laid across the bed:

The design is such that the weight of the headboard presses the two angled surfaces together forcing the headboard back to the wall until the fixing mounted on the headboard is flat against the wall. As long as the wall is flat the broad area of the fixing attached to the headboard will lie flat against it. So, if the headboard is pushed towards the wall at the top, or pulled away from it, the only way it can move is if it is lifted against gravity at the same time. Consequently, its own weight holds it firmly in place. It is therefore the shape of the fixings, with the angled edges set at 60°, that enables this method to work. (Note: 60° hasn’t been proven to be the optimum angle.)
Below is an engineering drawing in First Angle Projection of a pair of fixings used on the Right-Hand side of the bed. The view of the front elevation on the left is one you would see looking at it if it were screwed to a transparent wall.
The thickness of timber used is 35mm in this case. It has to be sufficient to space the headboard from the wall by the desired amount, and to give sufficient support to keep the headboard in place. The other pair of fixings are identical in design but Left Handed:

Assembly
In my case the screws that came with the headboard (4 off M6 x 30mm countersunk CSK) were not suitable for attaching these alternate fixings to it because they weren’t long enough. I had to buy 4 off M6 x 50mm (CSK) zinc plated screws and shorten them to 45mm with a hacksaw. Then I filed off the burrs while holding them in a vice. The large fixings were firmly screwed to the headboard using the 45mm M6 screws and the M6 threaded bushes embedded in the headboard by the manufacturer. DIY people be careful to shorten screws to meet your own requirements which will not necessarily be 45mm like mine.
The wall fixings were cut from the waste wood that came from making the headboard fixings. Their position on the wall was determined by laying the headboard down on its front and placing the wall fixings on the back of the headboard aligned in their assembled positions so that measurements could be taken and used to mark the wall (see diagram below).

The 25mm horizontal gap between the side of the wall mounted fixing and the headboard mounted fixing allows the headboard to be moved left or right to centralise it with the bed.
The place on the wall where the bottom of the headboard had to be was determined and marked. Then a line was drawn above it against which the bottoms of the fixings were aligned using the distance measured on the laid out headboard as shown below. A spirit level and straight piece of wood were used to draw this line horizontally. Then the line was marked where the centre of the headboard should be. The distance between the two wall fixings was measured as they lay on the back of the headboard. The measurement was halved and used to mark the wall from the headboard centre mark made earlier. One mark to the left and one to the right, along the horizontal line, where the edge of the wall fixings will be.
Each wall fixing had to be placed at its mark and squared up using the spirit level before pricking the wall with a thin screwdriver pushed through the holes. The wall was then drilled and plugged for the screws. The wall fixings were screwed to the walls with the aid of the spirit level and straight wood to check they were both level with each other before tightening the screws. Inaccuracies in their position could have been corrected by tapping the fixings with a hammer and a block of wood to overcome their friction with the wall before final tightening. Vertical accuracy at least is required to keep the headboard level.
Tip For Drilling Holes In Masonry
When drilling masonry the drill bit can wander about moving the hole away from the desired position. In the example below a thin screwdriver has been used to mark the plaster where the centre of the hole should be. But the drill has wandered off centre unbeknown to the drill operator who would only find out later.


If a cross larger than the diameter of the drill bit is marked with a pencil over the pricked point on the wall (see the left diagram below), the drill operator can see if the bit wanders relative to the cross. They can then apply sideways force on the drill in an attempt to correct it immediately, before the hole gets too deep. If the situation gets out of control drilling can be abandoned to consider the problem.


One attempt to fix the problem of a drifting hole is to fill any hole made with a good quality wall filler and wait 24 hours to let it completely harden before starting to drill again. At the second attempt start drilling with a smaller drill and then enlarge the hole to the required size with another drill. Maybe use an intermediate size drill in between.
Mounting And Centralising The Bed Headboard On The Wall Fixings
If the bed is not in the way one person can ledge the headboard onto the wall fixings. Otherwise use one person on each side of the bed. It can be picked up and moved left or right, or just slid, until it is centralised.
I have a light cord (attached to the room light switch mounted on the ceiling) which dangles above my headboard. The switch is aligned with the centre of the bed so I use it to align the headboard exactly.

Design Features of The Bed Headboard Wall Fixings
The headboard can be adjusted horizontally by ± 25mm.
These fixings utilized the headboard manufacturers embedded fixing nuts. So no new holes had to be drilled into the headboard. In particular this method didn’t require holes which pass all the way through the headboard making bolt heads visible.
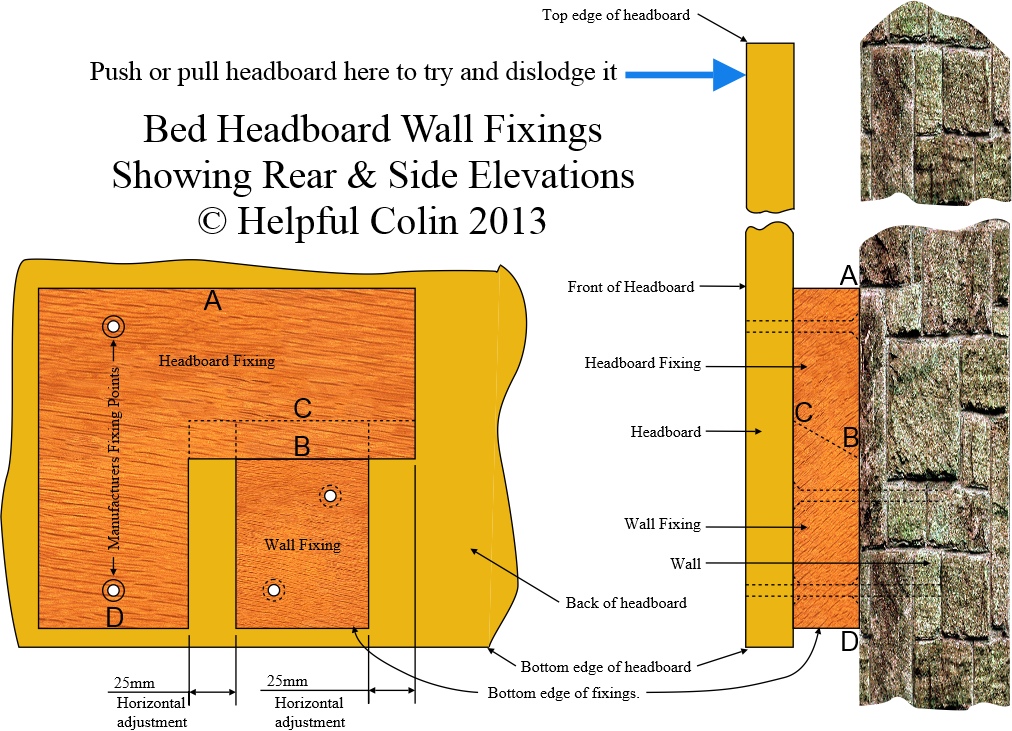
Even though the headboard can be put in place or removed with little effort it cannot easily be pushed or pulled to or from the wall. Refer to the diagram below. The top of the Headboard can only be pushed towards the wall if point B of the Headboard Fixing slides up towards point C of the Wall Fixing whilst the Headboard Fixing pivots at point A where it touches the wall. This will only happen if the force applied is sufficient to lift the Headboard up. Similarly the top of the Headboard can only be pulled away from the wall if point B of the Headboard Fixing slides up towards point C of the Wall Fixing whilst the Headboard Fixing pivots at point D where it touches the wall. Again this will only happen if the force applied is sufficient to lift the Headboard up.
I haven’t treated my fixings with any paint or varnish mainly because:
- They aren’t visible.
- I don’t want their glossy clean painted surface to stick to the wall or the headboard.
- I don’t want the two parts of any fixing to stick to each other.
These are points to bear in mind by anyone considering treating wooden fixings of this type.
Leave a Reply