Introduction
This article covers some of the issues involved when using a Digital Signature. Each Digital Signature is generated from a Digital Certificate (otherwise known as a Digital ID) issued by a certifying authority.
All examples given are created using Microsoft Outlook 2010 on a PC using Microsoft Windows 10, but the principles apply to other versions of Outlook and other email clients.
Anyone using an Apple Mac can get appropriate certificate information in this article published by TechRepublic entitled: How to configure digitally signed email in Apple Mail.
This article has been written to compliment my previous article Make Safe Financial Transactions.
NOTE: email addresses have been replaced with the text “email address” in images. Also some domain names have been replaced with “domain”.
Items Discussed In This Article
- Using Digital Certificates particularly in Outlook 2010 to:
- Obtaining and installing Digital Certificates particularly in Outlook 2010,
- Checking the validity of a Digital Signature attached to a received email,
- Deleting outdated Digital Certificates particularly in Outlook 2010.
Why Use A Digital Signature?
Anyone embarking on email communication regarding important matters relating to government, legal matters, expensive purchases, etc., should validate their own identity and prove whether or not emails appearing to be from them are genuinely sent by them. They should also require other parties with whom they communicate to do the same. Then everyone can be assured they are not receiving false/fraudulent emails. See my previous article Make Safe Financial Transactions.
All parties should get an email Digital Certificate for each of their email addresses and use email clients installed on their computers that can deploy Digital Certificates to add Digital Signatures to emails, e.g.
See References.
What Digital Certificates Offer
A digital certificate, signed by a third-party (e.g. the certificate provider), when used to digitally sign an email confirms it was sent from the email address it purports to be from. (Certificate providers usually have ubiquitous trust.)
It doesn’t prove the email was actually written by the owner of that email address unless a higher level of validation has taken place. Such levels of validation don’t take place with free certificates but, as long as the email address owner keeps up a good security regime to prevent unauthorised access to the email client on their computer the presence of a digital signature shows the email must have been written by someone with authority to send from that email address.
A fraudulent person can still fake an email using another computer by modifying the Internet Headings, which can be viewed in the email’s properties, to show a fake email address (they would need special software to do that), but they can’t fake a valid certificate appropriate to the address they are faking.
See Why A Fraudulent Person Can’t Fake A Digitally Signed email.
So the fraudster’s email will still arrive in the recipients inbox but it will either be:
- unsigned (most likely),
- digitally signed but not by the person they are trying to misrepresent (this is possible but it’s very unlikely anyone would bother to do this).
In the case of 1 above the email properties can be checked to confirm where it came from. If it is thought that it may be genuine but not signed the recipient should contact the sender and request they resend it digitally signed.
In the case of 2 above checking the digital signature will show it belongs to a different email address. The recipient can then safely delete it on the presumption it is a fake.
Obtaining Digital Certificates
Businesses will likely have to pay for email digital certificates but individuals will find they can obtain a certificate for each email address that will be valid for 12 months and free of charge from these companies:
- Comodo (No longer available. Company is now Sectigo and they don’t provide free email certificates.)
- Dekart
Paid for digital IDs can be obtained from the above companies and these below:
- Entrust
- Symantec (NOTE: Symantec ended email certificate sales on 22nd August 2016. On 23rd August 2017 the system will be shut down.)
I currently have two digital IDs which are embedded in my desktop PC so that they can be used by Microsoft Outlook. I got them free from Comodo, whose instructions I followed closely, and they were installed without much effort on my part.
The process for this is:
- Complete an online form,
- Receive an email (which may be delayed but in my case only by minutes) sent to the email address to be certified (so only the correct person can receive it) advising that the certificate is ready to collect,
- Follow a link in the email to collect and install the certificate,
- Check the digital ID works by sending an email to ones self using the digital ID.
What A Digital Signature Is Not
Don’t confuse digital signatures with text or picture signatures in outgoing messages. They are just customizable closing salutations for visual effect as shown below.

Digital signatures show up as a red rosette alongside emails listed in mail folders, 0n email headers displayed in the Preview pane and Message window.
Sending Emails With A Digital Signature
NOTE: I refer specifically to Outlook 2010 for which I have experience. Other versions of Outlook may work in a similar way.
Anyone using MS Outlook can have several email addresses available for sending messages but they may not all have a digital certificate associated with them.
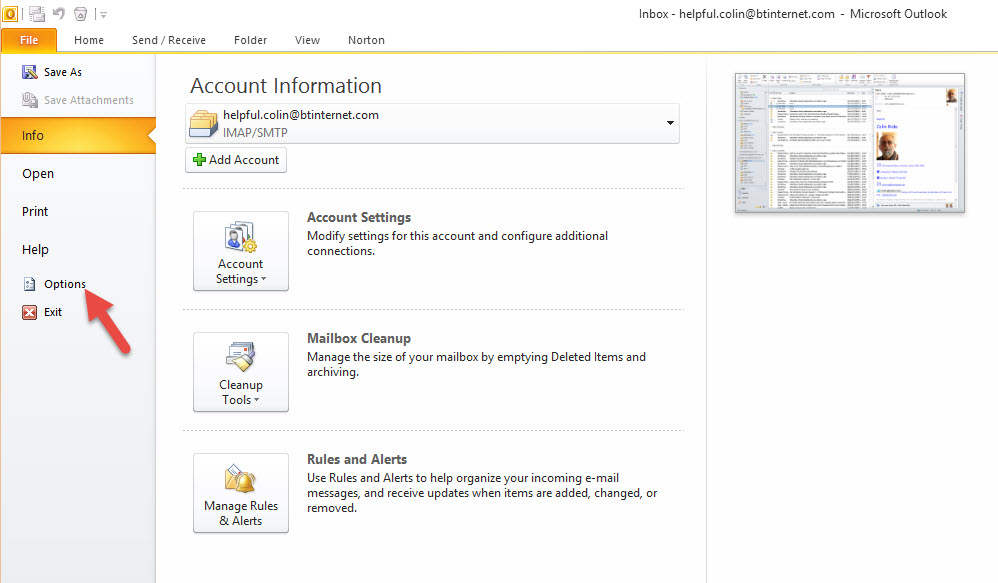
To attempt to sign all outgoing emails select File > Options > Trust Center > E-mail Security. Then in the Encrypted e-mail section check Add digital signature to outgoing messages.
If an email is sent from an address that has a digital ID then the email will be sent as normal when the send button is selected and the digital signature will be applied.
Outlook can have several email accounts added to it. Some may have Digital Certificates and others may not. Once a digital certificate has been installed for at least one email account Outlook 2010 automatically becomes set to sign all emails with it. So the user has to make a deselection if they don’t want to sign an email sent from that account. They also have to do this each time they send from an uncertified email account because it is inclined to send all emails with a digital ID, once installed, since the “Add digital signature to outgoing messages” check box gets checked automatically as seen here in: “File > Outlook Options > Microsoft Outlook Trust Center > Trust Center Settings > E-mail Security > Encrypted e-mail” accessed via the following chain of three windows:


So if an attempt is made to send an email from some uncertified email address the sender is advised thus:

The sender then clicks the “Change Security Settings. . .” button to see the “Security Properties” menu already checked as seen here:

Then in order to send from that email address immediately the “Add digital signature to this message” check box must be unchecked thus:

Then on selecting OK the message will be sent.
If the sender hasn’t previously realised that this email address was not covered by any digital certificate they had they can go and get one to use on this and further occasions. They should cancel their way back out of the change just described and save their message as a draft so it can be sent later after obtaining a digital ID for that email account.
Alternatively the “Add digital signature to outgoing messages” checkbox can be unchecked in the “E-mail Security” settings of the “Trust Center”. Then applying a digital signature to outgoing emails will have to be done on a per email basis by selecting the ![]() button from the “Permission” section of the “Options” tab on the new message ribbon as shown below:
button from the “Permission” section of the “Options” tab on the new message ribbon as shown below:

Preparing To Send Encrypted Emails
If two parties want to exchange encrypted emails they must first exchange digitally signed emails. That will convey the required encryption key to the other party so they can then use it to return an encrypted message. On receipt of the signed message it must be used to create a new contact.
If the contact already existed in the Contacts list before a digitally signed message was received the process of creating a new contact must still be undertaken. In that case a query will be raised with the recipient asking if they want to merge the new contact details with the existing contact information. The recipient must reply in the affirmative. Ultimately the encryption key belonging to the other party will be saved with their contact details and used for all future encryptions for as long as the certificate from which it was derived is valid.
Sending Encrypted Emails
Having prepared to send an encrypted email the sender could arrange to encrypt all outgoing emails from the Trust Center Settings by checking the check box entitled “Encrypt contents and attachments for outgoing messages” in the E-mail Security section. However it’s very unlikely that large numbers of emails will require encrypting. It’s more likely that only one or two contacts would take encrypted messages so they would need to be encrypted on a per message basis. To do that, select the ![]() button in the Permission section of the Options tab in the new message window ribbon thus:
button in the Permission section of the Options tab in the new message window ribbon thus:

Alternatively go the long way around and do the same thing by accessing the Security Properties of a new email. Select the small arrow in the bottom right corner of the More Options section of the new message window ribbon as shown below:

This will open the Properties window thus:

From here select “Security Settings”, under the Security heading, to open the Security Properties window already seen above. Here it is with the “Encrypt message contents and attachments” already checked:

With “Encrypt message contents and attachments” already checked select the OK button to return and complete processing the message in the normal way.
Viewing Received Emails In The Inbox
Below is a section of an Outlook Inbox containing:
- Test 2: An unsigned and unencrypted email,
- Test 1: A digitally signed email,
- Encryption Test 3: An encrypted email which is not digitally signed,
- Encryption Test 1: An encrypted and digitally signed email.

The Inbox image shows the different icons used to represent the various types of email thus:
- Test 2 is just an ordinary unsigned and unencrypted email with a basic sealed envelope icon,
- Test 1 has a red rosette on the envelope showing that it is digitally signed but not encrypted,
- Encrypted emails all have a padlock on the envelope whether they are digitally signed or not.
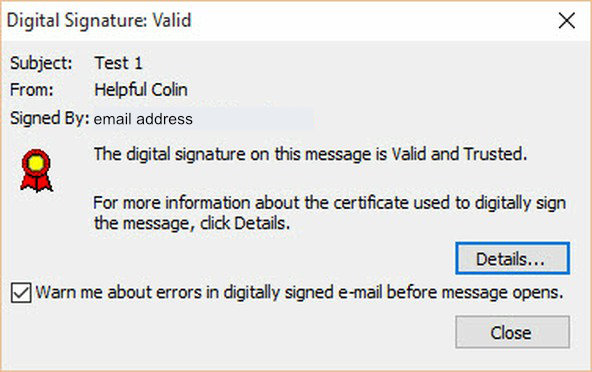
Receiving Emails With A Digital Signature

When a digitally signed email arrives in an Outlook Inbox it has a Red Rosette attached near the bottom left of the sender’s image thus: Clicking on the rosette advises the Digital Signature is Valid or otherwise in this window:

Receiving Encrypted Emails

Above is the message window displaying an encrypted email. To the left of the sender’s image icon is a blue padlock indicating the message has been encrypted during transmission. It has obviously been decrypted successfully since it is readable. (In previous email clients/versions of outlook a blue rosette was used instead of a padlock.)

Above is the message window displaying an encrypted and digitally signed email. To the left of the sender’s image icon is a red rosette indicating it is signed and to the left of that there is a blue padlock indicating the message has been encrypted during transmission. It has obviously been decrypted successfully since it is readable.
Examining And Deleting Outdated Certificates
Once stored on my PC I found I could examine email certificates and all other certificates (you’ll be surprised how many there are) using the windows Certificate Manager “certmgr.msc”. This is a Microsoft Console Document located in the System32 folder via the path C:\Windows\System32. In Windows 10 this type of document is opened in Management Console 3.0 and looks like this:

I enabled regular access to these certificates from a Start Menu tile by:
- locating “certmgr.msc”, right clicking on it and sending a shortcut to the desktop,
- I renamed the shortcut “Certificate Manager”,
- In Windows 10 I right clicked on that desktop shortcut and selected “Pin to Start”. This created a tile on the start menu with a useful name rather than just a file name.
- Then I deleted the desktop shortcut.
The Certificate Manager can be used to delete certificates that are out of date.
WARNING: The Certificate Manager gives access to many certificates used by a modern PC (to verify that updates are coming from a valid source for example). If any such certificates are deleted PC security and functionality may be lost and very hard to regain.
Personal Certificates can be observed by expanding the Personal Section and then selecting Certificates thus:

To delete a certificate:
- Select it in the right hand pane,
- Right click on it to produce a context menu.
- Select Delete from the context menu.
Warning: If the email address owner fails to keep a good security regime and lets someone else write from their email address and gives them access to their passwords, then that someone could probably set up the email address on another machine and export the certificate to that other machine so that they can send fake digitally signed emails.
Why A Fraudster Can’t Fake A Digital Signature Remotely
Let me make it clear. A fraudster could only send a digitally signed email in someone else’s name by having access to their computer or email password. With the password the fraudster may be able to set up the email account on their own computer. Then they could order a digital certificate. However the real owner of the email address would also see the email containing installation instructions and become suspicious.
THE RECIPIENT MUST CHECK THE VALIDITY OF THE DIGITAL SIGNATURE USED TO SIGN AN EMAIL MANUALLY.
Email Properties
To see the email properties of an individual email first select it. This allows it to be shown in a Message window of its own. Its properties can then be accessed by selecting:
- the File tab,
- info in the left column,
- the Properties icon at the bottom of the central column.
The icon to select is shown surrounded by a red rectangle in the Message window above.
When the Properties icon is selected the Properties window will then open as shown below:

The properties window contains the Internet Headers. These show the detail of true and false email addresses used in the transmission of the message.
Leave a Reply