Preface
I could write an article about Building A Bathroom or Tiling A Bathroom but I have decided to just cover a Tiled Bath Panel in this article even though some detail of the tiles on the walls is mentioned. Bath panels can easily be made from painted hardboard or plywood, or boards, but a tiled panel can fit in with the rest of the bathroom very well when all the walls are tiled.
Introduction
In 2005 I began a project to build a new bathroom in the same small room as the existing one. The bath had to be in the same place as before because it is the only place it could fit.
Why have a tiled bath panel? The choices were:
- the moulded plastic panel offered by the manufacturer,
- a plain painted wooden panel,
- a panel made of horizontal or vertical boards finished with paint or varnish,
- a panel finished with tiles to match the bathroom walls.
The previous bath had a plastic panel which was moulded to a fancy shape and was the full length of the bath. Due to that bath being a tight fit between two walls, and one end being near to a wash basin pedestal while the other was near to a door architrave, it was very difficult to manoeuvre the bath panel into place. Over time that plastic panel cracked due to being bent where it should not have been bent.
Many plain wooden bath panels look cheap and I was looking to remove as much painted wood from the room as possible. Wood and wallpaper call for redecoration over the years and I had already decided to have a fully tiled room. I wanted a bathroom that could tolerate being wet.
So I chose to have a tiled bath panel but needed to work out how I could construct it without using unsightly screws, bolts, hinges or handles. I eventually came up with the idea of a panel that looked like a tiled wall, just like all the other walls in the room, but made in two sections at least to resolve the difficulty of getting it in and out of its place. It would also resolve the weight issue. I would hold it in place using mould resistant white ‘silicon sealant’ which would look just like white tile grout.
I knew silicon sealant was strong and would make a good adhesive and I reasoned that it could easily be removed after cutting through the silicon sealant with a knife. Then when it had to be replaced it could be held there with more silicon sealant just as before. Only time would tell if this was a good idea.
Designing A Bathroom To Accommodate A Tiled Bath Panel
Part of the bathroom design involved planning exactly how it was tiled since large Spanish tiles had been chosen (45cm x 31.6cm and 9mm thick) and mounted in portrait fashion. If they had just been put on the walls after the bathroom suite had been installed and without any forethought there would have been some ugly tiling and an ugly tiled bath panel.
Some parts of the bathroom were adjusted to best suit the tiles:
- The wall with the window had the tiles arranged to fit symmetrically around it while maintaining good spacing in the corners of the room.
- The window ledge was raised to make it come level with the bottom of a row of tiles.
- The wall with a mirror had the tiles arranged and the mirror cut so that the mirror could be let into the tiles and take up a space exactly 2 tiles x 1½ tiles.
- The bath height, which could be adjusted with screw-in feet, was set so that the bottom edge of the bath rim (rolled over edge) was level with the top of a row of tiles. This was what allowed me to have a tiled bath panel with complete (full height) tiles on it.
I had to cut all the wall tiles that sat on the edge of the bath. However their cut edges are hidden under bath sealant. I also had to have a very narrow (30mm) strip of tiles at floor level, but that has allowed the bath panel to sit nicely on a batten fixed to the floor boards.
After fitting the bath and the semi-pedestal wash basin I tiled the walls throughout. These were fitted around the bath which I had mounted with the bottom edge of the rim at a specific height (49.4cm) above the floorboards. This height gave me space to have a tiled bath panel with full height tiles mounted on it, together with a tiled batten fixed to the floor for the tiled bath panel to sit on.

The presence of a tiled wooden batten keeps the MDF board on which the bath panel tiles are mounted well above any puddles of water that may form on the vinyl flooring. This supporting strip of wood has narrow 30mm strips of tile stuck to it so that it and the bath panel tiles match the tiles on the other walls at the same height above the floor. The top edge of the narrow strips of tile are mounted flush with the top edge of the Panel Support Batten. Having them sticking up above the batten would leave them in danger of being chipped when the tiled bath panel sections are put in place or removed.
If I had chosen an arrangement of tiles requiring horizontally cut tiles either at the top or the bottom of the panel I think it would have looked ugly. In my opinion it is hard to hide the rough edge of a cut tile and if there is a row of them all looking a little different then they look doubly ugly.
The floor is covered with vinyl flooring sealed to the thin strip (30mm) of tiles under the tiled bath panel, and similar tiles on the walls. That prevents ingress of water into the 1⁄8 inch hardboard sitting on top of the floor boards underneath. The hardboard prevents the vinyl flooring from moulding itself to the undulations of the floorboards which doesn’t look good.
The detail of how this tiled bath panel was constructed is described in the following information.
Tiled Bath Panel Design
The whole panel is actually made in two sections each having two complete and one cut tile placed to match those on the wall behind the bath. As a consequence the panel sections have different widths. Anyone who has handled tiles of this size (45cm x 31.6cm and 9mm thick) will know how heavy they are and realise that one complete panel could not be manoeuvred into place, or removed when work under the bath is required, without either damaging the panel or something else in the bathroom even if its length alone was not an issue. The division between the two sections lies between the two centre tiles. See below how the tiles are laid out:

Tiled Bath Panel Construction
The baseboard for each section of the tiled bath panel was made from 12mm medium-density fibre (MDF) board. I drew a rectangle on the front of each panel to show where the boundary of the tiles must be when stuck in place. The tiles were stuck to it with normal white tile adhesive as used to stick tiles to walls and spaced apart with 3mm tile spaces. Oozing adhesive was carefully wiped away from the edge of the tiles with a damp cloth and a penknife. When the adhesive had set I grouted between the three tiles on each section with the same adhesive since it can be used as grout. Any Oozing grout at the top or bottom of the tiles was removed.
The two sections of the bath panel are shown below with their dimensions. The right edge of the left panel butts up to the left edge of the right panel with a 1mm gap between them. In practice the gap between the tiles, for the silicon sealant, was set to 3mm using a tile spacer giving a 1mm gap between the two MDF boards.
The left edge of the left panel and the right edge of the right panel are positioned so that there is a 3mm gap between the cut end tiles and the tiles on the walls at the ends of the bath for the silicon sealant.


Below is a cross-section of the tiled bath panel showing its construction. This applies to both tiled bath panel sections:

Another benefit from making the bath panel from two sections came to light when I stuck the tiles in place. The adhesive wet the MDF expanding the tiled side so that a slight curve developed in each section which remained when the adhesive and grout dried out. If the curve had developed over the full length of the bath, were it in one piece, I would not have been able to use the panel due to its curvature not aligning with the straight edge of the bath. As it is the curve is in two short sections giving a slight scalloped effect and is not particularly noticeable except when eyeing it up.
Bearing in mind that the tiles were stuck onto the MDF while it was lying flat on the floor I should, in retrospect, have raised the ends of the MDF off the floor with two short battens so that the weight of the tiles would have made the MDF sag in the middle sufficiently to counter the bow that formed.
Lifting The Panels Into Place
“The suction cup handling method has proved very successful and I recommend it.” — HC

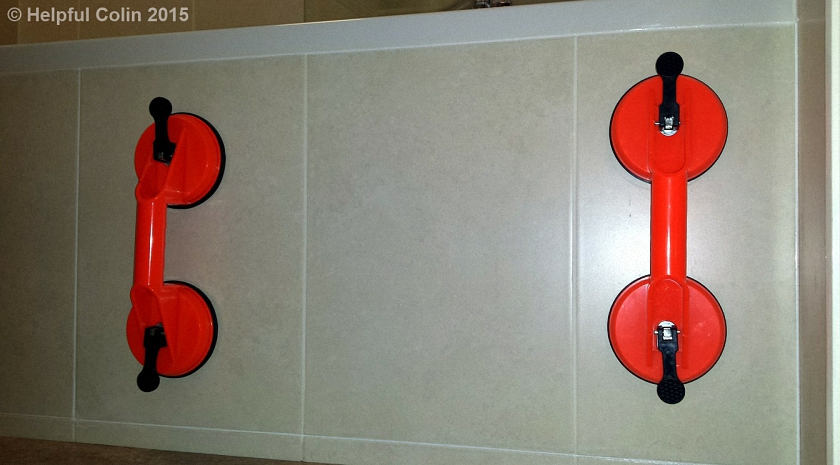
I expected the tiled panel sections to be heavy but it was only after construction that I realised just how heavy they were. I had already bought two pairs of suction cups with handles (the type used by glaziers for lifting plate-glass) known as a ‘Double Suction Lifter’ from Screwfix. These have proved ideal. My tiles have a smooth but matt finish to them so I always wet the suction cups before use. Once clamped onto the end tiles my tiled bath panel sections have handles enabling me to move them very easily. One panel could be lifted into place without this aid and it might be possible to get the second into place, but there is no way of extracting a panel without the risk of chipping a tile. The edge of the MDF panel has a lot of friction with the batten on which it rests and so cannot easily be dragged off it. The suction cup handling method has proved very successful and I recommend it. I keep them in the airing cupboard reserved especially for this purpose. In the picture below they are attached to the right-hand tiled bath panel section:

The tiles were spaced 1mm from the join down the middle where the two sections meet and 3mm up from the bottom ensuring there is a 3mm gap for the silicon sealant to be injected. The bottom of the panel rests on a batten screwed to the floor which is 36mm high. This batten then has tile strips 30mm wide stuck to it which are made flush with the top edge and aligned vertically with the tiles on the tiled bath panel. The 6mm space below these tile strips is reserved for letting in the hardboard and vinyl flooring. When the vinyl flooring was put in place it was a tight fit under the edge of the tile strips making a good seal in itself. Applying a bead of bath sealant between the flooring and the tiles should keep water spilt on the floor from going where it shouldn’t go.
NOTES:
- The tile strips were so narrow they had to be cut using an electric tile saw. They didn’t have to be cut from new tiles because there were plenty of offcuts of a suitable size, since all the tiles at the top of the walls had to be trimmed.
- The hardboard covering the floor is in more than one piece or it would be difficult fitting it under all the tiles around the edge of the bath and the room, but it is accurately cut so that there are no gaps between the pieces. Its purpose is to provide a flat surface for the vinyl flooring. When vinyl flooring is laid straight on top of floor boars it eventually sinks to follow all the floor board contours which spoils its looks.
- The closet pan rests on top of the vinyl flooring. Its weight presses it into the vinyl flooring and forms a seal so that liquids don’t go under it. The wash basin is wall mounted so it doesn’t have a pedestal on the floor.

The amount of MDF board above the tiles was about 18mm. 3mm of that was space between the tiles and the rim of the bath. The other 15mm was sufficient to tuck behind the rim of the bath. I had to stick some cork pads (available from hardware stores) to it in order to pad it out so that the tiles lay flush with the rolled over edge of the bath rim.
Because the tiles are so heavy the way they hang on the outside of the MDF panel causes it to be pulled over when it is stood on its edge, as it is in situ. This ensures that the top edge of the tiles leans forward pressing the cork pads against the back of the lip of the bath. If it were not so, some restraint may have been required to prevent the panel leaning back against the underside of the bath.
Sealing The Bath Panel In Place
With the bottom of the bath panel sections pushed back against the Panel Back Stop screwed to the top of the Panel Support Batten and the top of the panels leaning forward, under the weight of the tiles, against the back of the rim of the bath they were sealed in place. This was done by injecting bath sealant, using a caulking gun1, into the 3mm gap left around the edge of the bath panel tiles.

It doesn’t take much sealant to hold the panel sections in place, 5mm sealant depth with a 9mm tile thickness is sufficient. The less sealant used, the easier it is to remove the panel sections in the future. In my case the tiles were grouted with white grout and the bath sealant was white so one didn’t stand out against the other.
Tiled Bath Panel Removal
If a repair has to be carried out under the bath at least one section must be removed. Unfortunately this type of panel cannot be removed in a few minutes. I have had to do it once to fix a water leak from the waste pipe as a consequence of me not tightening it sufficiently to the waste hole in the bath. The bath lasted several years without a problem and then gave way suddenly with severe consequences in the kitchen below. Fortunately most of the bathwater did pass down the pipe. Once the bath was empty the immediate leak stopped.
Before a panel section can be lifted from its place the silicon sealant must be removed from around the edge of the panel. Unfortunately just cutting through the sealant is not sufficient. A gap must be created around the edge of the three tiles of the section to be removed in order to make space for it to be moved about.


A sharp blade is required to cut through the silicon sealant. It’s tough stuff when it’s been set for some time. I used a Stanley retractable utility knife and a Swiss Army knife (penknife). I had to make two parallel cuts all the way around the tiles:
- with the blade running along the edge of the tiles fixed to the panel section MDF board;
- with the blade running along the rim of the bath, along the tiles on the wall, along the top of the Panel Support Batten and then along the tile of the other panel section.
I could use the utility knife on the top and bottom edges and the join between the two panel sections, but the bulk of the handle prevented me from running it against the wall tiles at the ends of the bath. For this I had to use a penknife which didn’t have much bulk to the handle on one side at least. There’s something to be said for sharpening up an old flexible long-blade knife from the kitchen for doing this job.
Comparing A Penknife With A Utility Knife
The pictures below show how the penknife got closer to the wall tiles than the retractable utility knife did. They show a section through the bath panel just at the top edge of the bath panel tiles with a little perspective looking down towards the floor. The pictures depicts a situation where the viewer’s eye looks straight down to the floor at the edge of the wall tile.
When offered up to the sealant the retractable utility knife sat against the wall tile at a relatively steep angle of 11º, whereas the penknife sat with a much shallower angle of 4º. So with the utility knife it was almost impossible to make two cuts and get any sealant out from between the end tile and the wall tile. On all other edges the utility knife could be presented perpendicular to the tile surface and easily make the necessary cuts.


Having made two cuts along each edge I was able to prise and pull out a strip of sealant. This created a gap to loosen up the panel. While doing this I realised how important it is to limit the sealant when fixing the panel sections in place. It’s very difficult to remove sealant which has penetrated as deep as the MDF board. It’s not easy to see what’s happening to the sealant as it’s injected1 around the edge of the tiles. For these tiles, which are 9mm thick, 5mm depth is ample.
NOTE: The hard glazed edge of the tiles will scratch the surface of a penknife blade while doing this work. So it’s not advisable to use the shiny new one that granny bought as a birthday gift.
Footnotes
- Pushing a caulking gun forwards lets you watch how much of the sealant is going into the groove. Then you can adjust your caulking speed accordingly. When dragging backwards it’s not easy to see the point ahead where the sealant is coming out of the tube. The caulking gun gets in the way. Also downward pressure on the spout by pushing forward at a 45° angle counters the nozzle pressure. This forces the heel of the spout to ride on the edges of the groove. That action will smooth the surface of the sealant as the groove is filled.
Leave a Reply